Ever thought about what process Agencies and Freelancers follow to create websites for their clients? Well, What I am talking about doesn’t apply to everyone but most of them. Most of the agencies and freelancers use a specific set of themes, plugins, and instructions to create websites for their clients.
This article is all about creating a website for clients within minutes. If you have a base of clients which can be converted into customers for website creations, you can literally mint 100s of $$$ from each client.
I want to make it very clear that you don’t need to have any knowledge of coding, and advanced technological knowledge. What you must have is knowledge of basic WordPress, Internet, and some logical mind.
I personally have made $400 on average from making a basic website for clients. Creating a basic website is an easy task, and this article will make everything simple and explained to you. So, let’s start with each step you need to take in this process. Here we go…
Choosing a Hosting Provider

Image Credits: Freepik
In the market, there is a lot of good hosting service provider available in all price ranges. Personally, I don’t recommend you to buy any specific hosting service. Because the choice of hosting provider depends on the budget and requirements of the client.
Although, if you are offering an all-inclusive package, you have to decide it on your own. So, you must choose a reasonably priced and good performance hosting. If your client is not expecting much traffic, then you can go with Namecheap, and if in case slightly high traffic is expected, you can go with Bluehost, Hostgator, WP Engine like companies.
Almost every major hosting company is offering a WordPress installer, still, you should make sure if they are providing WordPress installer or not. Because WordPress installer is the first thing you will need in this process.
Step 1: Installing and Configuring WordPress
Installation and configuration of WordPress will be the first step on the foundation of the website. It is very easy to install WordPress, just go to the cPanel and you will find an option called “WordPress” or “Softaculous Installer” which will help you in installing WordPress script. Here, is a screenshot of how the installation screen will look like:
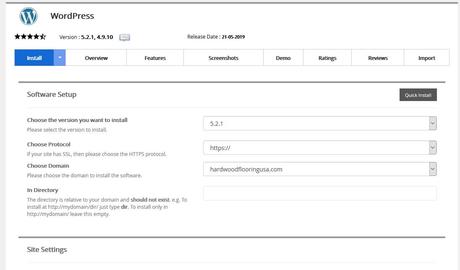
This is how you will follow the steps:
cPanel >> Softaculous Installer >> Hover on WordPress and Click Install >> Select the Domain and fill in essential information >> Click Install Button.
It will take few seconds to Install WordPress on your domain. After installing WordPress, you are done with the cPanel and hosting part of the website creation process.
Step 2: Installing Themes and Plugins
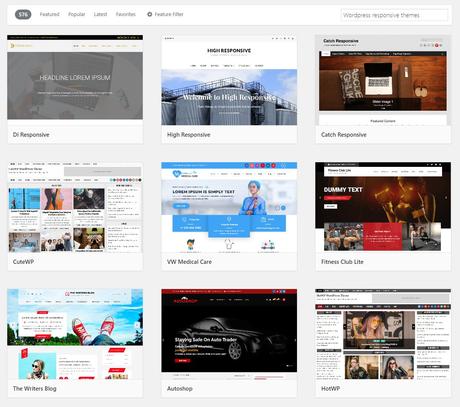
Choose the theme you will be using, depending on the type of business you are building the website for. WordPress directory is full of themes for every purpose available for free, but these are not the themes you are supposed to use on a business website. If you do so, you will end up losing the long term relationship with the client.
Still, there are some countable themes available on WordPress which are available for free and can be used to create website for clients. Those themes are Astra, GeneratePress, OceapWP, etc. I personally recommend using Astra or GeneratePress.
In this tutorial, I am going to use Astra theme. I use their premium theme which costs $69 annually. As you are going to build a website for clients, you shouldn’t rely on free themes because, at some time, you will feel the lack of options.
How to Install Astra Theme and Required Plugins?
You can easily download Astra theme from the WordPress directory. Go to Appearance >> Themes >> Add New >> Search “Astra” >> Click Install >> Click Activate. You are done with installing Astra, but the process is not yet over.
Now, you need to go to Plugins >> Add New >> Search “Astra Starter Sites” >> Click Install >> Click Activate. That’s it. Now you are ready to proceed with website creation.
The theme will automatically ask you to install all remaining required plugins in just one click if required.
Step 3: Most Interesting Part, Importing Demo
Do you know that most of the agencies and freelancers use pre-made demo layouts to create website for their clients? Well, now you know it. If you are already aware of templates, then good. If you are not aware of templates, let me tell you that some good themes offer you pre-made professionally designed templates for various business needs in their themes.
You can import these layouts or templates in just a click and replace its content and images to make an all-new website. Isn’t it cool? Obviously, it is. It saves hell lot of time for website creators.
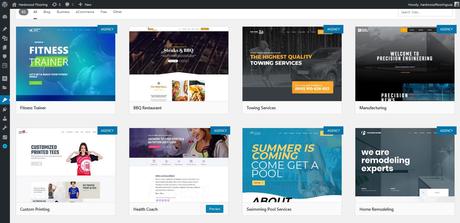
In the above image, you can see a grid of templates. These all are demo templates and can be imported in one click. When using Astra, you will need to install a page builder plugin. I suggest you Elementor plugin for this.
Now, how you can import any of these templates?
Here are the instructions about doing it. Also, please note that templates marked as “AGENCY” are only available in the premium version of this theme.
For using these templates, you need to follow these instructions: Go to Appearance >> Astra Starter Sites >> Choose the template which suits your client’s business >> Click on Preview >> If preview looks good to you, Click on Import >> Give it a few seconds or a minute, Your website will be ready.
Step 4: Creating Logo for Client’s Website
Many businesses already have their logo designed. So, you can ask your clients for the logo, but the problem you will be facing is the dimensions of their existing logos. They won’t match your website’s requirement. So, in this case, you can ask a designer to do so or if the client is ready, you can design a separate logo for the website.
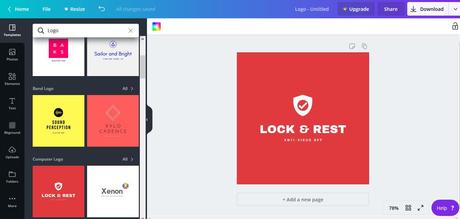
Shown above is a tool called Canva. I hope that you know about Canva, it is an extremely popular tool for creating graphics for literally anything. You can create logos from Canva for free and within minutes. The logo shown above doesn’t look like fitting in the header of the website, but this is for presentation only. You can customize it in required size.
To change the logo, you need to go to Appearance >> Customize >> Header / Identity. There you will find the option for changing the logo.
Step 5: Creating Content for Your Website & Finding Copyright Free Images
You have Installed WordPress, themes, plugins, imported demo, created and uploaded the logo, what’s next?
Content.
You need to put some time on this. Content is something which consumes a lot of time. You can either create similar content by taking reference from some competitor’s website. Or, you can hire a writer and pay him/her to write about 1k to 2k words.
Also, along with writing content, you also need images to use on websites. People usually take images from clients or Google images. Taking images from google images can do trouble if you get any copyright issue.
So, what we suggest is to take images from Stock photos website. Stock photos are basically copyright free images which can be used anywhere without any issue. These are the websites from where you can get these images:
Wrapping Up:
By putting all the stuff and following all the steps mentioned above, I hope that you have your client’s website ready. Yes, there will always be some changes that you need to make or requested by the client, for that you will have to work on themes and plugins to better understand them and their working.
This will help you in gaining knowledge about the theme and plugin you are working on and also you will be able to make changes on the website. Still, if you find yourself in trouble, you can reach to your theme’s customer support or you can comment down in the box below. We will be more than happy to help you out.
If you find this article useful, let us know by pinning this.
Image Credits: Freepik
Here are some relevant articles for you to read next:
- 10 Best Security Plugins for WordPress in 2019
- How to install Google Analytics to WordPress?
- 10 Best WordPress Newsletter Plugins in 2019
- How to hide the WordPress Login Page for Security?
- 10 Best Adsense WordPress Themes to get more clicks in 2019
