How to wire your Closed Grow Environment
In order to be completely accurate on how to wire your Closed Grow Environment, you will need to get a list of all the equipment you will use in your room. If you read our last segment, Closed Grow Environment Equipment, we went over all necessary pieces of hardware. When you have this list together, you will be able to determine the locations of the outlets, as well as , the amperage required for each circuit.
In this example we are going to assume our Closed Grow Environment is going to use:
- 3 @ 1000 watt HID Lights = 9 amps each = 15 Amp circuit
- 1 @ 18k BTU Mini-Split Air Conditioner = about 30 amps = read requirements
- 2 @ 6″ in-line fans = 4 amps each = 10 Amp circuit
- 3 @ 16″ wall mounted oscillating fans = 3 amps each = 10 Amp circuit
- 1 @ CO2 Generator = 3 amps each = 10 Amp circuit
- 1 @ Humidifier = 4 amps each = 10 Amp circuit
- 1 @ Harvest Pro Controller = 6 amps each = 10 Amp circuit
- 4 @ Miscellaneous 15A circuits
Determine Circuit Amperage for you Closed Grow Environment
In the post, Closed Grow Environment Sub-panel, there were directions for how to bring power from your main circuit panel to you sub-panel.
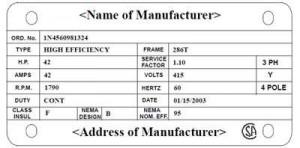
The easiest way to determine the circuit size required for the equipment needed is to look at the Name Plate, on it there will be a lot of information. What you are looking for, is the “Amperage”, “Amps”, or “A”. It will normally be displayed like this:

Name Plate For Closed Grow Environment Equipment
Typically, in the United States, circuits are wired for 120v, with the exception of the Air Conditioner and possible the HID lighting. With this in mind, it is fairly easy to determine the amperage required by the piece of equipment if it is. All you have to do is divide the total watts by 120. This will give the amount of amps. Always, increase the amount of amps needed by at least 10% in order to build in a little insurance against fires.
It is also preferred to put each piece of equipment on it’s own circuit, this will allow you to isolate any problems that you may have in the future.
What gauge wire to use for your Closed Grow Environment

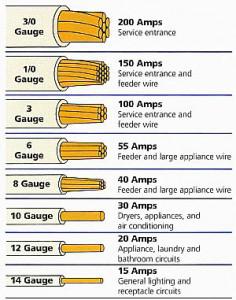
Closed Grow Environment Wire Gauge Chart
With the exception of your Air Conditioning unit, 95% of the time you will end up using either 12 gauge or 14 gauge wire. When in doubt use the larger size. And in electrical, the Smaller the number gauge, the larger the wire.
Also, NEVER go above 80% of the maximum allowed amperage for a wire. If you are using 14 Gauge wire, you should not go over 12 Amps.
The Process of wiring your Closed Grow Environment
- Make sure the power is turned off to your sub-panel, turn the power off at the main panel if you need to.
- Mount Electrical boxes where you are going to want power. Typically a 2″x4″ box will work for most pieces of equipment.
- Using a Romex type wire of appropriate gauge, start at the sub-panel, and run your wire to your electrical box. Give your self at least 9″ of play at the box and 30″ of play at the sub panel.
- Tack the Romex to the wall with wire staples about every 24″ and within 6″ of both the box and sub panel.
- After all wire has been run, strip the outer jacket from the Romex at the Boxes.
- Knock out holes in sub panel, typically about 5/8″ to 3/4″ is more than big enough. You will want 1 hole per wire.
- Then, install Romex Clamp Connectors of appropriate size in the knock outs. Thread wire through clamp connector and tighten per instructions on package.
- Strip wire inside Sub Panel.
- Go to boxes again, Cut your wire to about 6″ long. Now, look at the back of your new electrical receptacles, There should be a guide for how for to strip your wires. I like to use the simple push in type Receptacles. This will allow you to simply push the stripped wire into a little hole at the back of the outlet, no tools required.
- The Black wire is typically going to go to the Copper or bronze side of the out let, While the White wire is going to go to the silver side. The pure copper wire is going to attach to the green grounding screw.
- When you are done, push the wires inside the box and screw the outlet into the box with provided screws.
- Screw a cover plate over the newly installed outlets.
- Now install your circuit breakers into you sub panel, make sure to alternate from left to right to make sure you distribute the amperage draw to both legs of the power.
- Cut and strip the wire for each circuit to the right length.
- Attach the black wire to the nut on the circuit breaker, Attach the White wire to the common bar. Attach the copper wire to the common or ground bar.
- Re-install the cover plate for your sub-panel.
Congratulations you have now completed the wiring of all of your circuits for your Closed Grow Environment! In the next section, we will discuss CO2 Equipment.
Useful links for Closed Grow Environments

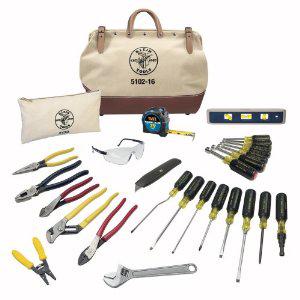
Electrical Tools for Closed Grow Environments
- Electrical Tools Cheap
- Electrical Books
- How to Build a Spider Mite Free Closed Grow Environment – Part 3 – Grow Equipment
- How to Build a Spider Mite Free Closed Grow Environment – Part 2 – Sub-Panel
- How to Build a Spider Mite Free Closed Grow Environment – Part 1 - Preparation
