How much do you hate it when you're at work, school, college surfing the web, trying to access some website and you get prohibited, because "they" don't want you to see the content of just because you have some work to do and you shouldn't waste your time on Facebook.
Here in this post you will learn how to bypass the web filter using ssh tunnel in 3 extremely easy steps.
Don't be so hasty now, it's not the time for you to skip to the steps. First you have to know a little about ssh tunnels and firewalls.
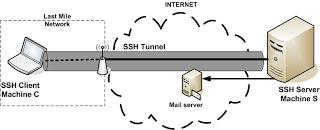 Well, as shown clearly in the picture above all that an ssh tunnel do is connect to an online ssh server that allows SSH access and
create a Tunnel between the host PC(ssh client) and server by bypassing the web
Filter.
Well, as shown clearly in the picture above all that an ssh tunnel do is connect to an online ssh server that allows SSH access and
create a Tunnel between the host PC(ssh client) and server by bypassing the web
Filter.As for the firewall, well it is the sadistic son of a b*tch that is prohibiting you from accessing facebook. As you see in the picture below.
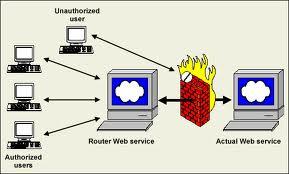 Or, as Wikipedia defines it: a software-based or hardware-based and is used to help keep a network
secure. Its primary objective is to control the incoming and outgoing
network traffic by analyzing the data packets and determining whether it
should be allowed through or not, based on a predetermined rule set.
Or, as Wikipedia defines it: a software-based or hardware-based and is used to help keep a network
secure. Its primary objective is to control the incoming and outgoing
network traffic by analyzing the data packets and determining whether it
should be allowed through or not, based on a predetermined rule set.Now after I bored you to death with my babbling here is how you can access Facebook, Youtube, ..from your work place or school :
 Sign up for a free bash ssh account on Cjb.net which is going to grant access to an online ssh server.
The Registration is so simple first you'll get an activation email then a second email to provide you with more information.
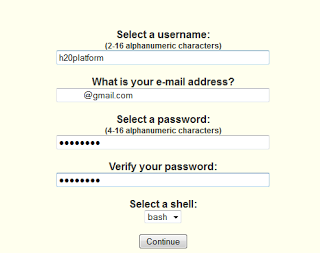
 Now that you have a username and a password and the hostname you can connect to the server through an ssh client ( I recommend PuTTY).
The universal port of ssh is 22 but cjb.net allow you to connect through another port 443.
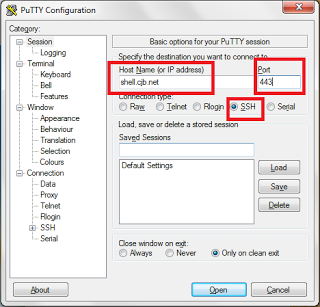
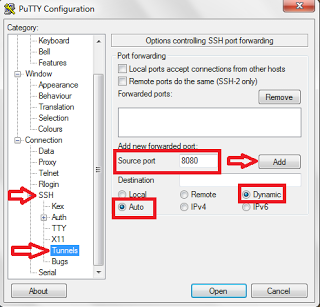 After you're done with the configuration you go to the sessions page in the left pane and save the session.
Then you click on open, a terminal should open, you log in with your username and password.
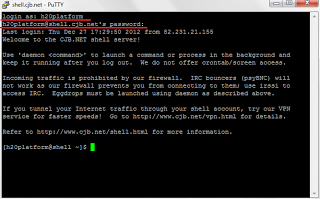

Now the connection is established, all we have to do is o apply the proxy settings to our browser.
Now for this you need a browser that allows Manual Proxy settings via Socks.( meaning chrome and Firefox are just fine).
For this example I'm going to use Firefox.
Tools -> Options ->Advanced -> Network -> Settings Manual Proxy Configuration and Fill the following details Socks Host: 127.0.0.1 Port : 8080 Then choose SOCKv5
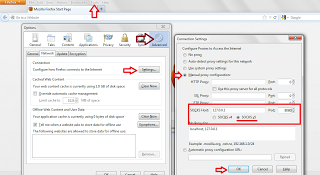
For Google Chrome follow these instructions : settings > show advanced settings
Network : change proxy settings
LAN Settings > use a proxy server for your LAN and click on Advanced.
Socks Host: 127.0.0.1 Port : 8080
Enjoy your free surfing.
