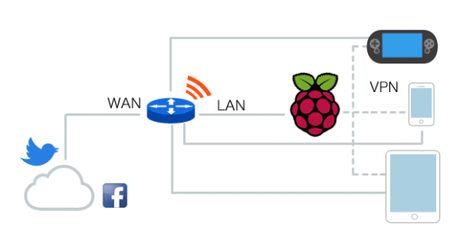
A VPN or a Virtual Private N etwork is a secure way to browse the internet by routing your traffic through a server that is not your point of origin. This means when you go to a website while connected to a VPN, the website doesn't see your IP but instead sees your VPN's IP address and thus keeping your safe from being monitored or snooped.

There are a lot of services that provide free and paid VPN services some are safe & secure but some are very shady and keep logs of you browsing data. We will soon have a guide on the best free VPN services to help you choose the best and secure ones. But there always a chance of being monitored or logged or even chance of VPN server to be offline.
The best way to tackle that problem is set up your own VPN server at home. This gives you the utmost security and relief that your browsing data is never going out to a third-party server but instead staying with you. BBC has a very beautifully made guide for this. You can head over to BBC and follow that with detailed explanation or follow the guide here which will just show your quick set-up.
This article won't explain you every step or every command but it is a overview of how the process goes and what to expect if you want to embark on this geek mission of having your own VPN Server. Most of the explanation is very well done on the BBC so for a long-detailed guide on every step please refer the original article on BBC.
The guide assumes you understand the basis of bash, Unix based systems and know how to use putty on windows or Terminal on Mac and so on.THINGS YOU WILL NEED
- Raspberry Pi/Pi2
- 8GB microSD Card
- SD Card reader
- 5V mini USB power supply ( any smartphone charger )
- Computer monitor or TV ( required for setup )
- USB Keyboard
- Ethernet cable

INSTALL THE OS AND ASSIGN STATIC IP
You need to install a OS to run the VPN software and also assign a static IP address which will be your server IP and the IP to access this Raspberry Pi.
- Download New Out Of the Box Software from Raspberry Pi website.
- Insert and format the SD card in your card reader.
- Extract the NOOBS OS into the SD card, insert this SD Card to the Raspberry Pi.
- Connect the Keyboard, Monitor and Power Supply to the Raspberry Pi and let it boot. Green and Red LEDs on the board are indication of proper boot up.
- The files on the SD card should start a window with range of options. Change the default password from 'pi' to something very strong.
- Update your Raspberry Pi to the latest version by running the following commands
$ sudo apt-get update & apt-get upgrade - Assign a IP by connecting a Ethernet cable to the Pi.
Now that your Raspberry Pi is updated and has a IP address you can connect to it from your computer via SSH using terminal on mac or putty for Windows, instead of connecting it via the monitor and keyboard connected to it directly.
A static public IP would also be needed to assign to your Pi which will help it locate on the internet for your devices to connect to. This can be done by free DNS services that let you pick a name of your choice.
INSTALLING VPN, GENERATING KEYS & BUILDING CERTIFICATES
Raspbain OS is a OpenVPN ready, this means you just need to install OpenVPN in it via the command
$ sudo apt-get install openvpn
To connect to OpenVPN server, you need unique keys for every new connection. This means for any device to connect to OpenVPN, you need to authorise it with the key generated from the server. The key generation is managed by Easy_RSA, a key RSA encrypted unique key generator. Once the unique keys for each device and every user are generated, assigned and ready you need to build certificates for your VPN to give every device the necessary authority to connect to your VPN. Read the BBC article for the key generation process and building certificates. Make sure you follow every step properly to make sure your VPN server is secure and protected and only you and permitted devices & users could connect to it.
CONFIGURATION OF THE VPN SERVER
Once all the users, keys and devices are mapped on the server your Pi is ready to start serving them. To do this the server needs to be configured correctly. This file contains all the server configuration to run your Raspberry Pi as a OpenVPN Server
Now your Raspberry Pi is a VPN server ready but you need to create a new configuration to let it accept the internet traffic and forward it to your devices as and when you want. After this step your VPN server should be a functioning already and providing you encrypted connected over the Internet.

SECURING YOUR VPN SERVER
To make sure that all incoming connections ( apart from the ones you need ) are blocked you need to activate the built-in firewall in the Raspbian. If you have setup a VPN before, this step should be fairly simple and easy to handle. You just need to make some new firewall rules and allowed certain ports and put that in a script to make sure these rules always run even after restarting the VPN server.
After the firewall setup the devices need to find where the server is and the server need to allow them to do so with the provided keys. This would require setting up profile scripts for each device that needs to connect. BBC has a very easy to run script which does that. Make sure you do this final step for a functioning VPN server.
Once your VPN is ready to be deployed all you need to do is export all the keys for all your devices from the VPN to the respective devices. This can be done by using a SCP client on Windows or Fugu on Mac.
OpenVPN ON DEVICES
Every device now needs to connect to VPN only whenever it wants to access internet with the generated keys. For iOS you would need the run the .ovpn file via OpenVPN connect app app which would load the profile and for Android you can directly launch the .ovpn file from the File Manager to make the connection.
For more details and following every step cautiously follow the guide on BBC
