I’m sticking with the wind theme for my March DIY posts. Today’s project will make use of those beer bottles sitting in your recycling bin and also give you a bit of glassy sparkle and ambient noise when outdoors. I poked around the internet for upcycled wind chimes and found a an idea for wind chimes made from used wine bottles. I bummed some pretty blue beer bottles from a friend’s recycling pile and brought them home, knowing they would catch the light and sparkle just the way I wanted.
Now, this DIY is less instruction and more intuition. The actual plan that I formulated to string my bottles together totally fell through. I originally purchased some clearance chain-link bracelets that I was going to use as the cord, and a package of small eye hooks to attach to corks that I would place in the mouth of each bottle. After beginning my assembly, I discovered that my engineering skills needed a little work so I abandoned the original plan.
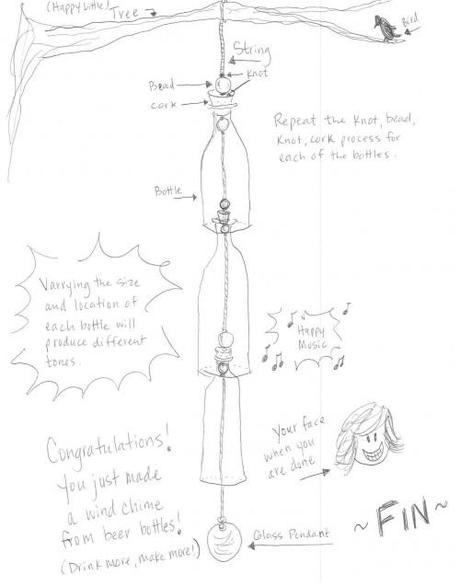
My husband and I then sat at the table and began formulating a new plan, this time using a natural fiber string rather than the chain bracelets. We discovered that we could poke a hole through the length of the cork and then thread the string through using a screwdriver. We tied knots on either end of each cork to secure it and then added a large bead above and below the knots on each cork to make sure that nothing slipped. I added a wind-catcher (glass jewelry pendant) at the very end of the string.
After trying to take pictures (which turned out horribly due to the lighting), I decided that the best way to handle this particular DIY was to just illustrate it using good ol’ pen and paper (below). You can choose to assemble your wind chime any way you wish, using various materials. We just happened to use what we had around the house (and trust me…I have tons).

Who needs real instructional images when you have technical illustrations like this?
The trickiest part of this DIY was the bottle cutting. I bought a seven-dollar-ish pistol grip glass cutter and it worked okay. It took some trial and error, so I suggest having a few extra bottles on hand for experimentation. The method that worked best for me was to first score the bottle (lightly!) and tap it gently along the score with the back of a large kitchen knife. I then held a long-handled lighter under the bottle, rotating the bottle as the flame heated the glass (roughly 20 seconds). Then I submurged the bottom of the bottle in a glass of ice water, again, for about 20 seconds. Then I removed the bottle and tapped it again. I repeated this between four and five times per bottle. The cuts weren’t exactly straight (and we cracked two out of five bottles) but the end result was well worth it.
There are several videos on YouTube that explain various methods of cutting a bottle. Some use string, acetone nail polish remover, and a lighter. Others use proper glass-cutting equipment. Based on my results, I would say that the string-polish remover option would produce a cleaner line with no jagged edges. Just be sure to use caution as tiny shards of glass will probably be part of the process. If I had to do it over again, I would have done it outside.
Using find-grit sand paper, sand around the edges to smooth them out. I kept the bottom portions of the bottles to give away as ash trays, jewelry caddies, votive holders or for storing paper clips. You can also use this same method to make drinking glasses (or vases). Just make sure to sand them really really good.

