I receive a lot of questions about slashing and opening. A lot. My first tutorial explains what slashing and opening is, why it is used, and gives a simple tutorial on how to transform a pencil skirt into a flared one using the technique but readers continue to email me and ask how it can be applied elsewhere. A sleeve opening? A bodice? While there are many cases when a pattern is slashed and opened, I picked another simple example that hopefully will answer some of the questions I’ve received as well as give a better understanding of the concept of slashing and opening.
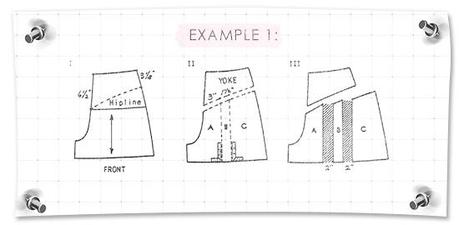
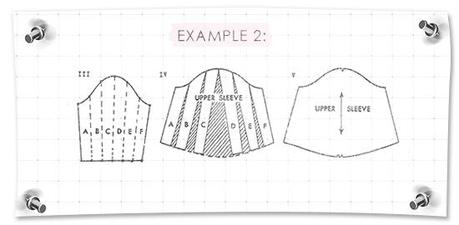
First of all, what is slashing and opening? Slashing and opening is the process of cutting into a pattern and spreading it open to add or transfer fullness. Slashing and opening is also used to add width or length to a pattern (FBA or SBA). Ruffles are created when a pattern is slashed through the entire width or length of a pattern and spread open like in example 1 below. Flares and flounces are created when a pattern is slashed through the entire length or width of a pattern, just like a ruffle, but instead of spreading it open from top to bottom or side to side, it is opened at one point and tapered to nothing at another point like in example 2 below.
For this example, I’m going to add fullness to the front bottom opening of a simple bodice in order to create a slightly flared hem like this (it looks like there has been more fullness added but it’s the closest thing I could find to get my point across). I am going to do this by transferring/pivoting the bust dart from the side seam to the front bottom hem. Basically, I’m going to use the fullness from the bust dart to make the front bottom opening bigger.
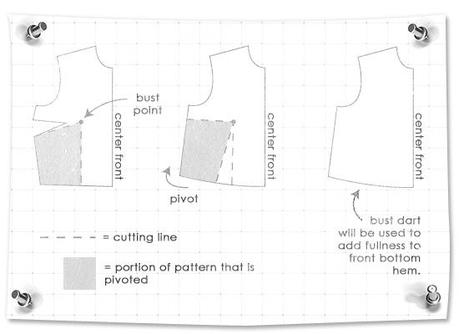
One: Draw a line from the bottom of the dart leg at the side seam to the bust point (represented by dotted lines on diagram)
Two: Square a line down from bust point to the waist line (also represented by dotted lines on diagram)
Three: Cut pattern along lines
Four: Pivot pattern up and over as shown in diagram until bottom dart leg matches with top dart leg
Five: True pattern by redrawing the side seam and bottom open. Revised pattern should resemble pattern furthest to right in diagram.
A couple of things to note about this tutorial and hopefully, this is where you will get more of an understanding of the concept of slashing and opening.
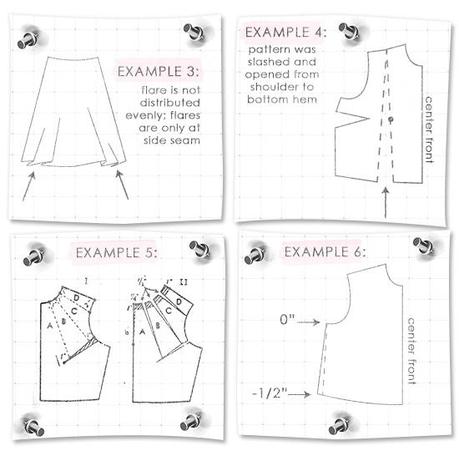
One: In the skirt tutorial, I slashed and opened the pattern at several points (and regular intervals) in order to create a flared hem. This is because I was adding more than 1-2.” When slashing and opening, each slash point can only be opened a certain amount. Half an inch is a good starting point, 3/4″ to 1 1/2″ is ideal, but 2″ is the maximum, for me at least (chime in if you disagree). This is done because we want the fullness to be added evenly across the entire width of the hem. If we added all the fullness at one spot, you would end up with something like example number 3. Because the amount of fullness we’re adding to the front hem of the bodice was equal to the bust dart intake, which is usually no more than 2″ (unless you’re very busty), only one slash line was used. Lesson? A pattern can only be opened a maximum of 2″ at each location; if more fullness needs to be added, another slash line must be used.
Two: In the skirt tutorial, I slashed and opened from the top of the pattern to the bottom pattern and that’s because I wanted to fullness to be added from the top of the skirt to the bottom of the skirt. But a pattern can be slashed and opened at any point. For this example, I wanted the fullness to start at the bust point because I wanted the area around my armhole, neck, and shoulder to stay as is – close fitting. But I could have slashed and opened the pattern from the shoulder seam to the bottom opening as in example 4 and created a blouse was roomier around my upper chest (also called across chest).
Three: Also, the direction of the slash lines can be varied. Look at example number 5. Do you see how the direction of the slash lines is from the neck to armhole/side seam? That’s because they, whoever is altering the pattern, wanted the fullness to go, or “carry,” in that direction. If they wanted the fullness to carry straight down to the front bottom hem, and not towards the armhole/side seam, the slash marks would have been as such – from the neck straight down to the bottom opening.
Four: What if you wanted to add less than the bust dart intake? Example – what if your bust dart intake is 1 ½” total, which means you will end up adding 3” to the front bottom hem (because the pattern is on the half), but you only wanted to add 1″ (2″ total)? I would do the same adjustment as in the tutorial above, but after, I would reduce the bottom opening ½” and taper back to 0” at armhole, which is represented with the dotted line in example number 6.
Five: Also, remember that this is only for the front pattern. If you want to add fullness to the back as well, you will have to slash and open the back pattern too. Believe it or not, a lot of companies only add fullness to the front of the pattern to save money but still achieve a flared look.

