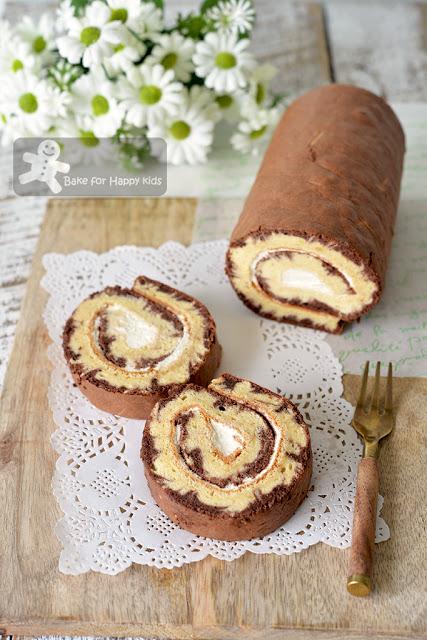
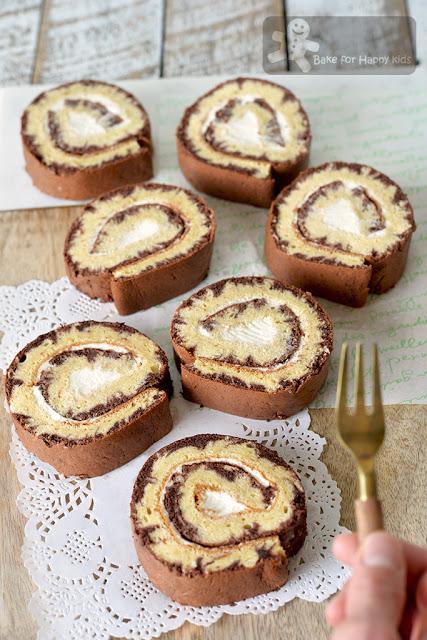
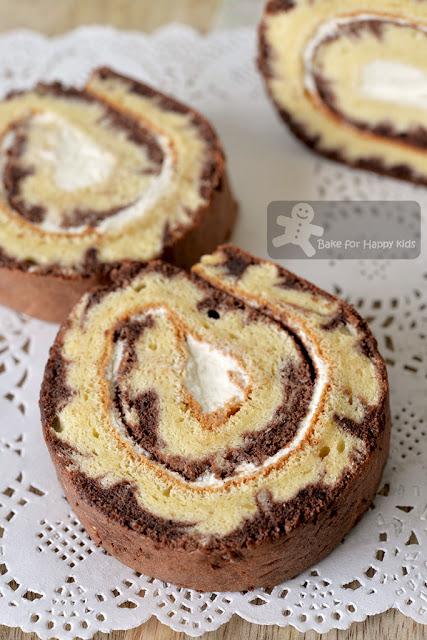
Why hurricane? Simply because the Swiss roll cake base contains two contrasting layers of batter and they are messed up into a streaky motif that looks like this...

My first Hurricane Chiffon Swiss Roll
And I'm baking it with cocoa and vanilla layers.
This is my first time baking hurricane chiffon Swiss roll. Not too bad, huh?
Although my cake is cottony soft and delicious, the fussy me think it still needs more streaks for a more dramatic hurricane effect. Hmmm... I hope more practice will make perfect.
Besides, the thick cake base can be difficult to roll into perfect round Swiss roll shape as you will see that most Hurricane Swiss rolls are flat and oblong shape instead being perfectly round. Or the perfect round ones are actually filled with A LOT of CREAM!!!
What if we don't like the flat oblong Swiss roll shape or the excessive cream? Hmmm... I'm sorry that we don't really have a choice here. The hurricane cake base has to be thick so that it can contain two contrasting cake layers including the nice streaking hurricane motif.Therefore, some part of my cake did crack a bit but most of them look pretty decent and ROUND! Plus, the lucky me have managed to roll my cake without using too much cream.

This is me dissecting my Cocoa Vanilla Hurricane Swiss roll... LOL!
Hmmm... Let me see. Pass or fail?... LOL!

My son said that I can pass lah! LOL!
... but I think that I need more practice!
Here's a video showing how I baked my first Hurricane Swiss roll if anyone is interested.
To create a nice streaking layer, the top layer batter has to be slightly thinner than the bottom layer so that steaks from the top layer can flow in-between the bottom layer. Get the idea?
Like my video and recipes? To get the latest updates, you can follow me at either my Facebook at here or here or my Instagram @zoebakeforhappykids
And here's my recipe.
IMPORTANT: Please use the exact weight and make sure that all ingredients are at room temperature.
Make one Swiss roll (unrolled size: 35 x 25 cm / 10 x 14 inches)
For the vanilla batter:
A
140g egg whites - about 4 large but please use exact weight.
60g caster sugar
B
60g egg yolks - about 4 large but please use exact weight.
50g milk
50g vegetable oil, preferably something neutral tasting
1/2 tsp vanilla paste or extract
70g cake flour
1/4 tsp baking powder
10g cornflour
For the cocoa batter:
C
70g egg whites - about 2 large but please use exact weight.
30g caster sugar
D
30g egg yolks - about 2 large but please use exact weight.
35g milk
25g vegetable oil, preferably something neutral tasting
1/2 tsp vanilla paste or extract
30g cake flour
1/4 tsp baking powder
10g cocoa powder - I used Dutch-processed
a pinch of salt
For the filling:
150ml whipping cream with 35% fat
1/2 tsp vanilla paste or extract
Note: I have used 150ml whipping cream and this amount is just right for me but if you like your Swiss roll to be filled with more whipped cream, you can increase the amount up to 250ml. I prefer to add NO SUGAR into the cream but you can add 1-2 tsp icing sugar into the cream before whipping it.
Preheat oven to 180°C / 350°F. Line baking tray with baking paper.
For A and C:
Using an electric mixer with a whisk attachment, beat egg whites in lowest speed for at least 10 mins to stabilise the egg white mixture.
Hint: You can beat 210g egg whites (from A and C) all in one bowl (adding 90g subsequently) and divide the stiff egg white mixture by weight into 2:1 (2 parts for A and 1 part for C). For my bake, the total meringue weight is 280g and so 187g belongs to A and 93g belongs to C.
While beating, proceed to B and D.
For B and D:
In a large mixing bowl, combine egg yolks, milk and oil and use a hand whisk to mix until combined. Then, whisk in vanilla paste or extract. Sift cake flour, baking powder and cornflour (for vanilla batter) or cocoa powder and salt (for cocoa batter) into egg yolk mixture and use a hand whisk to mix until all are well-incorporated. Set aside.
Back to A and C:
Increase beating speed to the next higher speed. While beating, add sugar gradually. Increase beating speed to the next higher speed and continue to beat until stiff peaks form. The egg white mixture should be very smooth with tiny bubbles. Do not over-beat the mixture or use too high speed to beat the mixture.
Combine A+B and C+D:
Using a hand whisk or a spatula, gently fold in the egg whites to the egg yolks mixture in 3-4 batches. It is ok to mix the 1st batch of egg white more vigorously into the egg yolk mixture but the subsequent portions must be folded in very gently. Make sure that most of the white is not visible after folding.
Pour vanilla batter into the prepared baking tray and use a spatula to spread the batter evenly.
Spoon cocoa batter onto vanilla batter very gently. Use a spoon or spatula to spread the cocoa batter evenly and very gently.
To create the hurricane / typhoon pattern in the cake:
Start from one corner of the pan, use a chopstick to draw multiple (about 15-25) lines from left to right, from bottom to up, up-and-down along the long side of the pan, leaving about 0.5 to 1 cm in-between two lines.
Then, start from one corner of the pan, use the same chopstick to draw multiple (about 25-35) lines from left to right, up-and-down along the short side of the pan, leaving about 0.5 to 1 cm in-between two lines.
Bake for 20 mins or until the cake is well-risen and fully cooked.
When done, remove cake (with its baking paper) from the tray immediately and transfer it onto a wire rack to cool. After about 5 mins of cooling, flip the cake onto a clean baking paper and remove the used baking paper at its bottom. Allow the cake to cool completely.
To assemble:
Using an electric mixer or a cream whipper, whip cream and vanilla until stiff peaks form.
Place cake with the vanilla side down on a clean baking paper. Use a knife to trim off about 0.5 cm from both the shorter sides of the cake.
Spread thin layer of cream evenly on the cake. Roll the cake from the shorter end (that is closer to you) along the longer side to form a Swiss roll.
Wrap in clean baking paper and then in cling wrap. Allow cake to firm up into its shape for at least 3 hr or overnight in the fridge.
Trim off both sides of the cake. Slice and serve. Enjoy!!!
Happy BakingPlease support me and like me at Facebook...

