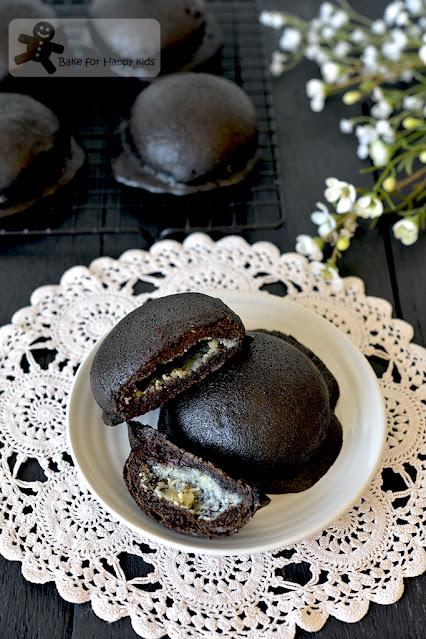
Something that is very dark and intensively chocolate...
After baking my Super Moist Black Chocolate Cake at HERE and Chocolate Coffee Roti Boy at HERE, I wonder... Can I use the highly Dutch-processed black cocoa powder that I used to bake the black chocolate cake at HERE to bake Black Chocolate Coffee Roti Boy?Clearly, YES!!!And these black chocolate coffee roti boy are a lot more darker and intensively chocolate than the regular brown ones!

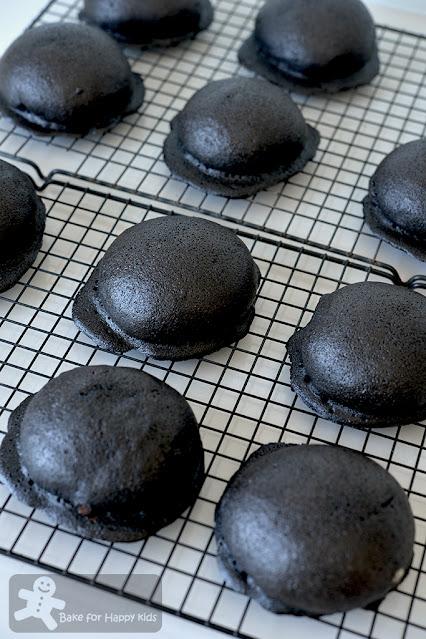
My Black Chocolate Coffee Roti Boy
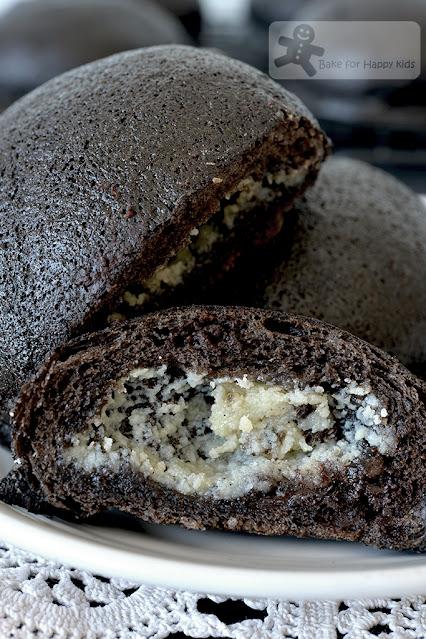
Very dark with stronger intensive cocoa taste!
What is black cocoa powder?Comparing with the regular Dutch-processed brown-coloured cocoa powder, the black cocoa powder is extra-highly Dutch-processed or alkalised, thus resulting it to be darker in its color.
Where can I buy it?I bought mine via online. If you do a Google search with "black cocoa powder", I'm sure that you will find several online stores in your country or area that will sell and post the item to you. It is usually not expensive.Are the brown and the black cocoa powder the same?No. The brown Dutch-processed cocoa powder is neutral in pH (7) whereas the black Dutch-processed cocoa powder is slightly more alkaline at pH 8.Being a fussy person, I don't like to assume that near-similar or related ingredients to work the same especially if they have a different pH.Then, there we go... So I used this highly Dutch-processed black cocoa powder to bake these very black chocolate coffee roti boy. And the substitution worked!

Wow! These roti boys are so naturally beautifully black!!!

darker with stronger intense chocolate flavor.so dark that the overpowering chocolate made the coffee fragrance rather subtle!making these buns taste less sweet than the regular brown cocoa ones.
Actually, I did made a few minor tweaks to the Chocolate Coffee Roti Boy recipe at HERE:
1) I wanted to make sure that the buns will turn out to be totally black, not gray or brown and so I added slightly more cocoa powder (only 5g more) to the topping. I wouldn't add more cocoa powder into the bread dough because it will ruin its super soft and moist texture.
2) In order to make the bread more chocolaty and darker, I added darker chocolate chips with 70% cocoa instead of the ones with 54% cocoa.
Watch my video to see how I baked these beauties. You will see that the cocoa powder that I used is naturally black, not the usual brown one.
Music: BensoundYes... We love these black chocolate roti boys and they were gone very quickly!
You might ask which is better? The black or brown roti boys? Honestly, I can't decide! Actually, they are both nice in their own ways and I would love baking both!!! LOL!!!
What's next? To be honest, social media including blogging is becoming a chore to me lately. I'm not motivated to share any of my tried-and-tested recipes, knowing that there are actually not many people interested in baking and reading blogs post-Covid as most people prefer go out more to socialize and dine despite of skyrocketing Inflation and interest rate.Not to worry, I won't kill my blog completely. Instead, I will just go easy. I will share my recipes not so actively like I did before but do it whenever I want. So, if you like recipes, videos and baking tips. please support me. Please LIKE, SHARE and FOLLOW me at either my Facebook at here or here or my Instagram @zoebakeforhappykids or SUBSCRIBE my YouTube channel at here.Unfortunately, Facebook and Instagram have lost its popularity recently so it will be nice if you can show your support by subscribing to
my YouTube channel at here so that you will be informed of my latest video / recipe promptly whenever it is published.I would like to say again that every LIKE, SHARE and FOLLOW or SUBSCRIBE from you means a lot to me. I will know that I'm in the right track and continue to bake and share more in the future. Thank you.Here's my recipe.Make 12 buns
For the butter filling:
75g unsalted butter, softened at room temperature
35g caster sugar
35g milk powder1/2 tsp vanilla paste
You can mix and prepare the butter filling one or a few days before the baking day.
Using a wooden spoon or an electric mixer with paddle attachment, beat butter, sugar, milk powder and vanilla paste in a large mixing bowl until combined. Divide and scoop filling into 12 equal portions and chill in a fridge for about 2 hr or preferably overnight or until firm and ready to use.
On the baking day...
For the bread dough:
180g water, lukewarm
245g bread flour with 12% protein
20g milk powder - please do not use milk to replace water and milk powder.
25g caster sugar
2g salt
5g black cocoa powder
1 tsp vanilla paste or extract
30g unsalted butter, softened at room temperature
3/4 tsp instant dry yeast
100g (1/2 cup) dark chocolate chips with 70% cocoa
extra bread flour for dusting and shaping
If you are using a breadmaker to knead and prove the dough, add all ingredients except chocolate chips into the breadmaker according to this order. Use "dough" setting to mix and knead dough for 30 mins or until the dough is elastic and stretchy. At the last 3-5 mins of kneading (or some breadmakers will beep), add chocolate chips and continue to knead until the chocolate chips are well incorporated. Then, let the dough prove for 1 hr or until doubled in size.
If you are using an electric mixer with an hook attachment or your hand to knead, combine all ingredients except butter and chocolate chips in the mixing bowl and mix at low speed until a soft dough forms. Then, knead in the butter until incorporated. Continue to knead for at least 25 mins or until the dough is elastic. It is important that the dough has to be elastic and stretchy. Add chocolate chips and continue to knead for 3-5 mins until the chocolate chips are well incorporated. Cover the dough and allow the dough to prove in a warm and humid place for about 1 hr or until doubled in size.
IMPORTANT: This bread dough is sticky. Do not knead the dough by hand and do not add more flour while kneading. The bread dough will become smooth and easy to handle when it is kneaded adequately (at least 25 mins).
Line baking trays with baking paper. Gently deflate the dough and divide it into 12 pieces (about 50g each). Shape each piece into a round smooth ball and allow it to rest for about 10 mins. Use a rolling pin to flatten each dough slightly and place each chilled butter filling in the middle of the dough. Pinch up the sides of the dough to completely enclose the filling. Arrange the shaped buns with their seam sides down and also about 5 cm apart on the prepared baking trays.
Cover the dough and allow them to prove in a warm and humid place for another 1 hr or until doubled in size.
While proving, prepare the cocoa coffee topping.
For the cocoa coffee topping:
10g instant coffee granules (mine is decaffeinated)
15g (1 tbsp) boiling hot water
60g (1/4 cup) unsalted butter, softened at room temperature
60g (1/2 cup) icing sugar, sifted
1 tsp vanilla paste or extract
1 medium egg, 50g without the shell, at room temperature - please use exact weight
50g plain / all purpose flour
10g black cocoa powder
10g milk powder
1/2 tsp salt
Dissolve coffee granules with hot boiling water. Set aside to cool slightly.
Using a wooden spoon or an electric mixer with paddle attachment, beat butter and sugar in a large mixing bowl until combined. Add vanilla and egg bit by bit and beat well after each addition. Add coffee mixture and mix until combined.
Combine flour, cocoa powder, milk powder and salt. Sift flour mixture into the butter mixture. Use a spatula to fold in gently until combined and smooth. Transfer mixture to a piping bag. You can fit the piping bag with round tip - Wilton no. 7 but I realize that I can do the piping without any tip. Chill topping slightly (10-15 mins) if it is too runny for piping and remember to remove it from the fridge 5-10 mins before piping or the mixture will become too firm to pipe. Note: I didn't have to chill my topping at all because it was a mild 25°C day when I was baking these buns.
Pipe cocoa coffee topping in spiral pattern onto buns just before baking.
Bake in a preheated 180°C (350°F) oven with one tray at a time for 15 mins or until the breads are thoroughly baked and the topping is set.
Transfer immediately onto a wire rack to cool slightly for the topping to harden and crisp. These buns are the best on the day they are freshly baked. If the topping is not crispy enough after cooling (because this chocolate bread is actually moister than the non-chocolate ones), you might have to bake the buns for another 5 mins or until the topping is crispy.
Please note that the toppings on the buns won't be crispy on the next day even if you keep the buns in airtight containers. The best way to store is to wrap tightly in plastic wrap and freeze them in serving portions for up to 3 months. To reheat, bake frozen buns in preheated 180°C oven for about 10-15 mins until they are thoroughly warm and the toppings are crispy again. You don't have to thaw the frozen buns before reheating.
Happy BakingPlease support me and like me at Facebook...

