A sloper is an invaluable tool to sewers and patternmakers. I drafted mine 3 years ago and I continue to use frequently. I compare its measurements and shapes to RTW patterns and I use it as a starting point for projects. Also, when readers email me with questions about my sloper tutorial, I refer back to my experience to help them with theirs. Despite its perfect fit, I don’t use it as is. In order for it to become an actual design like Carter Rae, I make a few minor alterations. It’s subtle, but makes a big difference. Below are the changes I usually make to my slopers as well as the other pattern alterations for Carter Rae. One thing to keep in mind is that these are my measurements, so even though they might not align with yours, the amount increased or decreased would be similar.

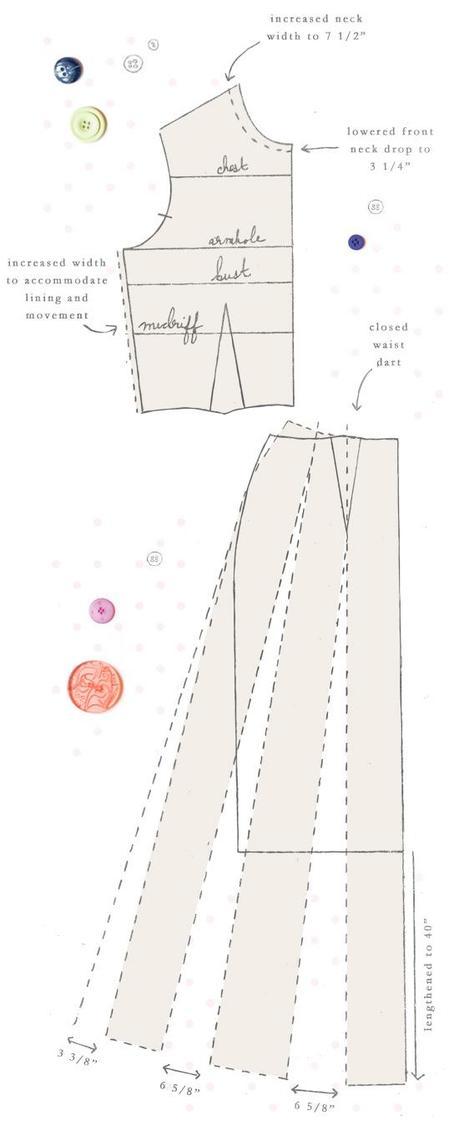
First up in the front neck drop and neck width. On my sloper, front neck drop is 2 3/4” and back neck width is 6 1/2” (I always measure back neck width, not front). For a collared shirt, these measurements are great as the neckline should be close fitting in order to support the collar and not have it fall off. When I was part of the jacket team during my technical design stint, back neck width hovered around 6” and rarely went about 8” for a size 6. The type of collar determined neck width. For a regular blouse or top, a 6” back neck width would look stuffy. If you looked at the photos of Carter Rae, you will see that even when I increased the neck width and drop to 7 1/2” and 3 1/4” (respectively), it’s still very close fitting. Can you imagine if it were any closer? Seven and a half is the smallest neck width I use, and I usually lean towards 8.” (note: increasing the back neck width is the same as reducing the shoulder width. In both cases, I removed/cut away from the pattern to create more room for the neck). I also increased the body width from the bust through the waist to accommodate the lining and give me a little more wiggle room. My sloper tutorial differs from ones in textbooks in the amount of ease that is added (I add a lot less), but when I’m making a new pattern from it, I add just a hair for more breathing room.

When slashing and opening, there is one concept to be mindful of and that is fullness is added, eliminated or transferred exactly where you want it. In an A-line skirt where the flare is at the side, fullness is added only at the side seam, whereas in a flared skirt, fullness is added throughout the pattern. Many sewers, pattern makers and even manufacturers err by adding fullness only to the side seams for a flared skirt (it’s a lot easier!), but what results is a garment that “wings” out. The opposite mistake for a flared skirt is to only add fullness within the pattern, but this results in a garment that lies flat at the sides. If you’re going for a true flare, fullness must be distributed evenly throughout. To achieve this, 1/2” the amount of that is added at each slash point within the pattern is added at the side seam. Because half will be added to both front and back, the sum will equal the amount slashed within the pattern. This will result in even flares throughout the garment. So, in addition to lengthening my skirt sloper to 40”, I also slashed and opened using this technique to make the sweep of my skirt measure 50” flat (see image for amount). When doing this, I also closed the waist dart. When all was said and done, I split the pattern into 2 (added princess lines) for yield (one skirt piece wouldn’t fit the width of my fabric).


