How to get BlueHost Discount?

BlueHost is one of the recommended Web Hosting providers for WordPress. In this small tutorial, I will explain to you, the step by step procedure to claim your BlueHost discount. Without wasting any more time, let’s get started.
Step1: First, you need to visit BlueHost through this special link to get your discount.

Step 2: After landing up at BlueHost website, you need to choose what type of hosting you want to buy. For Basic hosting purposes, BlueHost offers 3 types namely, Shared Hosting, VPS Hosting, and Dedicated Hosting.
If you wish to go for a Managed WordPress Hosting, then BlueHost offers three choices namely, WordPress Hosting, WP Pro and eCommerce.
Choose the Web Hosting you need to host your website.

Step 3: After choosing your desired Web Hosting package, you would have landed up at the respective webpage. Now scroll down for the pricing. The pricing that I am showing here is for BlueHost Shared Hosting package.
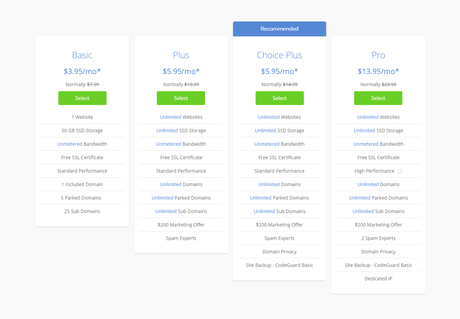
You could have noticed that there are different Plans for each type of hosting. In the above image, you could have noticed different hosting plans like Basic, Plus, Choice Plus, and Pro.
If you have only 1 single website, then the Basic plan will be more suitable for you. But, if you have more than one website, then you will have to go with plans other than Basic.
But, whatever Plans you choose, you will get a Free SSL certificate and a Free Domain.
Note: The Domain Registration is free. It means that you don’t have to pay any amount for your Domain for the first year. From the second year, you will have to pay for Domain Renewal.
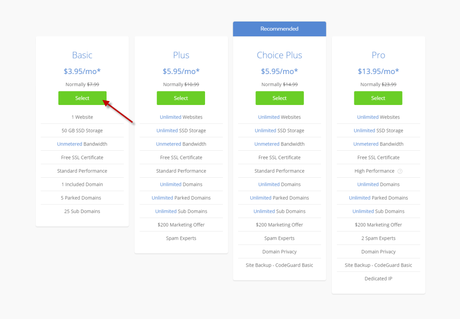
Step 4: Select the Plan you want.
How to claim your Free Domain at BlueHost?
Step 5: Now, that you have selected the desired Hosting Plan, you will have to select your domain. If you want to get a new domain name for free, choose the desired domain name in the 1st option.
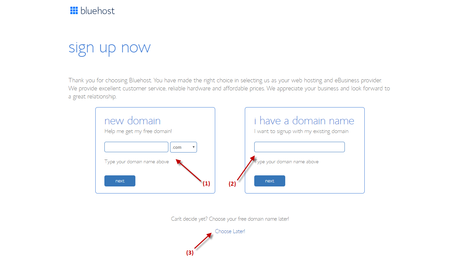
If you already have a domain name, enter it in the 2nd box.
In an alternate case, if you wish to skip the domain part, you can click “Choose Later”. The domain credit will be added to your account. And, you can use this later to register a free domain name.
Claim your BlueHost Special Discount
Now, you would have landed up at Hosting Signup Page. This page contains multiple sections that you need to fill.
Step 6: In order to buy your BlueHost Hosting, you need to create a BlueHost account. You can use Google Single Sign-on to create your account. This helps you signing into BlueHost account easier.

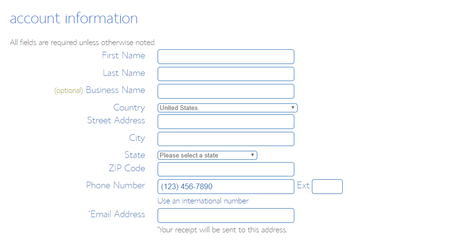
Step 7: After creating an account with Google Single Sign-on, you will have to enter your Account Information. It contains Basic details like Name, Address, Phone Number and Email Address. Enter your email address carefully. Because your Payment receipt will be sent to this Email Address only.
Step 8: Next comes your Package Information where you can get the real BlueHost Discount.
When choosing your Account Plan, you could see 3-period terms namely 12-month price, 24-month price, and 36-month price. Make sure that you choose the long term period.
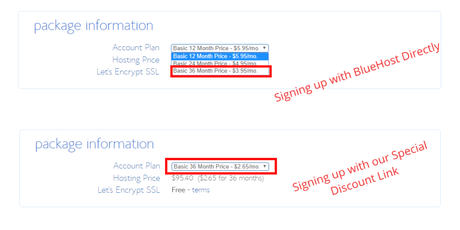
Choosing a long term package will give you the most discount. Also, the above image shows two different BlueHost Shared Hosting Pricing. If you had used my discount link, you would have seen the reduced price.
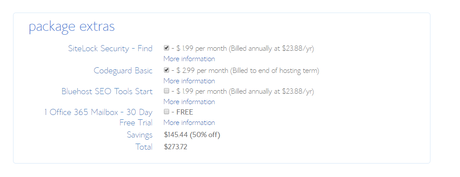
Step 9: Next, you need to choose the Hosting Package extras. You could notice addons like SiteLock Security, Codeguard Basic, BlueHost SEO Tools, and Office 365 Mailbox. Choose the ones that you need.
Step 10: And then enter your Payment details.

Step 11: Finally, you will have to tick their checkbox for accepting their Terms and Conditions and click the Submit button.

And doing so, you have successfully purchased BlueHost Hosting and claimed your discount.
If you had successfully claimed this offer, let the world know that by pinning this.

