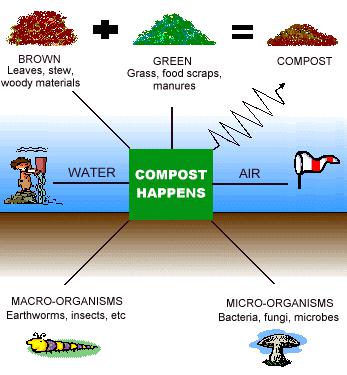
I’ve been composting for almost three years now and can’t imagine ever throwing anything “organic” into the trash (fruits, vegetables, egg shells, coffee grounds, etc.). Composting has helped us achieve monthly garbage service (20 gallons of trash a month). It’s much easier than you might think, just follow these simple steps.
Why Should You Compost?
- Approximately one-quarter of all refuse taken to our landfills is some type of organic waste. These materials do not decompose in a landfill because air and water and excluded.
- Composting reduces harmful greenhouse gases as organics that break down in a landfill produce methane gas, which is approximately 120 times more harmful than carbon dioxide.
- Composting improves soil, which in turn prevents plant diseases.
What Can I Compost?
Browns (carbon-rich) Greens (nitrogen-rich)
- Straw
- Sawdust
- Pine needles
- Small branches
- Drier lint
- Dry grass clippings
- Dried plant materials (trimmings, leaves, vines)
- Wet grass clippings
- Fresh plant clippings
- Vegetables and fruit waste
- Barnyard manure and bedding
- Tea bags/coffee grounds
- Hair/fur/feathers
- Eggshells
Step 1: Getting Started
- First, select a place in the yard, preferably in the shade and close to water.
- Choose a container that’s made of wood (or another sturdy material) and no smaller than three by three feet. For instructions on how to make your own compost, visit Metro’s website for step-by-step instructions.
- Shred or chop your materials into four inch or smaller pieces in order to expose more surface area for the microorganisms to work on.
- Start adding waste in a ratio of three “browns” to one “green”. Browns are carbon-rich materials and include wood chips, straw, branches, and leaves. Greens provide nitrogen and include grass clippings and kitchen scraps, such as fruits, vegetables, eggshells, and coffee grounds. When you’re adding new material, dig a hole in the pile and stir the new stuff in so it gets coated with the old mixture.

Step 2: Maintenance
If you notice your compost pile starts to smell, make sure you have enough browns. Also check the moisture level by grabbing a handful of the heap. It should be at about 50 to 60 percent, meaning the compost feels like a wrung-out sponge. If it’s too dry, add a little water or let rain even out the moisture. If it’s too wet, add a few more browns.
Step 3: Harvesting Your Compost
When your compost pile is ready to use, which could take anywhere from a few months to a year, it will look and smell like very dark soil. If you’re unsure, put it to the baggie test: place a small amount in a plastic bag and take a smell before sealing. Then place the bag in a drawer for a few days. When you open the bag, the sample should smell the same as it did before. If it smells worse, your compost needs more time in the pile.
How Can I Use Compost?
- As a soil enrichment for flower and vegetable gardens, trees, and houseplants.
- As a part of a seed-starting mix.
- As a liquid fertilizer by soaking a handful of compost in warm water for a few hours.
- Larger woody pieces can be used as a mulch. Because it is very rich and holds water, compost should be used sparingly around native plants.
- Give it away!
For additional resources, Oregon Metro has a great publication on backyard composting available for download (.pdf) via their website: “It’s Easy to Make Your Own Compost”
{image credit: TORFAEN County Borough}

