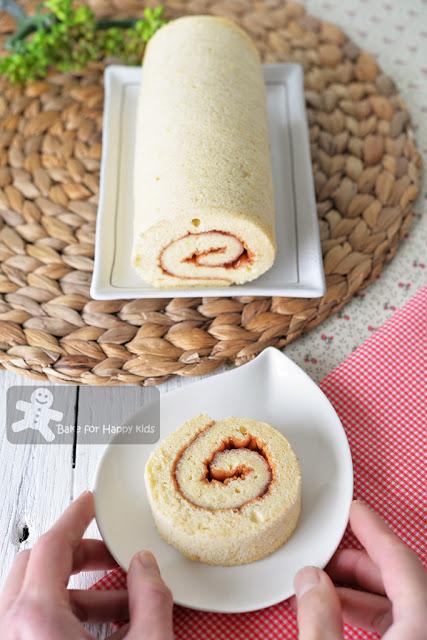
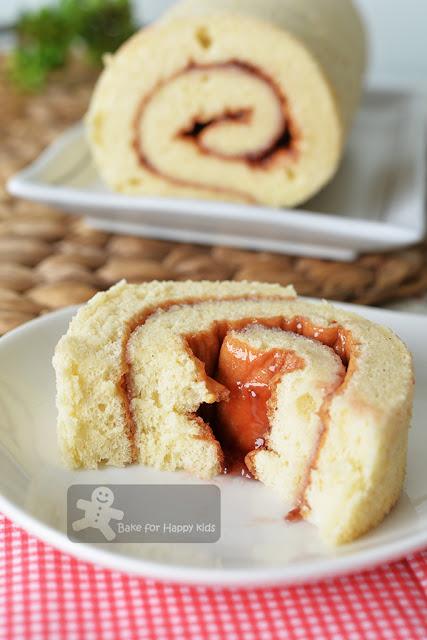
Today, I will be sharing the tips and tricks on how to bake a basic ASIAN style Swiss roll with a THIN LAYER OF strawberry jam FILLING.
Why ASIAN?
Have you noticed that most Swiss rolls selling in most Chinese or Asian bakeries look kind of naked with no outer cake skin? And most Asian-style Swiss rolls would taste very soft like cotton just like mine at here, here, here, here and here.
Why THIN LAYER OF FILLING?
Remember that I said before at here that I will need to apply THICK cream filling into the thicker fluffier cake base in order to roll it properly without breaking it. Now, I have discovered that I use the same cake base recipe even if I want to apply a THIN filling into it.
How? Do you want to know?

My Asian Style Cottony Soft Chiffon Swiss Roll... rolled with a THIN layer of Strawberry Jam filling.
If you want to apply any THIN filling into your relatively THICK Swiss roll cake without going through the nightmare of breaking it while rolling, please...
1) DO NOT OVER-BAKE the cake base - MOST IMPORTANT!!!
You must bake the cake base until it is well-risen and thoroughly cooked but it can't be baked further into a THICKER FLUFFIER cake base like the one at here. And you will be surprised that the extra 1 to 2 minutes of baking can make such a huge difference!
The "less-baked" cake base will shrink slightly more than usual and of course it won't be as thick and fluffy like the ones that are baked slightly longer. Yet, not to worry! Its texture will remain cottony soft and it will be extra flexible for rolling.
2) REMOVE the bottom cake skin. And it is ok if the top cake skin is too tender and fragile to touch.
The "less-baked" cake base will have moister top and bottom cake skins which can be very fragile and easily removed by peeling them off the cake. You must remove the bottom cake skin but don't have to peel the top one and I will explain why in my next point.
3) ROLL the cake with the bottom skinless side facing out.
If you examine the cross-section of the cake very closely, you will the see that the top layer of the cake tends to be more more baked and rigid than its bottom. Hence, this means that the cake bottom without the skin is actually more flexible and can be stretched further with wider angle without breaking it.
So now you know... This is why the Swiss rolls that are selling in most Chinese or Asian bakeries are kind of naked with no outer cake skin.
4) USE filling that are spreadable.
Once you have understood the principle of baking a Swiss roll with a THIN layer of filling, you can apply any kind of fillings that you want like Nutella, peanut butter, cream, buttercream and etc but they have be spreadable, not rigid! If you are using Nutella or peanut butter, please make sure that they are slightly warmed and runny so that they can be easily and evenly spread onto the cake base.
If you are still not confident to bake use this relatively thick Swiss roll recipe with thin layer filling, I suggest that you should bake 80% of this recipe with the same baking tray (35 x 25 cm / 10 x 14 inches) for 15 mins, just like what I did at here, here and here. The thinner cakes are usually easier to roll than the thicker ones.
That's all! Sound easy?
Watch my video and I'm pretty sure that you can bake this yummy Swiss roll too. Happy Baking!

Mmmm... It's delicious!
It was an instant thumb up from my son when he took a bite of this cottony Swiss roll.
Like my baking tips and recipes? If you want more, you can follow me at either my Facebook at here or here or my Instagram @zoebakeforhappykids
Here's the recipe.
IMPORTANT: Please use the exact weight and make sure that all cake base ingredients are at room temperature.
Make one Swiss roll (unrolled size: 35 x 25 cm / 10 x 14 inches)
For the egg white mixture:
175g egg whites - about 5 large but please use exact weight.80g caster sugar
For the egg yolk mixture:
75g egg yolks - about 4-5 large but please use exact weight.65g milk
60g vegetable oil, preferably something neutral tasting
1/2 tsp vanilla paste or extract
90g cake flour
10g corn flour
1 tsp baking powder
1/8 tsp salt
For the filling:
about 1/3 cup strawberry jam - you can use any other jam that you likePreheat oven to 180°C / 350°F. Line baking tray with baking paper.
For the egg white mixture:
Using an electric mixer with a whisk attachment, beat egg whites in lowest speed for at least 10 mins to stabilise the egg white mixture.While beating, proceed to mix the egg yolk mixture:
In a large mixing bowl, combine egg yolks, milk, oil and vanilla. Use a hand whisk to mix until combined. Sift cake flour, cornflour, baking powder and salt into egg yolk mixture and use a hand whisk to mix until all are well-incorporated. Set aside.Back to beating the egg white mixture:
Increase beating speed to the next higher speed. While beating, add sugar gradually. Increase beating speed to the next higher speed and continue to beat until stiff peaks form. The egg white mixture should be very smooth with tiny bubbles. Do not over-beat the mixture or use too high speed to beat the mixture.Combine egg yolk and white mixtures:
Using a hand whisk or a spatula, gently fold in the egg whites to the egg yolks mixture in 3-4 batches. It is ok to mix the 1st batch of egg white more vigorously into the egg yolk mixture but the subsequent portions must be folded in very gently. Make sure that most of the white is not visible after folding.Pour batter into baking tray. Use a spatula to spread the batter evenly and gentle tap the filled tray on the kitchen top to remove any large bubble.
Bake for 15-16 mins or until the cake is well-risen and fully cooked. IMPORTANT: Do not over-bake the cake or bake the fully-cooked cake for more than 16 mins especially if you are applying a thin layer of jam filling on it. And it's ok if the top cake skin is tender to touch - please read the above baking tip.
When done, remove cake (with its baking paper) from the tray immediately and transfer it onto a wire rack to cool. After about 5 mins of cooling, flip the cake onto a clean baking paper and remove the used baking paper and also the cake skin at its bottom. Allow the cake to cool completely.
To assemble:
Place cake with the skinless bottom side down on a clean baking paper. Use a knife to trim off about 0.5 cm from both the shorter sides of the cake.Spread thin layer of jam evenly on the cake. Roll the cake from the shorter end (that is closer to you) along the longer side to form a Swiss roll.
Wrap in clean baking paper and then in cling wrap. Allow cake to set into its shape for about 30 mins at room temperature
Trim off both sides of the cake. Slice and serve. Enjoy!!!
Happy Baking
Please support me and like me at Facebook...
