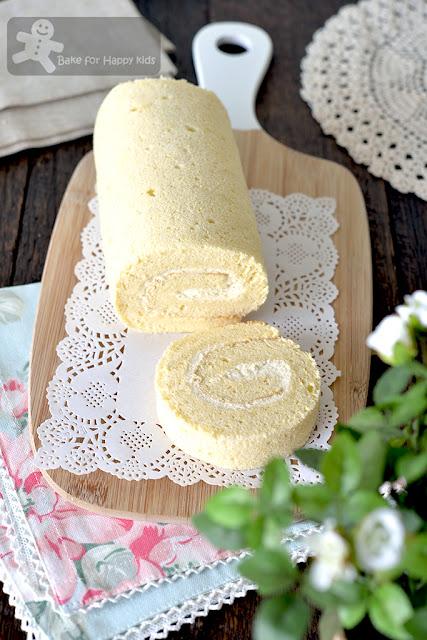
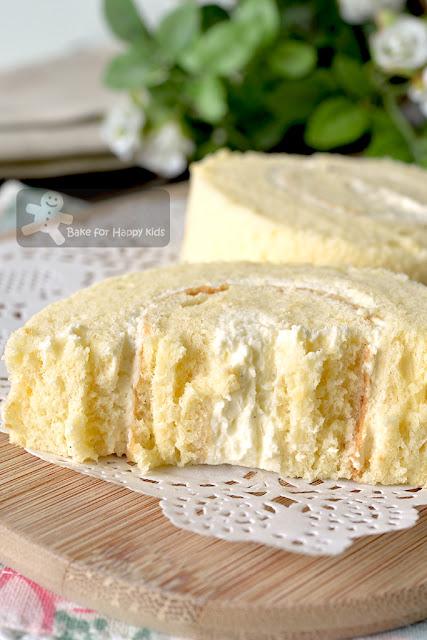
They are mostly the Asian styles chiffon ones which are typically feathery light and cottony soft... as they are always our favourite!
Although I’m pretty experienced in baking Swiss rolls, I’m still feeling nervous baking and rolling these cakes especially the thicker ones.
Why? The thick type of Swiss roll cake needs a longer time to bake, resulting the surface of the cake (also known as the cake skin) and also its edges to be drier and brittle even it is just slightly over-baked. Sadly, this will cause cause the cake to crack and break easily eventually especially at the beginning of the rolling. Stressful, huh?
Despite of these challenges, my family said to me that they prefer the thicker Swiss roll. And here I am, facing the challenge of baking and rolling an extra thick Swiss roll again...
Besides scaling the recipe proportional up to bake a thicker cake, I have also learnt that the use of mildly acidic ingredients as coffee or lemon juice can make the chiffon cake rise higher and remain fluffier with more stable structure. Just like my Extra Thick and Fluffy Coffee Swiss Roll at here.
So here, I’m test-baking another basic Swiss Roll recipe that contains lemon juice... And it’s true! The addition of lemon juice does make the cake thicker and fluffier!

Another impressive Extra Thick Cottony Soft Basic Swiss Roll
This recipe originates from my Instagram friend, Veronica @mybakinghub.sgThanks Veronica! This recipe is awesome!
Unlike most of the other Asia-style chiffon Swiss roll recipes that I baked and listed at here, this recipe contains:
- about 1-2 more eggs
- a little lesser oil and more milk by proportion
- an acidic ingredient, lemon juice
- no baking powder
- no cornflour, just cake flour
1. Veronica’s pan is 30 x 30 cm and mine is 35 x 25cm. Both are the same area and do our cake will have the same thickness. So, this means that my rolled cake is 25cm (not 30cm), 5cm shorter and also slightly fatter with an extra 5cm of rolling.
2. The oven temperature and duration that Veronica used is 170°C for 30 mins and mine is a combination of 160°C for 15 mins and 140°C for another 15 mins. I had to do this because I know that my oven is typically hotter than most ovens and if I have to bake my cake for 30 mins just like what Veronica did, I must use a lower oven temperature. So please note that different oven is different! You might need to adjust your oven temperature accordingly but I would strongly suggest sticking to 30 mins of baking.
3. Veronica filled her Swiss roll with meat floss filling which I assumed that it doesn’t require any chilling but mine is filled with whipped cream and need to set in the fridge after assembly. Unfortunately, chilling the cake makes its cake skin really moist and will get stuck to anything including the non-stick baking paper! Yes... I must admit that I was very disappointed! I lost my cake skin due to the chilling and so I would strongly recommend removing the cake skin after chilling or make the cake with fillings that doesn’t require chilling and store it at room temperature.
Watch my video and you will see what I mean. You’ll see that the skin is intact when I assemble the cake at room temperature but came off easily after chilling. And you might notice that this thicker Swiss roll needs more cream to fill as compared to the thinner cakes.Music: Bensound

Despite the loss of the cake skin...
I must say that the extra thick cottony soft texture is really awesome!
I hope that you will like my family-friendly recipes and baking tips. If you do, please LIKE, SHARE and FOLLOW my Facebook at here or here or my Instagram @zoebakeforhappykids or SUBCRIBE my YouTube channel at here. Your support means a lot to me. Your LIKE, SHARE, FOLLOW and SUBSCRIBE will tell me that I'm on a right track and will keep a busy full-time working mom like me motivated and share more of my tried-and-tested recipes in the future. Thank you!
Please stay tune as I'll be sharing more yummy recipes soon... but now, I'm taking a short break to spend time with my family during this winter school holiday. And I will be back soon in 1or 2 weeks time, sharing more delicious recipes and baking video. Ciao!
Here's the recipe.
IMPORTANT: Please use the exact weight and make sure that all ingredients are at room temperature.
Make one Swiss roll (unrolled size: 35 x 25 cm / 10 x 14 inches)
For the egg white mixture:
210g egg whites from 6 large eggs - please use the exact weight
about 1 tsp freshly squeezed lemon juice
70g caster sugar
For the egg yolk mixture:
100g egg yolks from 6 large eggs - please use the exact weight
60g neutral-tasting vegetable oil
80g milk
1 tsp vanilla paste or extract
100g cake flour
For the filling:
250g whipping cream
1/2 tsp vanilla paste or extract
Note: I prefer to add NO SUGAR into the cream filling but you can add 1-2 tsp icing sugar if you wish.
For the cake:
Preheat oven to 160°C / 320°F. Line baking tray with baking paper.
Using an electric mixer with a whisk attachment, beat egg whites and lemon juice in lowest speed for at least 10 mins to stabilise the egg white mixture.
While beating, proceed to mix the egg yolk mixture
In a large mixing bowl, combine egg yolks, oil, milk and vanilla and use a hand whisk to mix until combined.
Sift flour into egg yolk mixture and use a hand whisk to mix until well-incorporated. Set aside.
Back to the egg white mixture. Increase beating speed to the next higher speed. While beating, add sugar gradually. Increase beating speed to the next higher speed and continue to beat until stiff peaks form. The egg white mixture should be very smooth with tiny bubbles. Do not over-beat the mixture or use too high speed to beat the mixture.
Using a hand whisk or a spatula, gently fold in the egg whites to the egg yolks mixture in 3-4 batches. It is ok to mix the 1st batch of egg white more vigorously into the egg yolk mixture but the subsequent portions must be folded in very gently. Make sure that most of the white is not visible after folding.
Pour batter into the prepared baking tray. Use a spatula to spread the batter evenly and gentle tap the filled tray on the kitchen top to remove any large bubble. Bake for 15 mins. Reduce oven temperature to 140°C / 285°F and bake for another 15 mins or until the cake is well risen and fully cooked.
When done, drop cake from a height of 30 cm immediately to minimize shrinking. Then, remove cake (with its baking paper) from the tray and transfer it onto a wire rack to cool. After about 5 mins of cooling, flip the cake onto a clean baking paper and remove the used baking paper at its bottom. Allow the cake to cool completely.
To assemble:
Using an electric mixer or a cream whipper, whip cream and vanilla until stiff peaks form.
Spread a layer of cream evenly on the bottom side of the cake.
Roll the cake from the shorter end (that is closer to you) along the longer side to form a Swiss roll. The cake skin should on the outside of the rolled cake.
Wrap cake in clean baking paper and in cling wrap. Allow it to firm up into its shape for about 1 hr in the fridge.
Trim off both sides of the cake. Scrap off the cake skin if required when most of it has been detached from the cake. Slice and serve.
Happy BakingPlease support me and like me at Facebook...

