Programming and Schematics: (AKA Concept and Drawings)
When it comes to planning a renovation no matter how large or small the project, the Programming and Schematic Design Phase is where the “heavy lifting” begins. By that I mean – what was once a wish list and need list now becomes the foundation that develops the overall concept of the new and improved space.
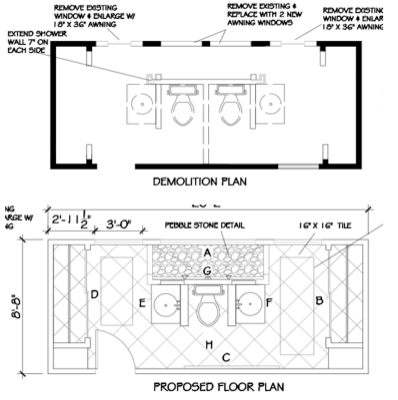
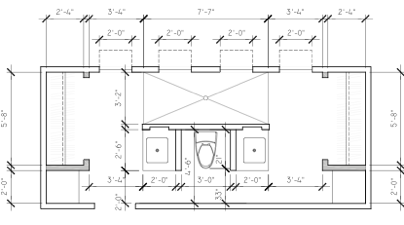
In this master bath remodel, once the concept was approved we moved on to the schematics, which integrated all the design criteria we had gathered – and translated that information into the ideal design solution.


New Floor Plan
There were certain conceptual elements in the existing layout which actually worked well for my clients’ lifestyle – and a lot more that didn’t.
Concepts That Worked :
- The shared shower accessible from her side/his side.
- The mirrored layout with two very separate and private spaces.
- Separate his and her entrances from the Master bedroom into the bath.
Old Problems:
- Dull, dated and dingy.
- Shower too narrow.
- Two WC’s taking up prime real estate.
- 2’ clearance from the front face of the vanity to the closet doors (too tight).
- Closet storage not maximized.
- Frigidly cold.
- Glass block exterior wall and awkward window placement.
- Poor lighting.
New Solutions:
- Maintain shower location (enlarged) with access from both his and her sides.
- Recreate two very separate and private spaces – a mirror image.
- Gutt the entire bath down to the studs bringing it into this century. Framing new pony walls (eliminating full height walls) allowing natural light to flood through.
- Enlarge the shower width by 6” ( doesn’t sound like a lot but trust me – it makse a huge difference)”every inch counts”.
- Provide one common WC to allow for more traffic space
- Push back each custom vanity into a niche area to provide over 3’ clearance from the front face of the vanity to the new closet.
- Shift closet over slightly from the original location with new interior closet stystems providing space to add a linen storage column on both his and her side.
- Add radiant floor heating throughout and re-vent providing warmth in this space. (Cold at the beach in the morning)
- Remove all windows and reframe and replace with a series of transom windows – which provides more wall surface area and natural light streaming in from above.
To Be Continued…
I would love to help you design your Master Bath Retreat. Contact us at Interior Makeovers Inc. 310-788-0990 or email: [email protected].
Looking forward to hearing from you.
Stay Inspired!

I encourage you leave questions or comments below this post, and fill out the form on the right hand side of this page to receive your free copy of my special report: “15 Money Saving Strategies When Planning Your Home Renovation”
Article by Lori Gilder, Architectural Interior Designer, Los Angeles, Ca. © 2012 Lori Gilder. Interior Makeovers Inc.

