One of the most common questions that gamers around the world and Steam community members ask- Where are steam screenshots saved?
Well, Trust me! It is not that hard to find your steam screenshots. In this article, we are giving you an ultimate guide to help to get access to the Steam Screenshots folder.
If you have found yourself asking the question- Where does steam save Screenshots? Or How can I get access to the steam screenshot folder?
You Have Landed The Right Article!
As a gamer, you might have captured a screenshot to save your gaming epic moment! Steam has a cloud storage capacity of 1GB and you can easily utilize the space to capture and store your best gaming memories!
While it is super easier to take snap screenshots, getting access to them can be tricky!
Gamers can know a lot about gaming and still struggle with something as simple as getting access to steam screenshots or screenshot folders.
Gamers over steam have expressed difficulty looking up screenshots and getting access to where they are located.
Whether you want to get access to your most recent screenshots or the ones you have taken a year ago! Getting access to steam screenshots is easy.
Where do Steam Screenshots Go?
Stream screenshots get stored inside Steam Client.

They also, by default, get stored locally over the user device for example, if you are using windows; by default, they get stored in directory C.
If you are a user of Mac; they by default get stored in the library.
To read more on how to get access to these saved steam screenshots, We have written up this perfect guide that will answer all your questions!
How to find Steam’s screenshots folder using steam itself?
These are the easiest methods to locate Steam Screenshots.
Method 1: Use Steam Client
Not everyone is familiar with Steam’s Screenshots folder. It is a folder that collects all the screenshots you have taken since you have been using Steam.
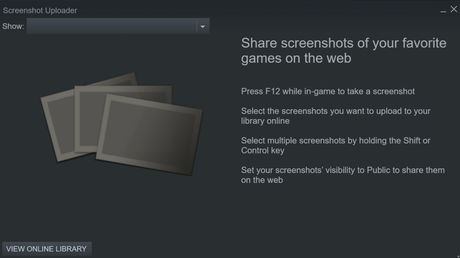
These screenshots could be viewed or discovered using Screenshot Manager. Over the menu bar, under the View option.

Follow the steps below to get access instantly:
- Go to Steam’s Menu Bar and open the “View” Option.
- Select “Screenshots” from the Drop-down menu.
- You’ll see a new section open. If you have ever taken any screenshots they will be displayed here.
- Once you have located the screenshots, Steam has given you options to choose what you want to do with the Screenshots.
- Select “disk on show” to open the system’s file explorer in the directory and get access to the specific location where the screenshot is stored. You now can easily discover the screenshot you are looking for.
- You can now without any difficulty move/upload these screenshots to other files or folders.
- You would only need this step if you have failed to locate screenshots through the steam client. There could be a number of reasons that have made locating screenshots impossible with Steam Client. It could also depend on which system you are using.
- We have also enlisted methods to help you discover screenshots other than Steam client.
Method 2: Locating Steam’s Screenshots folder using Windows (windows 8 and windows 10)
The very first thing that you have to look up is Steam’s installation directory.
For locating Steam Installation Directory, follow these steps-
- Go to C Drive and under program files select Steam Folder
- For easy and quick access, the default is:
C:\Program Files(x86)\Steam
The location of Steam installed directory may vary if you have installed steam on another location/ directory.
Once you have found Steam Directory follow these steps-
- Find “user data” and open the folder.
- Open userID or accountID folder.
- You have to look for the folder named 760 and select “remote”.
- You will see a folder of different games you have played.
- If you have played a hefty number of games, it could be difficult for you to exactly know the GameID of the game’s screenshot you are looking for.
- To know the Game ID, visit ( https://steamdb.info/apps/ ) and look up Game’s ID
- Once you have discovered your Gamer’s ID, you can come back to REMOTE and open a folder with Gamer’s ID.
- Once opened, go to the folder named “SCREENSHOTS”. This folder should contain all the screenshots you have been looking for.
Method 3- Accessing Steam Screenshots using MacOS-
If you are a user of Mac and looking for ways you can access Steam Screenshots through the Steam Application itself. Follow the steps given below-
- Over the menu bar, you’d see “view” click on it.
- Under View dropdown list you see “Screenshot” enlisted. Select that.
- Under the screenshot section, it should show if you have taken any screenshots or not. If you have taken any screenshots using Steam’s built-in screenshot tools over here.
- Select the “show on Disk” option from the screenshot section and an external screenshots folder should open.
- This is the folder that stores Captured Screenshots. You now can search for the desired Screenshot.
Finding Steam Screenshots Over Mac without the use of Steam App
If you have failed to locate or you have not been successful at finding any folder under built-in client over steam Apps. Try finding the Screenshots locally stored over your Mac
To locate Steam Screenshots locally you have to know the right path for locating Steam Screenshots on Mac. These screenshots are saved over the library.
For the same, follow the steps below-
- Open library
- Go to application support
- Lookup for the folder named STEAM
- Select and open Folder Steam
- Inside Steam folder lookup for “User data”
- If you have multiple mac users. You must look under the right username. Only search for Steam Screenshots under the correct username.
- Once you have selected the correct username, search for “Screenshots”
- Screenshot folder should have all screenshots you have been looking for.
Method 4: Finding Steam Screenshots for Linux users
For Linux, follow these steps-
- Find Userdata folder
- You have an option of either navigating to the screenshot folder or making a search for the Steam screenshot folder.
- Once you have located the Steam Screenshot folder. On opening, you’d find all captured Steam Screenshots over here.
FAQ-
Question 1- How to save or take Screenshots with Steam?
Answer- To capture the screen, you have to press the F12 key. Once you have pressed the F12 key, the screenshot will automatically be saved on your PC. This is method one.
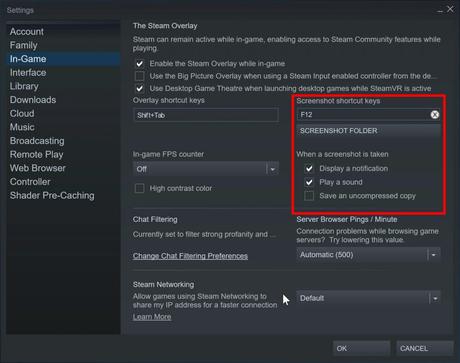
To customize taking Screenshots over Steam you have to customize hotkey. For this, you need to visit the IN-Game section of Steam Settings and under “The Steam Overlay” section look for “screenshot shortcut keys”.
Under Screenshot Keys enter the key name that you’d want to use for taking screenshots in future.

This section also lets you choose, when you are taking a screenshot if you want to have a display of a notification using a checkbox.
Right under-display notification, you’d see another checkbox saying “Play a sound”.
You can also select if you want to be notified through a sound as you have captured a screenshot. Under “play a sound” you’d see another checkbox, saying if you want the screenshot to be saved as an uncompressed copy or not.
That’s enough options for you to have just for capturing and saving screenshots! you can’t say steam doesn’t forget to work on even minor details.
Question 2- Is there any way to change the Steam screenshot folder location?
Answer – Yes. You obviously cannot relocate previously captured and stored Steam screenshots. But you can easily allocate a new path to the ones that you are going to capture in the future.
To say, if you want to relocate the whole Steam Screenshot folder, but you can allot a new folder for storing captured steam screenshots.
Follow these steps to change the location of Steam screenshots-
- Open steam and select “View” over the menu bar.
- You’d see a new window has opened. Click “In-Game” under options given over the left side.
- Now you have to look for the “Screenshot Folder” option that’s right below the Screen shortcut key option.
- You have to click on “Screenshot Folder” and create a new folder and give an address path of where you want the Steam Screenshots to be stored.
- After you have selected a new folder, click on “select” and to finalize and save made changes, “OK”.
- You have successfully changed the location of the Steam Screenshot folder.
Change folder Steam Screenshot folder location with Mac.
For Mac users, the process of changing the Steam Screenshot folder location is the same as above.
Question 3 – Having Difficulty opening Steam Overlay.
Answer- While above mentioned issues have easy fixes, this one might not. It is a problem of its own if you cannot get the Steam Overlay window open.
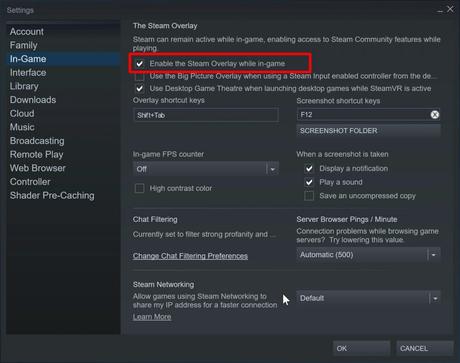
The overlay window can also be opened through shortcut keys, (SHIFT + TAB). If you are trying to access Overlay with shortcut keys, you must make sure you are pressing the right ones. In this case, firstly, you have to make sure the overlay is enabled and the default keys are correct.
The overlay is a supporting component of the games you play. There are chances of its closing on its own if you have a heavy load coming to your system as you are in the middle of playing games.

In this case, you must make sure that the system is not overloaded that could have prevented overlay from opening.
If you are using the right shortcut keys and your system does not have a heavy load. Follow the steps below-
- Open Steams system client
- Go to Steam settings and preferences in the game tab
- You’d find a checkbox next to system overlay while in-game.
- You have enabled overlay. Hence, you can now easily open it.
Another process that you can choose to perform the same is to–
- Right-click on the game on your computer ( only accessible to Windows users)
- Select properties under the general tab
- You find a checkbox next to “system overlay while In-game.
- Select and close the window
- Now you should be able to open overlay steam
Question 4- Why are my Steam Screenshots not saved in the desired folder?
Answer- If you are having a problem with Steam Screenshots not being saved on the selected folder. This might be just the answer you have been looking for.
If you have been wanting to save your screenshots on another hard drive, and even though you have made changes to the Steam Screenshot Folder location.
It is still not working for you, then you might want to look at your C drive where they were originally being stored/ or they were being stored by default i.e C drive\userdata\steam…
While making changes to the Steam Screenshot folder location, you also have to make sure that the checkbox next to the label “Save an uncompressed copy” is checked.
What this checkbox does if you leave it unchecked is, by default, it starts the same uncompressed copy to the default location that is C drive; regardless of moving Steam elsewhere or using symbolic links.
Steam will still implant its compressed JPG screenshots under-
C:\Programfiles(x86)\Steam\userdata\%SteamID3%\760\remote\%app-ID%\screenshots\*
Question 5- What could be the other use of Steam Screenshots?
Answer- Steam’s Captured Screenshots can be more than just a collection of epic memories or epic moments that you later get to share with your friends and family.
They are also useful when it comes to facing any technical issues or while troubleshooting. These Screenshots can easily help you get better support as you have recorded evidence of the issue/ problem.
Conclusion:
We have intensively covered this topic.
We hope as a gamer or non-gamer, after going through our article guide on locating Steam Screenshots has helped you and have provided all the answers you were looking for!
We’d sincerely appreciate it if our guide on locating Steam Screenshots has answered all your questions that brought you to us!
Let us know in the comments if we missed out on anything important! We are always looking up for ways to improve ourselves.
Also do not forget to post questions that you’d like to be added to the guide! They might get added to our article updates!
Also Read:
- Steam Update Stuck or not Downloading [Fixed]
- How To Fix Steam Not Opening or Launching Error?
- Unable to initialize Steam API [Steam Error Fixed]

