Vaadin framework is a java web framework for building web applications rapidly.
The final outcome is really nice and the coding style resembles java swing.
You can even find a recent comparison of the most popular java web frameworks here.
So in this article we will see how we can build a vaadin web application using IntelliJ Idea Ultimate 13 ide from Javabrains.
First we open IntelliJ Idea.
Then we go to File –> New Project
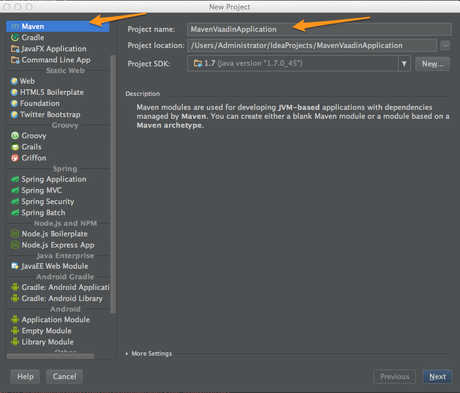
We choose Maven (as we want to build a maven project) in the left column and we give a name in the Project name field that denotes what kind of a project is this (picture1)
picture1
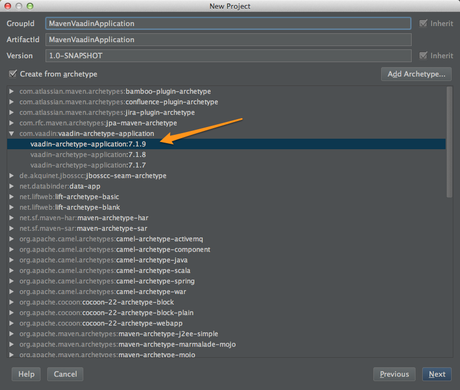
In the next screen we choose the vaadin-application-archetype, since all other vaadin archetypes have been deprecated in vaadin 7 (picture2)
picture2
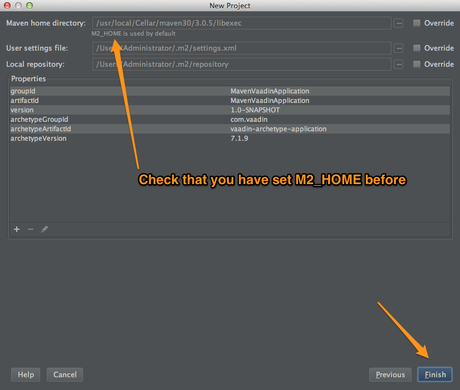
In the next and last step of the project creation wizard we must have set the Maven home directory and the easiest way to do it is to have set the M2_HOME variable in our .bash_profile file that is located in our home directory (at least on Mac OS).
So after you install Maven (you can check if you already have it with mvm -version) using its home page (3.0.5 is not the latest version but it is the more stable one) add this line into your .bash_profile :
export M2_HOME="/usr/local/Cellar/maven30/3.0.5/libexec"
That’s it!
Now at the last step you just press Finish (picture3)
picture3
Now while the project is being created IntelliJ Idea asks if it can auto import maven projects and we must press ‘Enable Auto-Import’ to let maven auto import libraries that need to be used from the project.
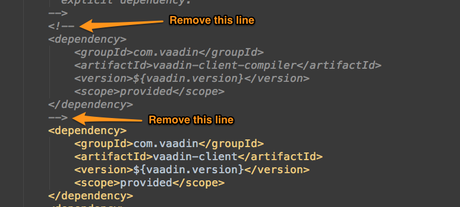
Now the first thing to do is comment out the following dependency in pom.xml (only for IntelliJ Idea, not required for Netbeans), like I show in picture 4
picture4
Another thing we must do before starting to code is to install a file watcher plugin that will allow IntelliJ Idea to automatically translate the scss files that the Vaadin Framework theme system creates.
To install this file watcher plugin the user must follow these detailed instructions.
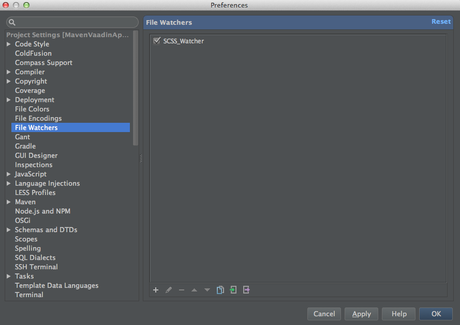
Then we open IntelliJ Idea –> Preferences –> Project Settings and we go to File Watchers , we press the plus sign button and we add a scss watcher giving it a name we like (picture5)
picture5
If you check now you’ll see that IntelliJ has created a java class like this :
package MavenVaadinApplication;

import javax.servlet.annotation.WebServlet;

import com.vaadin.annotations.Theme;
import com.vaadin.annotations.VaadinServletConfiguration;
import com.vaadin.server.VaadinRequest;
import com.vaadin.server.VaadinServlet;
import com.vaadin.ui.Button;
import com.vaadin.ui.Button.ClickEvent;
import com.vaadin.ui.Label;
import com.vaadin.ui.UI;
import com.vaadin.ui.VerticalLayout;

@Theme("mytheme")
@SuppressWarnings("serial")
public class MyVaadinUI extends UI
{

    @WebServlet(value = "/*", asyncSupported = true)
    @VaadinServletConfiguration(productionMode = false, ui = MyVaadinUI.class, widgetset = "MavenVaadinApplication.AppWidgetSet")
    public static class Servlet extends VaadinServlet {
    }

    @Override
    protected void init(VaadinRequest request) {
        final VerticalLayout layout = new VerticalLayout();
        layout.setMargin(true);
        setContent(layout);

        Button button = new Button("Click Me");
        button.addClickListener(new Button.ClickListener() {
            public void buttonClick(ClickEvent event) {
                layout.addComponent(new Label("Thank you for clicking"));
            }
        });
        layout.addComponent(button);
    }

}
As you see right after the class declaration all the classic web.xml settings have adopted the Servlet 3.0 model and they are set by annotations like @WebServlet.
I prefer the old web.xml style because I believe that is most clear to the user.
So we’ll transfer these settings there.
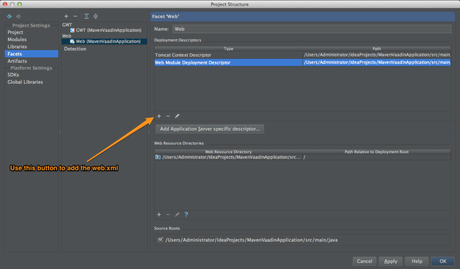
To do that remove the highlighted lines above and then we go File –> Project Structure and then in Project Settings column we choose Facets –> Web.
Then in the Deployment Descriptors area we add a web.xml version 3 under the existing Context Descriptor (in my case Tomcat Context Descriptor) like I show in picture 6.
picture6
Inside the web.xml file and between the web-app tags type the following code :
VaadinApplication

        Vaadin production mode
        productionMode
        false


        Vaadin Application
        com.vaadin.server.VaadinServlet

            Vaadin UI class to use
            UI
            MavenVaadinApplication.MyVaadinUI


        Vaadin Application
        /*
In the above code at line 5 we activate vaadin development mode so scss files can be translated to scss on the fly, at line 13 we declare the class that we will use to create our graphical web application and in line 18 we declare that the vaadin servlet(com.vaadin.server.VaadinServlet) will be responsible for all requests made by the user that uses the web application.
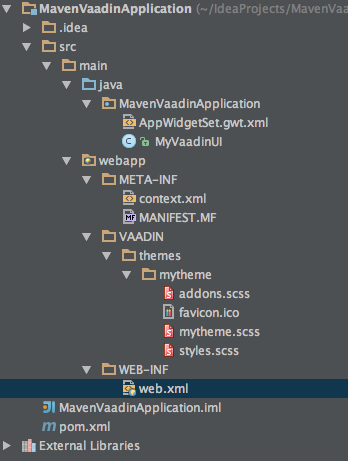
I give below an image of the application files right now (picture 7)
picture7
Now we need to make one last step before to start the real coding of the application.
Since we are talking about a web application, we need to add a web server in our project.
A simple, reliable, popular and free solution is to use Tomcat 7.
(A good link with instructions on how to install tomcat on Mac OS can be found here)
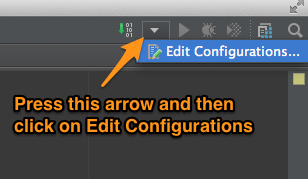
After the installation of Tomcat to our system we go to the upper right corner of IntelliJ Idea 13 and the we press Edit Configurations (picture 8)
picture8
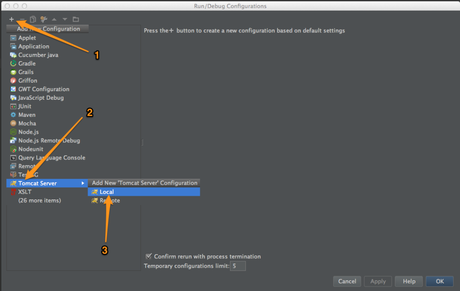
Then we add a Tomcat Server instance in three steps (picture 9)
picture9
We name the instance Tomcat1 and we press fix –> 1st option to deploy our war to the server.
We can run our application as it is but the code that is generated by our ide is very simple so we’ll add some more vaadin components with their own icons to see how Vaadin can produce really nice rich web interfaces.
So we start updating our code above (MyVaadinUI class).
I’ve decided to add some commonly used components like textfield, combo box, option button etc.
So here is the new code for the MyVaadinUI class (the new code is highlighted).
package MavenVaadinApplication;

import com.vaadin.annotations.Theme;
import com.vaadin.server.ThemeResource;
import com.vaadin.server.VaadinRequest;
import com.vaadin.ui.*;

@Theme("mytheme")
@SuppressWarnings("serial")
public class MyVaadinUI extends UI
{

    private TextField tf = new TextField("Email");
    private ComboBox cb = new ComboBox("Type");
    private TextArea ta = new TextArea("Details");
    private OptionGroup og = new OptionGroup("Priority");
    private Button bt = new Button("Send");

    @Override
    protected void init(VaadinRequest request) {
        final VerticalLayout layout = new VerticalLayout();
        layout.setMargin(true);
        setContent(layout);

        tf.setWidth("100%");
        cb.setWidth("100%");
        ta.setWidth("100%");

        og.setWidth("100%");
        og.addItem("Too low");
        og.addItem("Extremely high");

        HorizontalLayout top = new HorizontalLayout();
        top.setWidth("100%");
        top.setSpacing(true);

        HorizontalLayout bottom = new HorizontalLayout();
        top.setWidth("100%");
        top.setSpacing(true);

        top.addComponent(tf);
        top.addComponent(cb);

        bottom.addComponent(og);
        bottom.addComponent(bt);

        layout.addComponent(top);
        layout.addComponent(ta);
        layout.addComponent(bottom);

        bottom.setComponentAlignment(bt, Alignment.BOTTOM_RIGHT);

        tf.setIcon(new ThemeResource("img/email.png"));
        cb.setIcon(new ThemeResource("img/note.png"));
        ta.setIcon(new ThemeResource("img/document.png"));
        bt.setIcon(new ThemeResource("img/ok.png"));

        og.setItemIcon("Too low", new ThemeResource("img/attention.png"));
        og.setItemIcon("Extremely high", new ThemeResource("img/error.png"));
    }

}
I believe that the new code is self explained.
One topic I want to touch here is the use of the images.
To use images in our custom themes we must copy the in a my theme/img directory (for more informations about vaadin themes check this link)
Then we must use the ThemeResource class because all request are passing from the Vaadin servlet which is responsible for creating our custom theme.
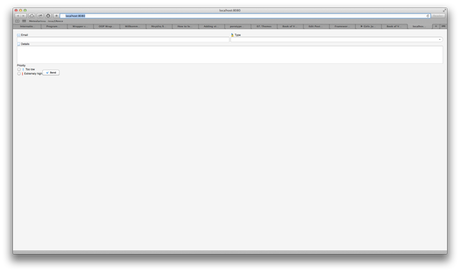
So now we can run our application (by pressing the play button near the Tomcat1 word in the upper right corner of IntelliJ Idea 13) and we get the final result (picture10)
picture10
So that’s all folks for today.
I hope that I have helped some Vaadin and IntelliJ Idea users with this article, to understand the great features that these two tools have to offer to modern web developers.

