Topaz Labs have released Topaz DeNoise AI – Image De-noiser integrated with AI Algorithm. I am a big fan of Topaz DeNoise (old version without AI) which does an excellent job in removing the noise from the image.
The other AI-powered tools from Topaz Labs like Gigapixel AI, Sharpen AI and JPEG to RAW AI are standalone tools.
You can use Topaz DeNoise AI as a standalone version as well as a plugin for Photoshop, Lightroom Classic, or Topaz Studio. So, Topaz Labs have made the tool flexible for all the users.
It supports both Windows and Macintosh OS.
I will use the 30-day Trial version for this Topaz DeNoise AI Review.
I will use my 13” MacBook Air for review.
How to use Topaz DeNoise AI?

1. Download and Install Topaz DeNoise AI. Enter your email id to get the download link via mail. The downloaded installation file will be around 13 MB. Once you start the installation process, it will download few more packages for installation.
2. You can see the standalone version in the applications. If you have already installed Adobe Lightroom or Adobe Photoshop or Topaz Studio, then you can see it as a plugin over there.
3. I will do the noise removal alone for multiple images in the standalone version to see its performance.
3.1 Standalone Version
3.1.1 I will open one of my image of Golden-fronted Leafbird, which is already processed in Lightroom. This image was taken using my Canon 7D camera at ISO800. This image is grainy, and noise reduction is required for this image. So, I will open it in Topaz DeNoise AI to remove image noise.
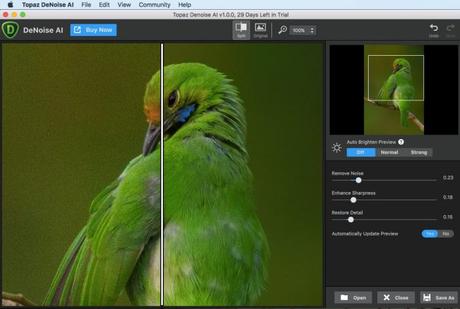
3.1.2 You need to drag and drop the image or make use of the “Open” folder option in the bottom Toolbar.
3.1.3 The processing starts automatically once the image gets loaded. The software generates the processed image preview with the basic settings.

3.1.4 In the top toolbar, you have the provision to see the Split screen view of Before and After image. This one is followed by the full view of Before/After Image. You can also zoom in the image to 100% or 200% or 400%. This setting is handy to view the proper noise reduction in the picture.
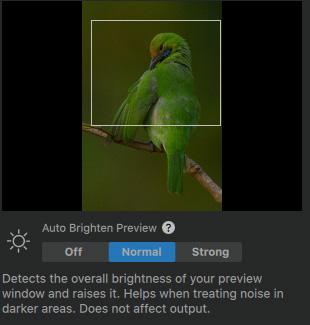
3.1.5 On the Top right part, they have provided the full view of the actual image with a square box for selected zoom in view in the Preview window on the left side.
3.1.6 Below this, you can see the “Auto Brighten Preview” option which comes with three settings: “Off,” “Normal,” and “Strong.” Initially, I got confused as I thought this setting would make the Brightness adjustment of the image. But, I was completely wrong. This setting is an interesting one. It just brightens the image in the Preview window. This brightening will help you to view the noise in the Shadows and the Darks in the picture. No brightness adjustment is made on the actual image. I found this pretty useful.
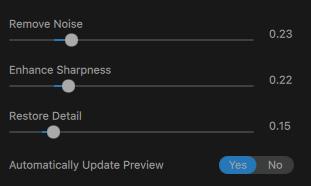
Settings To Play with
3.1.7 Now, comes the three sliders. “Remove Noise” for de-noising. “Enhance Sharpness” to control the sharpness of the image. “Restore Detail” slide for restoring the Details. By Default, the first two sliders will be set to “0.15” and the Restore Detail slider to “0.10”. The first two sliders can be adjusted in levels of +/- 0.01. But the Restore Detail slider can be increased or decreased in multiples of 0.05.
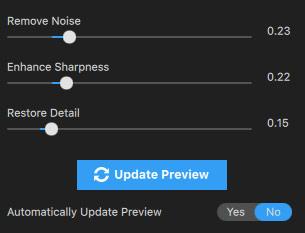
3.1.8 Whenever you make any changes to the first two sliders then the Preview window goes for an update, which takes around 5 seconds. If you find this irritating, then you can set the “Automatic Update Preview” to “No.” Once you set it to “No” then a new button “Update Preview” pops up, just above this slider. So, you need to click this button after making the slider changes to see the preview of the processed image with those settings.
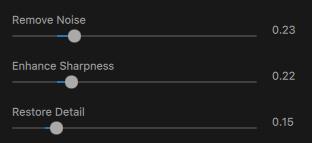
3.1.9 After playing around with the sliders, I found that the following slider values are suitable for this image of the Leafbird. So, you need to play around with these sliders to get your perfect noise removal settings without losing image sharpness. It varies for different images.
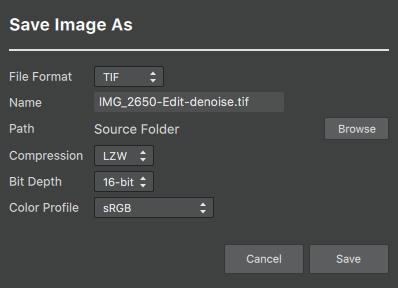
3.1.10 Now, you can click the “Save As” button in the bottom right corner to save the final image. You can save it any of the six image formats: JPG, JPEG, PNG, DNG, TIF, TIFF. Filename, compression, bit depth, and Color profile can be set in this window. You can also set the “Path” for storing the final processed image.
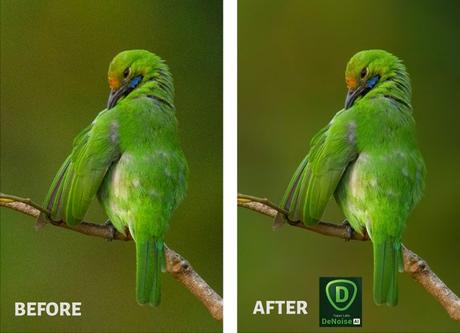
3.1.11 Let us see the Before and After versions of this image.
Topaz DeNoise AI as Lightroom Plugin
The main advantage of Topaz DeNoise AI is its plugin feature. If you are using Lightroom for post-processing, then you can right click on the image and select the “Edit in” option. Here you can see the Topaz DeNoise AI option.
You can click on it to transfer your photo to the DeNoise AI.
Once you do the noise removal, click save button to return to Lightroom Develop Module.
Topaz DeNoise AI Plugin for Photoshop
If you are a Photoshop user, then you can see the Topaz DeNoise AI option in the Filters section under Topaz.
It helps to save a good amount of time in your workflow, for fixing the noise part in the image.
Topaz DeNoise AI Before/After Images
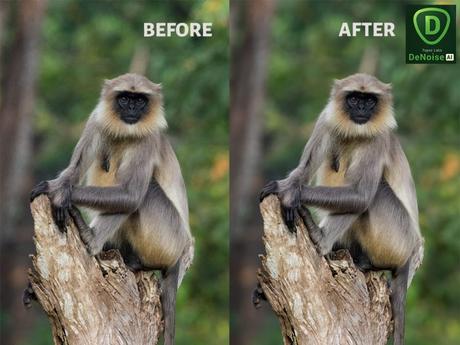
Now, let us see some more Topaz DeNoise AI Before/After Images.
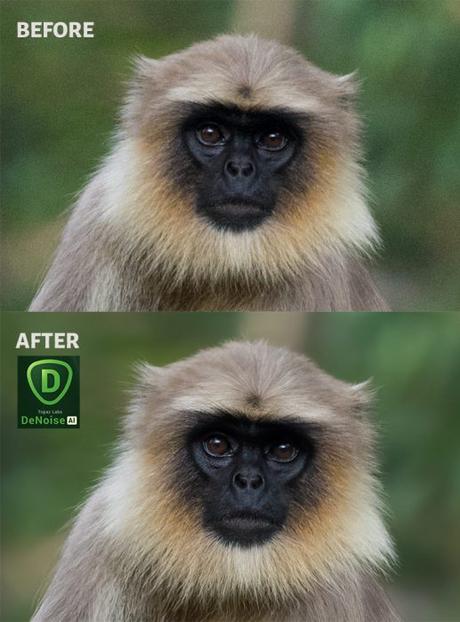
Here, the software does a good job of removing noise from the image without losing details in the Gray Langur’s face.
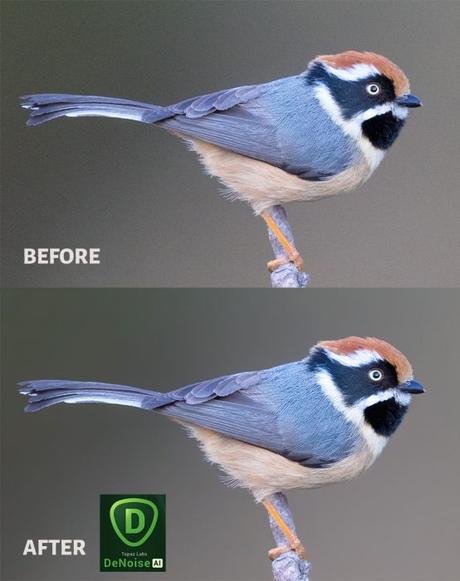
The above image of Red-headed Tit bird was shot at ISO2500 with canon 1DX MarkII and the image is noisy. It is clearly visible in the form of grains in the background. The noise has disappeared completely after taking it through Topaz DeNoise AI.
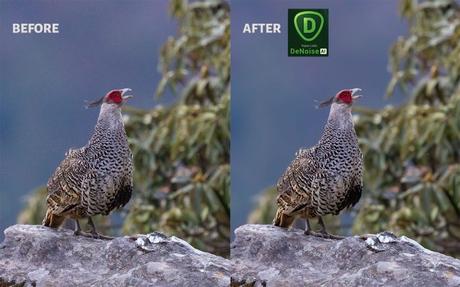
In the above image of Cheer Pheasant, you can see lots of noise since it is shot at ISO4000. Even at high ISOs the software is capable of removing the noise without affecting the details in the image.
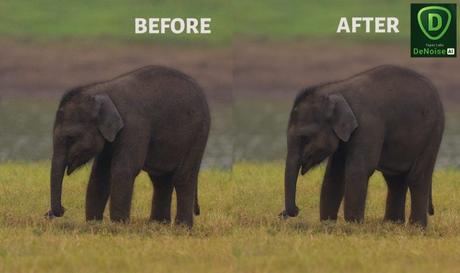
For the baby elephant picture, I have bumped the Exposure by 1 stop in Lightroom and ISO800 was used for this image. Here, when I applied the noise removal, the recovery is good even though the software has removed some of the details on the elephants body.
Conclusion
The fact that Topaz DeNoise AI comes as a plugin for Lightroom and Photoshop makes it more attractive. If it was a standalone product alone, as some of Topaz Lab’s other AI-powered products then it will be a time-consuming process to take the processed pictures separately to this software for noise removal.
After testing with many types of images, one thing I found out was it works best with RAW photos than with the JPEGs.
If it is a high noise image then you can expect some reduction in details if you want to remove the noise completely from the image.
If you are using it as a Lightroom plugin, then I recommend you to apply the camera calibration settings to the image first. It should be followed by the denoising with the Topaz DeNoise AI. You can play with the rest of the parameters like Exposure and White Balance after Noise Removal.
The old Topaz DeNoise comes with multiple setting options, and it will only do the noise removal part. But the new Topaz DeNoise AI does Image sharpening along with removing noise in the image. It is an added advantage.
One more improvement which I see is that Topaz DeNoise AI removes the noise from the image without affecting the sharpness in the focused part of the picture. If you compare Topaz DeNoise AI with Topaz AI Clear (discontinued by Topaz Labs) then there is only a slight improvement in the performance (no drastic changes).
So, if you were using the old Topaz DeNoise, then I think you can make the switch over to the new Topaz DeNoise AI. Topaz Labs have discontinued Topaz AI Clear, DeNoise, and Remove Noise. So, the new DeNoise AI is the replacement for these software applications.
If you already own AI Clear or the old DeNoise software, then you can get the Topaz DeNoise AI for free. Topaz DeNoise AI comes at $79.99.

