Ready to add the squat rack to your training routine? Here’s what you need to know about using this piece of equipment like a champ.

The squat rack is arguably the center of attention at the gym.
Even though the benches get a lot of love and hype, ultimately, the rack is where muscle and dreams are made.
For beginners, the rack can be a little intimidating. Especially when you see experienced lifters pushing 300, 400 or 500lbs or more with relative ease.
In fact, the novice may look at the weight being pushed in a rack and feel overawed by the idea of using one.
But in this beginner-friendly to how to use a squat rack, you will get a broad overview of this piece of strength training equipment.
By the end, you will feel have a firm understanding of how to best use a squat rack so that you can focus on nailing your lifting technique and workout.
Let’s jump right in.
What exercises can you do with a squat rack?
Even though they are called “squat” racks, in reality, power racks, half racks, and squat stands can be used for a TON of different exercises.
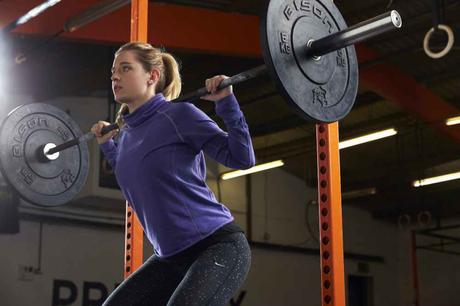
The main exercise is—obviously—squats!
Front, back, the hooks and pins on a rack allow you to set-up at a custom height (more on that in a bit!) for every color of squats you can think of.
But beyond that, there are a TON of other exercises you can do with even a bare-bones rack.
One of the first things I wanted in a squat rack of my own was a pull-up bar so that I could do chin-ups and other hanging exercises (like dead hangs, hanging leg raises, etc).
See also: How Much Does a Barbell Weigh?
Other standard exercises you can do with a squat rack include all manner of presses, from the standard bench press (incline, decline, flat—whatever floats your boat) to military press.
Squat racks are also awesome for holding a barbell at height, making them perfect for rack pulls, barbell shrugs, bent over barbell rows, and more.
And of course, as just about every gym junkie will always note and complain about “that” lifter at the gym—you could do barbell bicep curls using a squat rack, too

The range of exercises you can do with a squat rack expands very quickly once you factor in the vast array of attachments you can use with a squat rack—lat pulldown machine, pulley system, landmine attachment, dip station, Monolift, and on and on.
The sky is truly the limit with the number of exercises you can perform with a squat rack.
How do I use a squat rack safely?
Squat racks come in a variety of shapes and designs (here is a more detailed look at the different types of squat racks).
The best one is a power rack or cage, which is the safest of them.
Power racks (the 4- and 6-upright squat racks) give you the distinct ability to be able to lift weights inside the cage, where you can place safety pins or straps to spot you while exercising.
Power racks and cages are the “safest” racks for newer lifters as you can configure the rack to catch weight if you need to ditch halfway through a set, giving you that added layer of confidence when you step under the barbell.
Here’s a quick look at how squat racks actually help you lift more safely:
J-hooks for holding the barbell
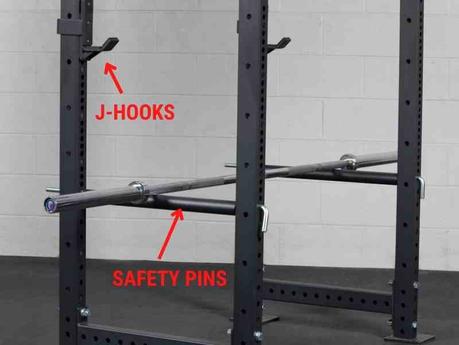
J-hooks are the little—you guessed it—hooks that are on the columns of the squat rack.
They come in a variety of hook-shapes, but they generally all have the same function: hold the barbell while you load and unload the bar.
They also keep the barbel high up off the ground so that you can step under the bar and get straight to squatting instead of picking the bar off the ground and somehow getting it behind your shoulders (it’s possible, and there are some techniques for doing this, but they come with their respective and substantial risks).
The J-hooks on squat racks can be lowered or raised on the uprights of the rack to your preference.
Set them at hip-height for doing bench press off the rack, or at shoulder height on leg day.
Some squat racks (like the one pictured below, feature Westside Hole Spacing, which gives you 2x the number of holes for maximum flexibility with bar placement).

Safety pins for catching the barbell
Safety pins are horizontal bars that you slide through or rotate onto the columns.
They are designed to catch the barbell when you fail a lift. Safety pins can also be used as an ad-hoc J-hook by setting them at a height that corresponds with where you want to start your lift, but that’s not really their primary function.
At the end of the day, they are supposed to be your last line of defense from a dropped barbell.
Even though they do this job exceptionally well, there is an even better solution on the market now that makes less noise and does a better job at absorbing the impact of dropped weight….
Spotting straps for REALLY catching the barbell
I absolutely LOVE my spotting straps.
The concept is so simple that it’s wild that these aren’t more popular in local gyms.
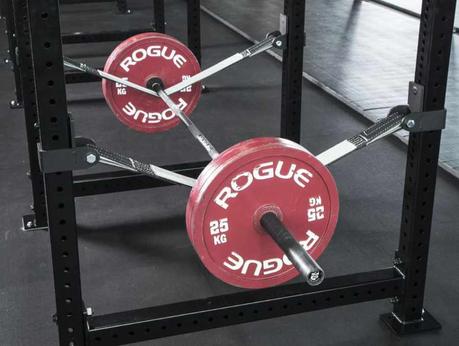
Made with super-heavy duty fabric (usually industrial-grade nylon), spotting straps can catch a metric ton of weight (Rogue’s Monster Lite Straps are rated for over 10,000lbs!), they have a couple of major advantages over pins and bars.

First, they absorb weight more effectively. Dropping the barbell into the straps won’t cause a huge clang and bang. The softer landing also absorbs the impact much better.
And second, it extends the life of your lifting equipment. Metal on metal causes damage over time, and straps mitigate almost all of this bar on bar wear and tear.
That said, spotter straps are better suited for more experienced lifters who are moving a lot of weight.
What are some alternatives to using a squat rack?
If you want to perform the standard exercises done in a squat rack—squats, bench, other presses, lunges, and so on—but want a more controlled path of the barbell and more peace of mind safety-wise, consider the Smith machine.
The Smith machine is basically a squat rack, but the barbell travels on a fixed track. Like a leg press machine, the path of the weight you are pushing is on a fixed trajectory, which is great for people new to strength training.
While you don’t get a lot of the stability benefits of pushing a free weight (which is what you are doing with a barbell while using a squat rack), a Smith machine does give you a better spot and serves as a good introduction to racks.
I’ve written a more detailed guide on the main differences between a squat rack vs Smith machine here.
Additionally, another alternative to using a squat rack is grabbing a pair of your favorite dumbbells! Especially for home-based lifters who want a weight resistance tool that has a low footprint.
Dumbbell squats, for example, are a great way to mimic the overall movement of squats without loading your back.
Dumbbells are also easy to ditch (drop) if you fail a rep, making them a safer alternative to barbell (squat rack) squats for those easing into strength training.
While squat racks have a ton of functionality, there are plenty of ways to do squats without a squat rack.
How to Set Up the Squat Rack Like a Pro (Step by Step)
Okay, to recap, here’s a step-by-step guide to using a squat rack like a champion:
- Set the J-hooks to your preferred height.
- Set safety pins/bars or spotter straps
- Add the barbell to the J-hooks.
- Load with plates (and secure with a barbell collar)
- Slide under the bar and push up the barbell off the hooks with your legs (NEVER your back)
- Take half to a full step back to give you and the weight clearance from the uprights
- Lift like a champion
- Replace bar
The Bottom Line
A lot of new lifters are hesitant to use the squat rack for fear of looking silly or being embarrassed.
Don’t be.
We were all there at some point, and the best way to get better at something is to build experience at doing it.
And now that you know the right way to use a squat rack safely and effectively, you have even less of an excuse to get your squat on in the rack.
Happy lifting!
More Squat Rack Guides


