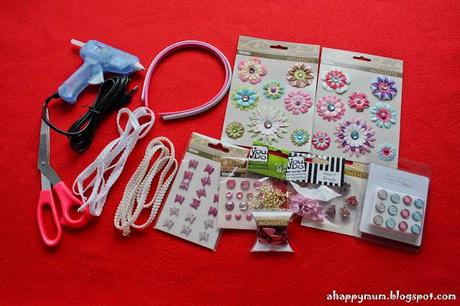
Sounds hard? Well, here's an easy way out. I decided to brad a gift for her.
If you are not sure what brads are, they are little shaped pins that come with two legs which can split to hold them in place.

Brads can come in all sorts of shapes and sizes. From hearts, stars, flowers, candies, animals, adorable baby stuff to elegant, sophisticated designs, you name it, you have it. They can also vary in textures from glazed, metallic, stitched, fabric and so on. Beautiful, ain't they? While they are mainly used for scrapbooking purposes, I guess it's up to your imagination on how else you can use these pretty little things.

So, since I had hair bands left from making the Minnie Mouse ears for Angel's birthday party, I decided to spice up these otherwise dull-looking bands and create my own designs.

What you need:
1) Assorted brads
2) Lace ribbons
3) Plain hair bands
4) Scissors
5) Glue gun (If you don't have one, you can also use a good quality all-purpose white glue)

Cut a piece of lace ribbon that is just slightly longer than the length of your hair band. It is best to use a ribbon that more or less matches the width of your band.

Visualise your design by playing around with the brads. Personally, I prefer to have a bold, striking middle piece and then add peripheral ones using the smaller brads. It's all up to your creativity! You can choose to brad the whole ribbon, on the left or right side, in the middle and so on. The good thing about brads is that you can move them around easily till you achieve the perfect look.

Once you are happy with the design, turn the ribbon around and split the pins of each brad to hold them in place. Ensure that the pins stay within the width of the ribbon so that they will not stick out.

Heat up the glue gun and start applying glue on one end. I find it easier to apply glue on a small portion of the band and stick the ribbon on as you go along so that the glue doesn't dry up. Press down firmly for 30sec and repeat till the end. Pay extra attention to places with brads as they might require more glue to hold them firmly.
 Ta-dah! You just made your very own one-of-its-kind hair band! Easy, right?
It can be a simple gift for your kid, a grown-up friend or even your mom since it's you who decides on the kind of brads and ribbons to use and you can either make it into a girly, sweet hair band or an elegant, charming one.
If you like, you can even make matching ones for you and your girl! And when someone says it's pretty and asks you where to buy it, you can go "Oh, I did these myself, quite out of this world, yeah?" when all it took you was probably at most 20mins to make them.
Have fun creating!

Hope these hair bands will help to chase away the blues, my darling!

