Creating a domain for specific business you may have to choose Google apps. Google is trusted and reliable. But recently they had shut down their free sign-up and from that
For creating a domain for specific business you may have to choose Google apps. Google is trusted and reliable. But recently they had shut down their free sign-up and from that movement onwards you will have to pay for every user account on that Google account.

We all looking for free domains specific email options you have an option to do it using cPanel. But there's another option which will help you to create free Email account ad that is ZohoMail.
Zoho mail is something you will start loving it after using its awesome features. They will give you the premium option which will provide you additional features. But if the need of this platform is for 10 users then you can go for the free version. I will be explaining the instruction to setup your domain Email address using Zohomail.
STEP BY STEP GUIDE To Creating Business Email:
It will only take 7 minutes to complete these steps and create a business email using ZohoMail. This process is very easy and reliable. You will go to free mail signup page here and you will have to enter your email address.

Just click on the add domain option and move on to next page, fill the sign-up form. You have a choice here to add any email address you want, use your nickname or anything else. You can add 9 more email address to that 10 free accounts plan.
On the other page, you will be getting confirmation about the sign up for the free lite plan. Now you have successfully signed-in.
VERIFYING DOMAIN OWNERS:
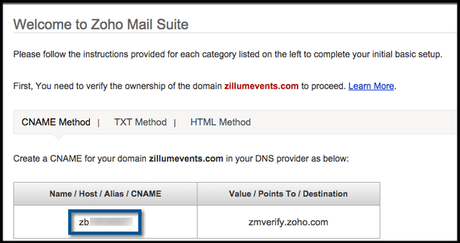
You can click on "proceed to verify domain ownership", automatically you will be taken to the page of verifying domain ownership. You have three options from now onwards:

* Cname
* TXT
* HTML file upload
The third method is most reliable, you just need to download and upload a file to your root server. The verification process of the HTML is very fastest.
You do have another option to use cPanel FTP manager on the desktop for connecting up to your web servers. At the time when you have verified your domain using any of these three methods, you will be getting success message of verifying and you need to continue to the email setup.
Also, read:
UPDATE MX RECORD:
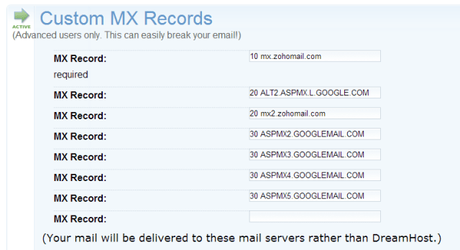
This is the most important step among the all you need to enable this for your business email is updating the MX record.
Just click on the change MX record and it will automatically show you which MX record you will be going to enable it on your website. You will do this all on Zoho domain email configuration page.
Once it is done, just go back to Zoho domain setup and finish the process. On the end, you will be on the dashboard where you can access that anytime here. Zoho will offer you a great solution in their dashboard for the business email including branding, domain and spam filter.

You may also like:
You can drop your queries in comment section and everything will be crystal cleared. Do share it on FACEBOOK and GOOGLE plus.

