TypeScript is a superset of JavaScript which compiles to plain JavaScript. Anyone with an intermediate knowledge in JavaScript knows that as the project complexity increases, the number of classes and script files increases. JavaScript differs from other languages and the OOP is done through prototypical inheritance. Lack of typing and intellisense in IDE is another problem. TypeScript solves all these and helps developers with all the things they need - typing, auto-completion etc. TypeScript came from Microsoft and thus both Visual Studio and Visual Studio Code has full support for the syntax with intellisense.
You may already have read lots of articles about how html5 is the future of web games and I am not going to put the same things that written everywhere in this post. In an older post, we've created a concentration game in phaser. That was written in pure JavaScript. We know that coding a game is not easy in JavaScript if it contains lots of classes and methods causing confusion with our own code at a later time. To know about the variables and argument types we open the class and check the implementation again. As said earlier, TypeScript solves this by providing intellisense inside supported IDEs. It is provided as a typing file for the library we use. In this article we will learn how to start html5 game development using phaser and typescript using Visual Studio Code.
Install NodeJS
TypeScript compiler runs in NodeJS environment. The first step is to install NodeJS. You can refer to the official nodejs website for that.
Offical NodeJS website: https://nodejs.org/en/download/
Next, create a folder for our game. Go inside that folder and run
npm init
This will ask some details about our project, you can ignore those by pressing the 'Enter' key for every question. It will create a package.json file inside the directory. This keeps a record of the node packages we use inside this project.
Install TypeScript
NodeJS has a package manager - npm. A node package can be installed by running the below command in a terminal. This works on Windows, Mac and Linux as long as NodeJS is installed in our system.
npm install packagename
If we install a package, it will be installed inside our project folder. Most of the time, it is enough. Sometimes we use things everywhere, for example, we don't want to install TypeScript as a local module inside our project. We will install the module globally so it will be available system wide and not exclusive for a specific project.
Install the TypeScript and TSLint modules like this.
npm install -g typescript tslint
The '-g' tells npm to install the modules globally. The tslint module is a lint package which helps us to find errors while coding.
I'm just going through the basics here to get an understanding on the required things you are not familiar of. You can always find enough information from all over the internet.
After running the above command, check if it is installed by running
tsc -v
This will show the installed TypeScript compiler version. If it does give an error about 'tsc' command not found or something like that, we need to re-install the typescript module by doing the previous step again, preferably as an administrator with root privileges.
Install Visual Studio Code
Go to the official vscode website and install it. Open it and drag our project folder to it. Now our project folder is opened and the side panel will show the files in it.
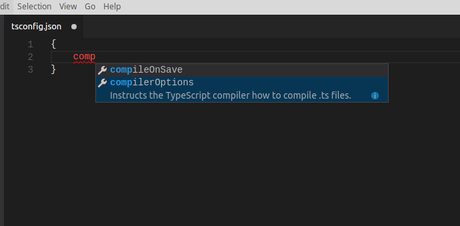
Create a new file called tsconfig.json and type this inside
{
    "compilerOptions": {
        "target": "es5",
        "outDir": "js",
        "sourceMap": true
    }
}
If you get an auto-completion for any of those parameters, then everything is perfectly working.

The tsconfig settings will tell the TypeScript compiler how to compile our code and where to put the resulting JavaScript files. You can change the directory if you want. I'd like my project structure to look like this.
project dir/
    dist/
    js/
    ts/
    assets/
    css/
    node_modules/
    index.html
    package.json
    tsconfig.json
Install Phaser Typings
We know that TypeScript provides the auto-completion and suggestions from the typings files for a library. Phaser provides the required typings files for every version released. We can use those but before that, install the typings module.
npm install -g typings
After that, install phaser typings by running
typings install github:photonstorm/phaser-ce/typescript/typings.json -GD
We need to do this step only once because these are installed globally and will work for every project.
Start developing Phaser games using TypeScript Click To Tweet
Setup VSCode Task Runner
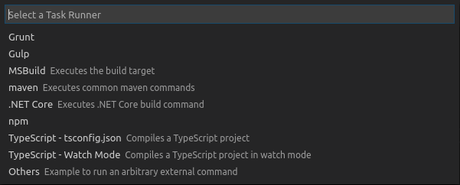
Open VSCode and press Ctrl + Shift + P, type 'task runner' and select the option 'Configure Task Runner'. Choose 'TypeScript watch mode' and hit enter. That's all, our project is now setup.

Create app.ts file inside the ts folder and type something like
var game = new Phaser.Game(400,200,Phaser.AUTO,'game');
After writing code in TS, you can press Ctrl+Shift+B to compile our TS code to plain JS. It will compile and put the JS inside our js folder.

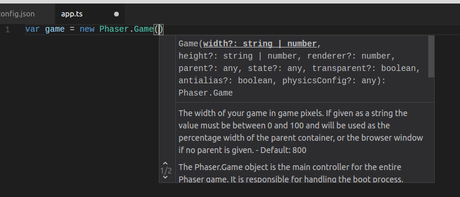
You can see it shows intellisense and autocompletion for Phaser library. That's it and we will see how to create a build automation for our project so that all required files are copied into the
That's it and in the next post, we will see how to create a build automation for our project so that all required files are copied into the dist folder as a task.
[Total: 0 Average: 0/5]
