Several weeks ago, my mother was sorting through some old family photos and found something unexpected. It was a small case with velvet lining that housed a shiny, hard photo-like image. After doing some research, we discovered that it was a daguerreotype. Daguerreotypes, popular from the early 1840s to the late 1850s, used an early photographic process to produce an image on a sheet of polished silver-plated copper. The images are shiny and almost mirror-like. And they are often housed in beautiful padded cases.
My mom and I are still trying to discover the identity of our ancestral sitter but in the meantime, we wanted to ensure the daguerreotype was stored safely to preserve the image and its case. Lucky for me, I work in the Lunder Conservation Center. Even luckier, our conservator of photography, Mirasol Estrada, was about to make an archival storage box for a daguerreotype in the museum's collection. She agreed to let me watch and document the process. If you have one of these and would like to ensure their longevity, these instructions will prove as useful to preserving your treasures, as they were to me and preserving mine.

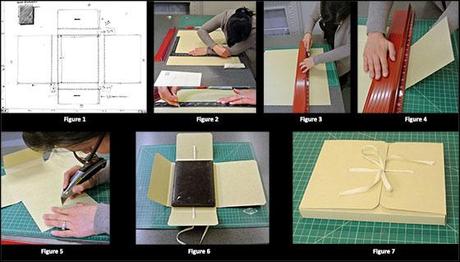
How to Make a Storage Box for Your daguerreotype (click image for larger view).
How to make an archival storage box for your daguerreotype:
Tools needed: Sketching paper, Pencil, Letter opener (or dull blade object), Square, Heavy ruler, Sharp blade (x-acto knife or utility knife is best), and a cutting surface.
Materials needed: Acid free inert mat board of approximately 1.5 mm thickness (Perma/Dur Heavy Duty Folder Stock is best) and string.
Instructions:
- Measure the dimensions of the daguerreotype (and case if you have one) on all sides. You will want to add a few millimeters to the measurement to account for bowing of the case and the thickness of the mat board.
- Record your measurements on your sketching paper with your pencil.
- Draw out the shape and dimensions of your box on your sketching paper (Figure 1).
- The left flap (flap 2) will flip over the right flap (flap 1).
- The top flap (flap 3) will flip over flap 2 and will reach half way down the front of the box.
- The bottom flap (flap 4) will also flip over flap 2 and will reach flap three in the middle of the box.
- Using your ruler, square, and letter opener, trace all your measurements and dimensions on your poster board using a dull blade, such as a letter opener. Making your impressions with a dull blade is preferable to a pencil to prevent stray graphite from getting inside the box and landing on the surface of your daguerreotype (Figure 2 and detail: Figure 2a).
- After the outside shape of your box and the fold locations have been traced with the letter opener, use your x-acto knife to cut away the additional poster material (Figure 3).
- Make the folds of the box using your ruler to ensure that they are straight (Figure 4).
- Cut a small slit in flap 3 and flap 4, where you will insert your string to tie the box closed (Figure 5).
- Slide the string through the slits in flap 3 and flap 4 and place your daguerreotype onto the central part of the box, over the string (Figure 6).
- Fold flaps 1 and 2 over the front. Fold flap 3 and 4 over the front. Finally, tie your string in a knot to secure flaps 3 and 4 - and the entirety of the box (Figure 7).
Notes:
The box will be one continual piece of mat board. The main support of the back will be the central part of the box. The right flap (flap 1) will cover the entirety of the front of the daguerreotype (ensure you include measurements for the depth of the daguerreotype).
And voilà! Your daguerreotype is protected! Be sure to safely store the box in an environmentally stable place, away from excess heat, cold, and humidity - but somewhere where you can easily access it, to show off your excellent handiwork and your personal treasure.

