My family doesn’t seem to believe that hangers and coats go together, so in each of my last three houses I have created a version of a built-in coat rack. When my first two children were young it was a four foot length hung 4′ – 6″ from the floor for independent use. As our family grew and the number of coats, hats, gloves exploded, entire walls and/or hallways were converted to efficient storage spaces.

The Design
If you don’t have a huge entry area or a designated mud room, this coat rack is perfect for use in a hallway or on a laundry room wall. I have even installed it in an enclosed passageway between a house and the garage. Add some baskets underneath for shoes and possibly on an overhead shelf (see the second design) and you have created your own mudroom.
I simply layered moldings to create an architectural style similar to a plinth over a door.

For this particular DIY project I purchased enough materials to build a 4′ rack, but you can expand this to whatever size works best in your home.
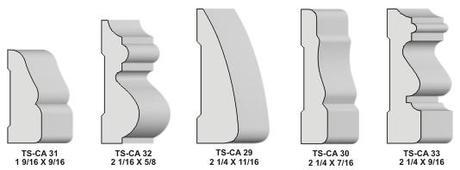
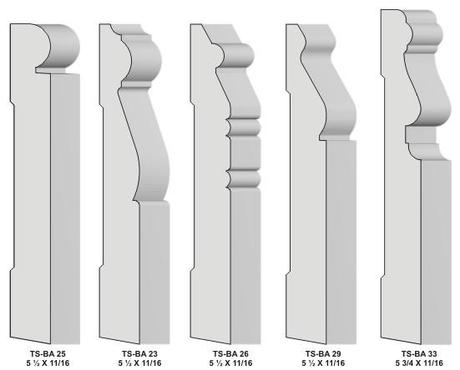
I chose a 6″ x 3/4″ primed flat stock: I used this as the board to mount the hooks and as the small shelf above. I bought a 1 – 1/2″ trim for the bottom edge and as a transition piece to the shelf. Layering the moldings at the top gives you the look of crown molding without dealing with angles and supports. I purchased a 6″ baseboard that I used upside down as part of the faux “crown molding” detail.
Then I purchased hooks. It is easiest if the hooks install with screws from the front, and most efficient if they have more than one hook to use for storing hats and scarves under the coats. In the video I suggest placing the hooks 6″-8″ apart, though in my laundry room I placed them 4″ apart. Keep in mind the closer your hooks are together the bulkier the coats become and the more they intrude into the hallway or room space. If you have a narrow hallway, don’t crowd your coat rack!
In the video I show you my completed laundry room wall with the coat rack installed, though it is a slightly different version that makes use of IKEA shelf supports and a 10″ shelf on top for baskets. I wanted to include that profile as well if this is a better solution for you.
 I installed the brackets first and then butted the baseboard and flat stock up against them in between the brackets. Watch the video to see the details of how this goes together

IKEA shelf support bracket
The Materials
This is what I purchased for the 4′ design I demonstrate on camera:
- 9 Black sturdy coat hooks
- 1-1/2″ finish nails
- 2″ wood screws
- Paintable caulk
- Semi-gloss paint to match other trim in the room
- 8′ of 6″ x 3/4″ primed flat stock
- 8′ of primed trim 1/-1/2″ high – anything similar to these moldings would work

- 4′ of 3/4″ x 2″ (this could be wider – use what you have) You will not see this wood it is simply a support piece behind the baseboard
- 4′ of 6″ high primed baseboard – something with a flat space on the thick end – anything like this would work
 For the laundry room version I purchased:
 - 10″ shelving for overhead
- 6″ primed flat stock
- A 5″ baseboard
- IKEA brackets (enough to space approximately every three feet against the wall)
- 1-1/2″ finish nails
- 2″ wood screws
- paintable caulk
- Semi-gloss paint to match other trim in the room
- Black sturdy coat hooks (enough to space 4″ apart)

The Process
If you are uncomfortable using a saw, predetermine your lengths in advance and have your trim cut at your hardware store.
This design is meant to be assembled on a wall. You should draw a level line on the wall at the height where you want to start your construction, I like to start at the bottom and build up. Then attach each piece to the wall individually, layering the pieces on top of each other and using longer finish nails as you get closer to the top. I sink screws through the flat board through a stud at least every 3 feet to keep the weight of the coats from pulling down the rack.
Once the rack is fully installed I caulk any gaps and nail holes, tape off the wall and surrounding trim and cover it with two coats of a good quality semi-gloss paint.
Watch the video if you are confused about any part of this process, or comment and I will respond!
The Outcome

We have a stylish storage solution for our beach home and a decorative element that ads some architectural interest to a previously tragic laundry room. I’ll take you on a tour of the entire laundry room makeover in an upcoming MESS to Yes video.
The Budget
$6.76 Baseboard – $1.69 per foot
$4.07 Flatstock – 8′ length
$4.31 Trim – 8′ length
$3.49 3/4″ x 2″ unfinished wood – sold as a 4′ length
$29.89 7 hooks – $4.27
$0.00 Semi-gloss paint to match (I already owned the paint)
$0.00 Wood screws (only need a couple – use whatever screws you have on hand)
$3.47 Trim nails
TOTAL: $51.99

This project was Week 2: we will be adding a new video to our YES Spaces DIY page every Thursday for the next 51 weeks! And based on your input we will have directions, measurements and plans here every week as well. So be sure to subscribe here and over on YouTube so you don’t miss anything! I am currently cooking up all the projects and simultaneously pulling together our MESS to YES makeover schedule for the year so if you have projects or spaces you are struggling with and would like some inspiration let me know and I will try to tackle as many as I can here this year.

If you want a beautiful, artistic home contact YES Spaces today! I would love to talk to you about your family and your space!
Visit our YES Spaces DIY channel to see videos of other family friendly projects!
Connect with us on Facebook for the “How To” behind some of today’s most popular design ideas!
View our Pinterest Boards for my curated design inspiration!

 For the laundry room version I purchased:
