 Growing up in the South, I had never heard of a cookie table. While the concept is easy enough to understand, the exact meaning of the term is harder to grasp until you come face to face with the cookie table itself. With acres of baked treats, it is truly a wonder to behold. These magnificent collections of delicacies are most often seen at weddings, but can also be found at anniversary celebrations, graduations, baptisms and funeral receptions.
Growing up in Youngstown, Ohio where the custom is said to have originated, Dom recalls cookie tables at family weddings that took all day to set up. Thousands of cookies all carefully arranged on platters each one more extravagant than the next. The custom dates back to the immigrant families (Italian, Eastern Europeans and Greeks) who worked in the steel mills and could not afford a wedding cake.
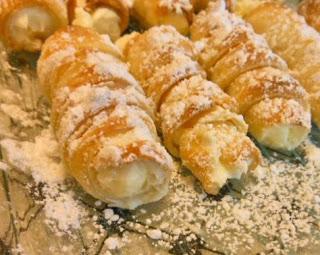
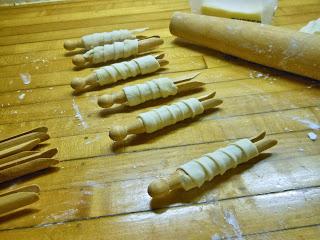
While the bride’s (extended; sometimes very) family does most of the baking, everyone is welcome to contribute. The obvious favorite is the buttery Italian wedding cookie, dusted with powdered sugar followed closely by pizzelles, flat wafers, round and lacy like a snowflake, with a whisper of anise or almond. Then there are the clothespin cookies (also called ladylocks because of their beautiful, spiral shape), flaky pastry horns formed by wrapping pastry dough around a wooden clothespin which is removed after baking and filled with a silky cream filling.
Each Christmas, Dom’s Aunt Phyll would make clothespin cookies which were reputed to be light as a feather with a crisp shell that would explode and then disappear to reveal a fluffy crème-filled center. Unfortunately, Aunt Phyll’s recipe was lost, but after many years of searching and experimenting, we think we have found a reasonable replacement for the missing heirloom recipe.

For the dough:
1 lb. butter
3 egg yolks
1 cup sour cream
4 cups flour
¼ teaspoon salt
Preheat oven to 425 Degrees F. Mix butter and flour together in a large bowl. Add eggs and sour cream, and then beat until smooth. Chill the dough overnight. Roll the dough on floured board and using a pizza cutter, cut into 1-inch wide and 6-inch long strips. Wrap the dough onto clothespins or rods and bake for 10 to 12 minutes; the crust should be light brown. Let cool on a rack until completely cooled. Gently remove the tubes from the clothespins and set aside.
 For the filling:
1 cup butter
2 cup powdered sugar
1 cup marshmallow crème
1 teaspoon vanilla
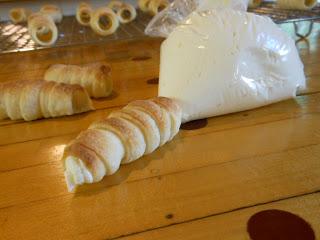
The filling can be made while the cookies are cooling. Cream together butter and sugar with an electric mixer until fluffy. Blend in marshmallow crème until completely combined. Scoop the filling into a Ziploc bag or pastry bag and refrigerate until cookies are cooled and ready to be filled. Chilling the filling before use makes it easier to handle.
Once the cookies and filling have cooled, snip of the end of the Ziploc bag and insert into one end of the first cookie and gently squeeze filling into the tube. Once filled, set aside and fill each of the remaining cookies. If you are not serving them immediately, store them in the refrigerator and take out about 30 minutes before serving. Arrange them on a serving platter and dust with confectioner’s sugar.


posted on 24 January at 02:55
I made these cookie for Christmas Very good