Do you feel that the photo print looks different from what you see in your computer display  ? If yes, then it can because of two reasons. Firstly, you will be using an uncalibrated monitor. Secondly, the color profile of the image is not matching with the color profile of the printer
  and the photo paper type. In this article, I will teach you how to do soft proofing in Lightroom for better prints
  . So, I will be addressing the second issue here.
What is Soft Proofing?
Before getting into Lightroom Soft proofing, let us understand, what is Soft Proofing?
Soft proofing is a technique that allows you to see how your actual photo print will look on your computer monitor. The actual print quality is dependent on many things like printing medium, printer ink, and printer color profile.
So, if you do a soft proofing before taking prints, you can avoid unnecessary paper and printer ink wastage. It helps to improve your printing efficiency.
Most of the photographers use Adobe Lightroom for image editing. So, you can add the Lightroom Soft proofing feature in your printing workflow for perfect prints.


 How to do Soft Proofing in Lightroom?

Now, I will explain the Lightroom Soft Proofing process in detail.
1. Image Import 

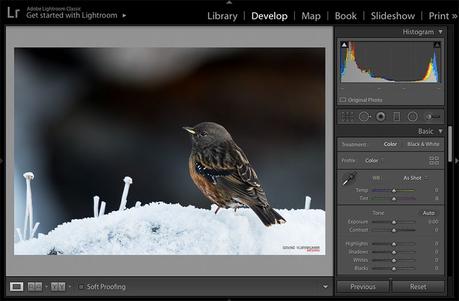
First, Open Adobe Lightroom. Import the image which you want to print. The picture will be in the Library folder after importing. Now, hit “D” to take the photo to Develop module.
2. Soft Proofing Process
Here, I am assuming that you have completed all your image edits before proceeding to the soft proofing process.
2.1 Initial Settings

You can see the “Soft Proofing” option in the bottom toolbar in the Develop module. If you do not see this option, then you need to enable it.
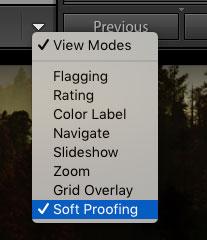
Click on the Dropdown arrow at the right corner of this toolbar.
Now you can see the “Soft Proofing” option in that list. Select it to view the soft proofing option in the toolbar.
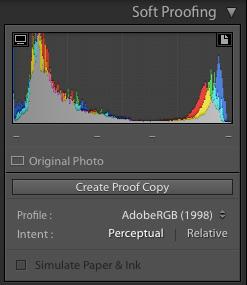
Now, select the “Soft Proofing” option to see the proof copy option in the right-side window. It will be below the Image Histogram.
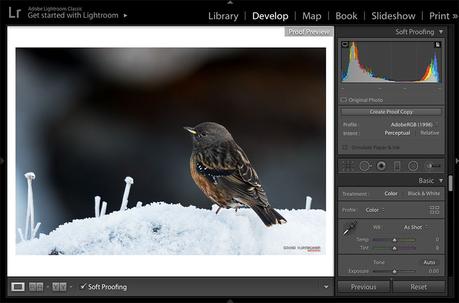
When you select it, you can see that the background color in the image preview window changes from Grey to white. There will be no change in background color if you have already set the default background color to white.
2.2 Profile Selection
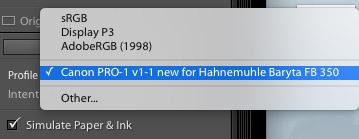
The first setting is the Profile selection. Here, you can choose the color profile to match the printer model and the paper type. I have selected the Canon Pro-1 printer color profile for Hahnemuhle Baryta FB 350 paper. I have downloaded this color profile from Canon.
If you have already installed the printer software, then you can easily select the appropriate color profile from the dropdown menu for popular photo papers. Otherwise, you need to add the color profile manually to the Library files. If you are using any particular type of paper, then you need to add it manually. You can easily download the color profiles for free from the Printer website.
NOTE: If you are using Mac OS, then download the specific color profile from the printer website. Copy the file to Library>ColorSync>Profiles folder. If you are doing this process while the image is open in Lightroom, then you will have to restart the Lightroom to see the copied color profiles.
2.3 Intent: Perceptual Vs Relative
Next comes the “Intent” option. This setting confuses 
“Perceptual” is to preserve “Out of Gamut” details. But it can change the In-gamut details. I will explain the meaning of Out of Gamut. Commercial printing uses CMYK colors, whereas photo editing software uses RGB color space. So, “Out of Gamut” refers to the RGB color range which CMYK cannot produce. From my experience, if you have a color-saturated photo, then Perceptual works good.
“Relative” maintains color accuracy. But, clips out of Gamut details in the picture. Relative tries to match the source color space to the destination color space, which is of the printer and photo medium combination. So, it results in the clipping of some colors. I use the Relative setting for more than 80% of my images.
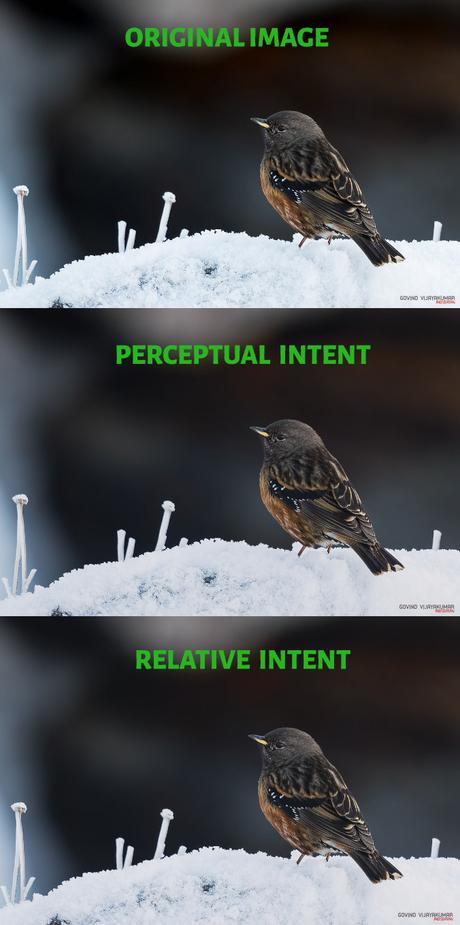
So, now you may be confused to make the right choice. If you are a beginner, then I recommend applying both to see the change for yourself for a better understanding.
You can see the effect of Perceptual and Relative on the picture only when you tick the “Simulate Paper and Ink” checkbox. You can see the difference between the Actual picture Vs Perceptual Vs Relative proof copies above. I have not made any edits to the proof copies. Here, in the proof copies, the picture has become slightly soft and underexposed. So, I need to fine-tune the image for printing.
2.4 Paper and Ink Simulation
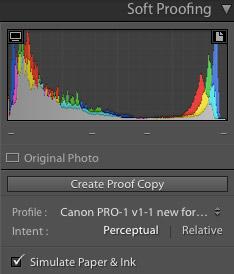
Once the settings are complete, click the “Simulate Paper and Ink” checkbox to preview the soft proof copy.
Now, you will get an idea, how your image will look in print for that particular type of photo paper and printer. It is how you simulate a photo print.
Now, you can make the necessary edits to make the soft proof copy look like the original fully edited image.
2.5 Proof Copy Creation for Prints
You can click on the “Create Proof Copy” button to make a soft proof copy of the image.

If you don’t click this button and try to make any edits, then you will get a pop-up. You can select the “Create Proof Copy” option here. Don’t go for the “Make this a Proof” choice. It will overwrite your original image settings
Thus, you can keep two separate versions of the photo 
I recommend doing this way because when you change the printer or the type of paper, you have to create another proof copy with the new profile and settings. So, the actual remains untouched.


Conclusion
So, next time, when you are printing your images at home, do soft proofing in Lightroom and make the necessary edits for perfect prints 
You can also do the same with an external printing house. You can ask them to share their printer color profile for the respective photo paper and load it in the color profiles section.

