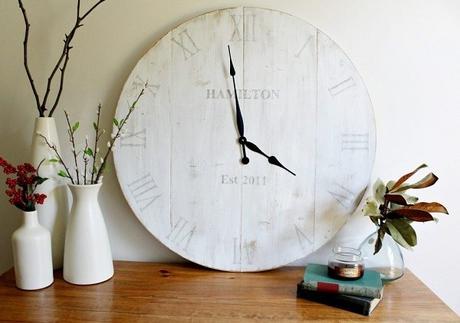
When you aren’t looking at your phone, you are still going to need to know what time it is. Instead of relying on the digital clock on the microwave or stove, how about trying your hand at making a DIY wall clock?
Yeah, you could always go to the store and purchase a clock, but this is your chance to give your space a personalized look with a homemade clock! Want to know what the best part is? Making your own clock is incredibly easy! We’ll tell you how!

How To Make A DIY Wall Clock
The first thing you’ll need when attempting to create a DIY clock is a clock mechanism. You’ll want to do a little research before purchasing any old kit. WE recommend going with a battery powered Quartex-branded movements as opposed to an electrical movement.
The battery powered mechanisms will give you the ability to move the clock wherever you wantwithout worrying about being near a plug (or trying to conceal the wire).
For this guide, we are going to walk you through the steps on how to make a DIY spool clock, but you can use these steps to turn just about anything into a clock.
Materials And Tools
For this project you will need:
- Drill
- Miter Saw
- Kreg Jig for drilling pocket holes (option)
- Large Clamps
- Router and Straight Bit
- Jig Saw
Materials:
- Two 1 x 10 x 8 inch boards
- Wood Glue
- 1 1/4” pocket hole screws (optional)
- Stain (whatever color)
- Paint (whatever color)
- Sandpaper
- Large Clock hands
- High Torque Clock Movement
Step 1: Making Your DIY Wall Clock Dial
First, you are going to want to cut four 1 x 10 inch boards slightly longer than you want the diameter of your clock. So if you want your clock to be about 34 inches in diameter, you will want to cut your wood to 36 inches long.
If you are confident with power tools, you can use a Kreg jig to create 3/4 inch pocket holes and 1 1/4” pocket hole screws to attach the boards together. Otherwise, you can simply glue the wooden boards together and clamp them together so the boards are secure.
Step 2: Creating A Circle
Once the boards have dried, you will want to draw a circle (or any other shape if you’d prefer something a little more fun) on the board and then cut it out with your jig saw. After the circle has been cut out, you will want to use sand paper to smooth the surface and the edges.
Step 3: Apply Paint Or Stain
This is where you can let your creativity shine. If you want a classic look, you can stain it whatever color compliments the colors in the room where the clock is going to go. You can do the same with paint. If you want to make something really artsy, you can use painter’s tape and tape off designs.
If you want your clock to have a little distressing, you can stain the circle first, let it dry, and then dry brush a white or an off white paint on top. Then you’ll want to use some sandpaper to remove some of the paint in some areas.
Step 4: Adding Numbers
Depending on the look you are going for, you can either use stencils to paint the numbers or Roman numerals on your clock. Your numbers should be about 3 inches tall. If you are creating your own stencils, you will want to mirror your numbers before printing.
When laying the stencil down, you want to make sure the numbers are in the right placements. You will want to use a speed square and a straight edge to make sure there are 30 degrees between each number.
You can drill a small hole in the center of the clock as a reference point and line the straight edge of the speed square. From there, use a pencil to mark the 30, 60, and 90 degree marks on the square.
Next, you will want to use the straight edge and line up the center hole to the mark. The line should be in the center of your number. You can tape the stencil in place with painters tape. Continue doing this process until all the numbers have been laid.
Step 5: Create A Hole For The Clock Movement
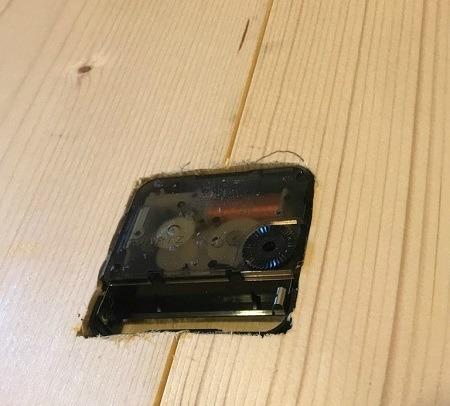
Flip your clock over and drill a larger hole in the center of the clock. This is going to hold the clock movement’s shaft. Place the shaft in the hole and then trace around it. Next, place the straight bit in the router and set the depth on the router to the thickness of your movement (typically about 1/2 inch). Cut out the shape. Then place the clock movement in the hole to ensure a good fit.

Step 6: Add The Clock Hands
The easiest part is just adding the clock hands as per the instructions for the clock movement. Once the hands are in place, you can set the time and enjoy your new clock! There’s usually a hook on the clock movement, but you could also prop the clock against the wall.
Conclusion
Creating a DIY wall clock is incredibly easy – especially if you already have the power tools on hand. If you don’t, most hardware stores will rent them if you need them (just inquire beforehand).
The beauty of making a homemade clock is that you can personalize it to suit the decor in your room. Your clock can be however you want it to be. The best part is, you can turn almost anything into a clock!
Resources:
WoodshopDiaries
DIYNetwork
