Do you want to use your laptop as a second monitor? Have no idea how to do it and need help to setting it up? If yes, then this guide is just for you, here I will show you one of the easiest method step by step. So, follow them to use your laptop as a secondary screen!
Before you know this thing there are many of you might be thinking that can we use a laptop as a second monitor but now your this doubt is clear. Using an external monitor for your work is pretty useful for boost your productivity. And the important thing is that it save your money also instead of buying a new monitor for using as an external monitor.
It is a very easy process and Here I have tried to show you each and every step so you can do that easily. For doing this, it doesn’t require any technical skills in you. However, if you have a basic idea about the system then it would be great.
Again, one question may be arises in your mind which is that for doing this we’ll need any HDMI cable? Well, the answer for this question is NO. Because the HDMI or Display port which comes with the laptop that only works for providing its output to the display and not the input.
Then how it works? So, to work your laptop’s display perfectly as a monitor it only requires Windows built in feature which is called “Miracast”. There is an another method also, by using third party software but when you do this thing with its in-built feature why you need to use any other software.
So, let’s get started, without further ado.
How To Use Your Laptop as a Second Monitor?
Here’s how you can use your laptop screen as a secondary display by using an in built Miracast feature of Windows which is available in the latest Windows operating system 10 and 11.
Step 1: Click on the Start Menu and then go to Settings (Gear Icon).
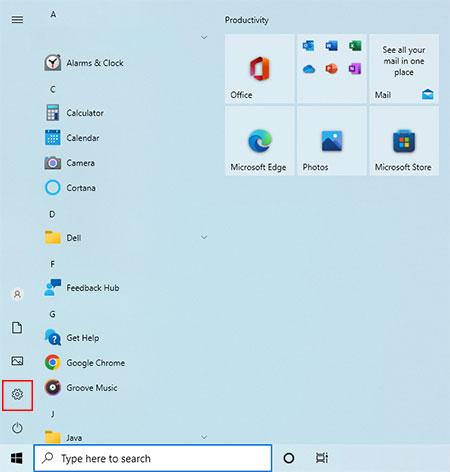
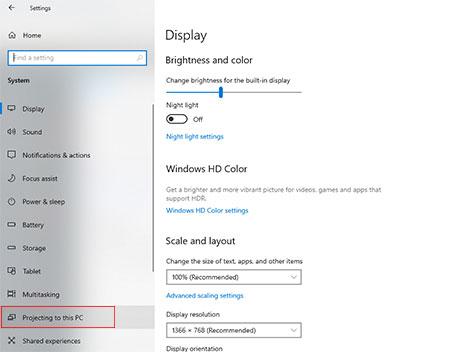
Step 2: On the settings page find the System and click on it.
Step 3: Now, you can see “Projecting to this PC” on the left hand side select that.
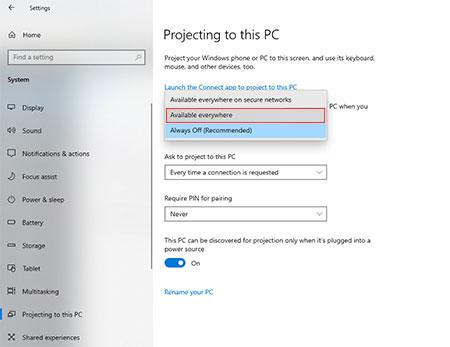
Step 4: To use this laptop as a monitor, just change the “Always Off” option to “Available Everywhere“.
If that option is disabled on your laptop then don’t worry. Just click on the “Optional features” which is placed below “Add the Wireless Display optional feature to project to this PC“.
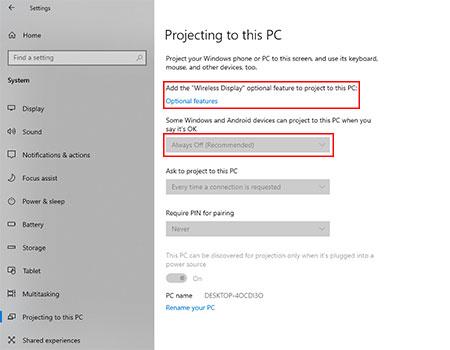
Now click on “Add a feature”.
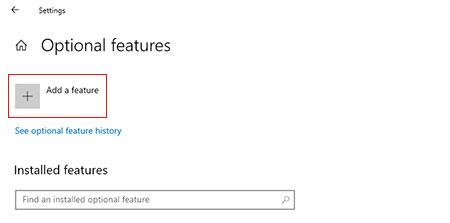
Once you click on that, a popup will appear on your screen where you need to type “Wireless Display” in the search option, check that box and click on the Install button.
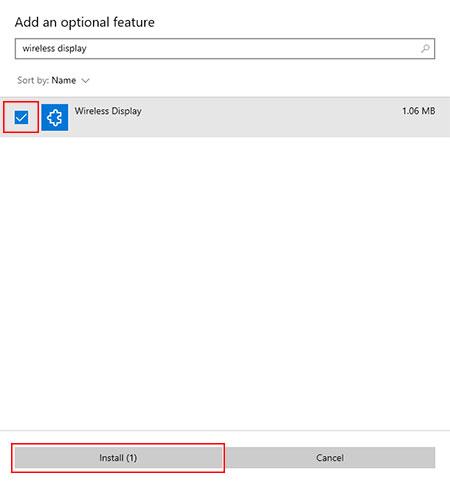
After the installation, it allows you to change from “Always Off” option to “Available Everywhere“.
These are the only setting that you need to do on your laptop to make it compatible and allow to use as a secondary screen.
Now, we need to do some settings on the main PC which we will use as a main screen.
Step 1: Click on the Notification icon on the right hand side of the taskbar.
Step 2: Now, you can see connect button just click on it.
Step 3: After that, your main PC will show you all the available devices, so now you need to select the name of your laptop.
Step 4: Once you complete the previous step, your laptop gets a notification to accept a connection request, simply accept it.
Step 5: Again, you have to come on the main PC and need to right click on the desktop home screen where you can find the “Display Settings” just click on it.
Step 6: On that page, you have to change the “Multiple Displays” option to “Extend desktop to this display”.
Step 7: Finally, all the settings are done and now you can use your laptop as a second monitor or external display.
Final Verdict
So, these are some basic steps to use your laptop as a secondary screen and I hope that all the steps which I have mentioned it would be easy for you to understand. You just have to simply follow the processor step by step and it will be done. If this article works for your then share this post with your friends on your social media profiles.
