Are you a PC user who's been wondering how to use System Restore on Windows 10? Keep reading this post to find out how! Step-by-step guide on How to Use System Restore in Windows 10, 8 and 7
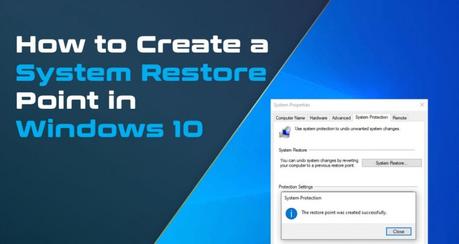
Because the process of making changes to your PC might not always work out as planned, it's probably a good idea for you to have a handy tool that can return your Windows OS to its previous working condition.
On the Windows 10 OS, the System Restore feature was developed to capture a form of snapshot for saving the state of your computer program, its driver configuration, and the software registry during specific points in time from where they can easily be restored.
These "restore points" can be accessed whenever significant changes are detected within your system.
Even if critical issues arise after modifying system settings incorrectly or installing a dodgy driver or app updates, you can still go ahead and use a System Restore point to return to the previous settings on your device to resolve any problems without losing your data.
Are you a PC user who's been wondering how to use System Restore on Windows 10? Keep reading this post to find out how!
Jump To:- Basic Steps to Use Windows 10 System Restore
- Creating a Windows 10 System Restore Point
- An Easy & Efficient Approach to Using Windows 10 Restore Points
- How to Use Windows 10 System Restore Point When Your PC Won't Start
Basic Steps to Use Windows 10 System Restore
Previous Windows versions weren't very successful with creating System Restore points. Luckily, the process has now been improved along with many other aspects of the OS and it could come in handy during emergencies.
But for unknown reasons, this brilliant troubleshooting tool is always disabled by default, so you must enable it before you can create any restore points or your Windows 10 system.
Here's how to set up Windows 10 System Restore on your computer:- Start by clicking on the Start button for Windows. Next, type out "Create a restore point" within the space provided on the search bar. Hit the Enter key to proceed.
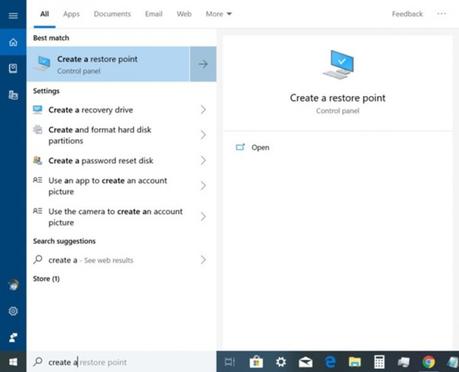
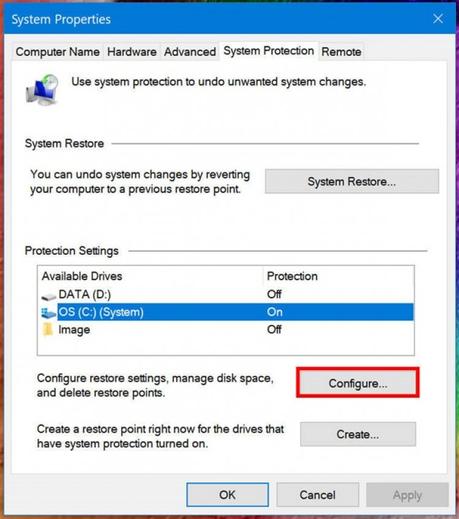
- You will then be redirected to the System Properties menu page where you will be required to indicate which system drive you want to restore i.e. (C:).
- Once this is done, you can then click on the Configure button on the lower section of the page to proceed.
- At this point, another pop-up window will appear with details of your restore point settings.
- Simply click on the 'Turn on System Protection' feature and then you can set the space-to-System Restore ratio by using the Max Usage slider.
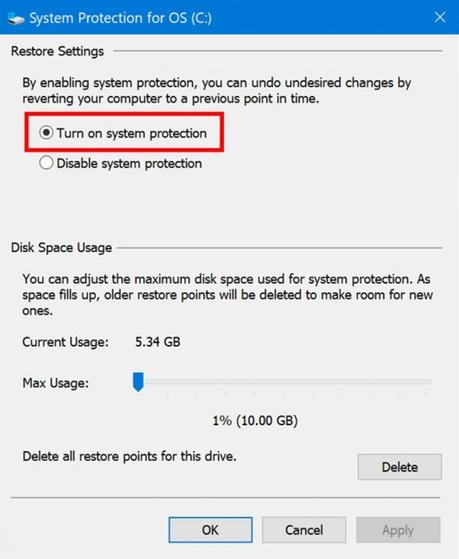
- You can now click on the Apply button to save the changes and then click OK to proceed further.
Well done! You have learned how to enable the Windows 10 System Restore feature.
We will now proceed to describe how to use System Restore on Windows 10.
Creating a Windows 10 System Restore Point
- You can start by clicking on the Windows Start button and then type out "Create a restore point" in the space provided. Press Enter afterward.
- Next, a System properties window will pop-up from where you can select the system drive that you enabled earlier.
- Once you have selected the drive, you can scroll to the bottom of the window and then click on the Create button.
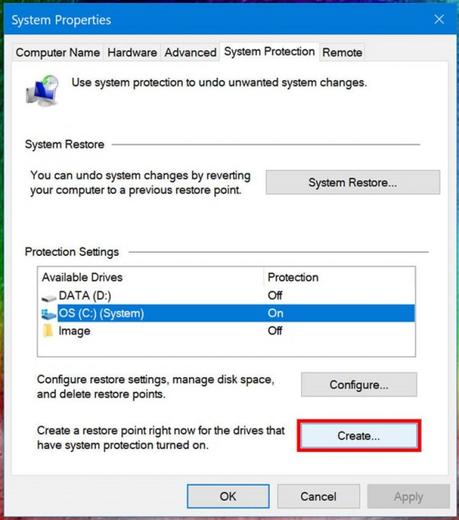
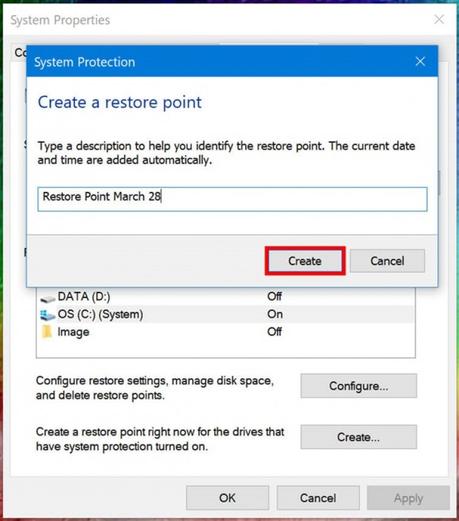
- Once this is done, the System Protection interface for your computer will appear. Go to the section for "Create a restore point" and then provide a detailed description for your System Restore point.
- Note that, if you skip this section, the system will select a default restore time & date.
- Once you are done with providing the required details, go ahead and select the Create option.
Now that we have reached the half-way point in the process, you must now be familiar with the restore feature for your system.
Here's how to use System Restore on Windows 10:
An Easy & Efficient Approach to Using Windows 10 Restore Points
- Start by clicking on the Windows Start button, and then type out "Create a restore point" within the space provided on the Search bar. Hit the Enter key afterward.
- You should now notice a different window pop-up on your screen where you can proceed to select the System Restore button that comes directly after the section for System Restore.
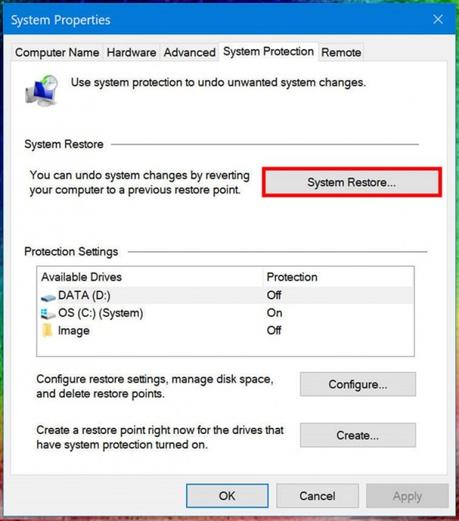
- Once this is done, the System Restore menu will appear. You can now click on "Next" so the process can move further.
- Next, you will notice a description of the previous restore point that was created. You can highlight it. Afterward, click on Next.
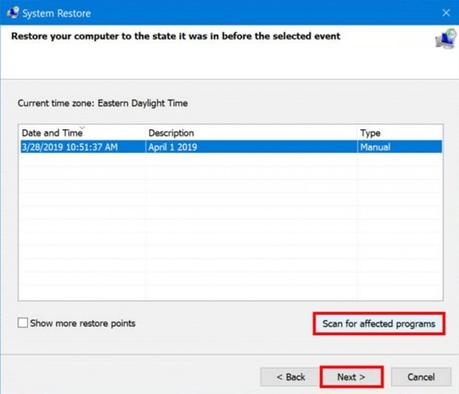
- This is the part where you get to round up the task by clicking on the Finish button.
That's it! You have now learned how to use System Restore on Windows when you have user access.
But what happens, when you don't have user access like during situations when your computer fails to start and you can't access the Windows 10 System Restore features?
Here's how to use System Restore on Windows 10 without user access:
How to Use Windows 10 System Restore Point When Your PC Won't Start
- You can start by switching your computer OFF.
- Now, switch in ON again by pressing the Power button.
- As soon as the Windows logo appears on the screen while booting, turn your computer OFF again by holding down the power button.
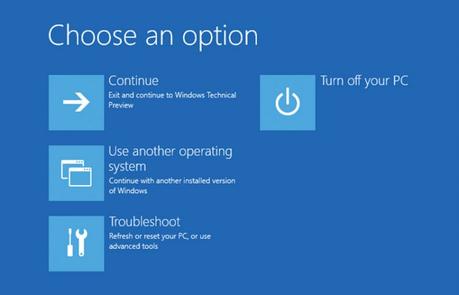
- Go ahead and repeat the steps above two more times. Afterward, the Windows recovery options for your PC should appear on your screen.
- You can now proceed to click on the Advanced Options tab after which, three additional options will appear. Select the Troubleshoot option.
- Look under the Troubleshoot section for the Advanced Options tab. When found, click on it.
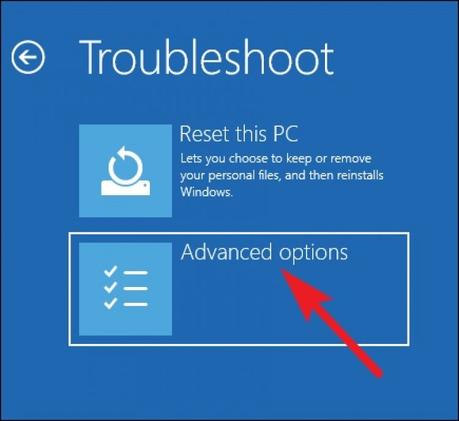
- Once this is done, you will notice more sophisticated options on your display. Go ahead and select System Restore.
- Next, you will be required to pick your account. After doing so, you can enter your password to proceed with the process.
- Afterward, you will be redirected to the System Restore screen where you can click on Next to advance to the next step.
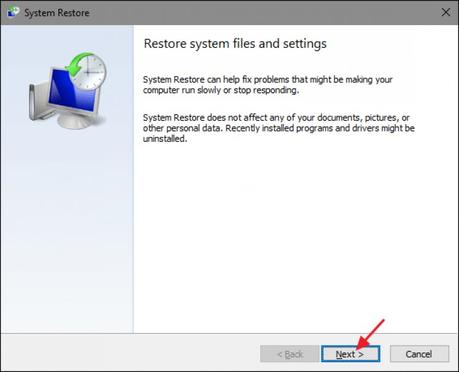
- Next, you'll notice the listed restore points on your system. Select any one of them and then click Next>Finish.
That's it! You've just learned how to use System Restore on Windows 10 without user access.
The Takeaway
Here ends our discussion on how to use System Restore on Windows 10. There are loads of other troubleshooting tips you can benefit from by bookmarking this pag
