Turing a laptop or computer into a wifi hotspot means creating a hotspot on your laptop and using it a wifi connection. By turning a laptop into a wifi hotspot, you can connect various smartphones and other smart devices to your laptop and can use it as wifi modem.
You might wonder what’s the point of the article how to turn your windows PC into a Wi-Fi hotspot? Isn’t it??
Well, to explain the need, of turning a laptop or computer into a wifi hotspot, I’ll have to make you imagine a situation.
You are in a hotel and you have been given access to the internet on a computer there. But you want to use the internet on your smartphone or laptop, you are not allowed officially for it but you want the access to the internet on your mobile at any cost.
Then the best workaround for this problem is to turn that computer into a wi-fi hotspot and use it as a wifi and connect as many devices as you want.
With this situation, you can imagine how handy this article can be! So shall we start our guide??
How To Turn Your Windows PC into a Wi-Fi Hotspot
Well turning windows into a wifi hotspot is jut a few clicks procedure. However, this can be done in other ways to0 like using a third party software or by using connectivity. But we are not going to use any third party utility or something like that.
Instead, we will we will see one of the best ways to turn your windows PC into a wireless hotspot that is Command prompt.
By using commands you can easily Turn Your Windows PC into a Wi-Fi Hotspot. Let’s check out what are those commands and how to use them in order to Turn Your Windows PC into a Wi-Fi Hotspot.
Let’s begin the tutorial and check out what command should be used and how to performs these commands to turn windows into a wifi hotspot.
The method I am going to share works in almost all the windows including, windows 7, windows 8 and windows 10. So, if you are using windows 7 or windows 8 or so, don’t think much and just follow the below steps.
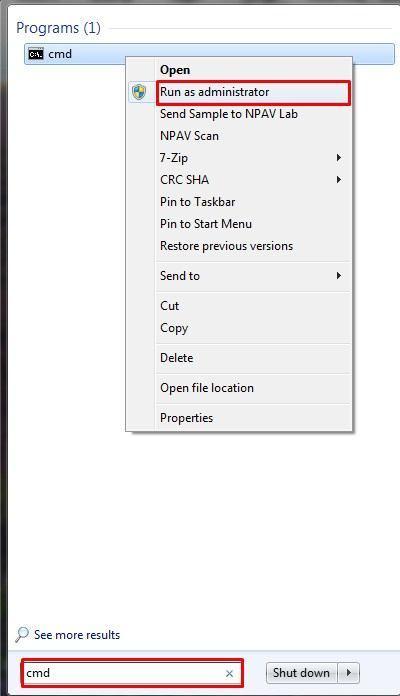
Step 1: First of all, open the windows search bar and type cmd. After that, right click on the cmd. After you click on the cmd, you will see various options, all you have to do is click on run as administrator.
Check out the screenshot provided below.
Step 2: After you click on the run as administrator, the command prompt will be opened up abruptly. Now at the command prompt, all you need to do is type a command to create a wifi hotspot.
But before that, first, check out if your computer supports hosted network or not. To do so, first, type the command “netsh wlan show drivers”. Press enter. And check the result.
If the result is like the image mentioned below, it means your system supports hosted network. And if not, then you will have to drop the plan of turning laptop into a wifi hotspot.
In other words, If the result is shown “YES”, it means your system supports hosted network. And you can turn you PC into a wifi hotspot. And if the result is No, then you can not turn your windows into a wifi hotspot.
As you can see in the above image, the result showing is Yes, So let’s move to the next step.
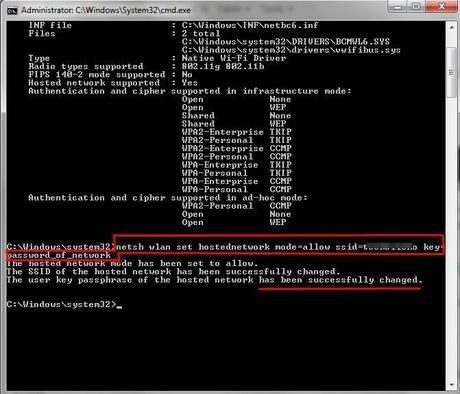
Step 3: Now as you have checked your system supporting wifi hotspot, you will have to create the network. For this type the command “netsh wlan set hostednetwork mode=allow ssid=network_name key=Password” . And press enter.
Note: Here, ssid is the name of the network you want to create. In the command, I have already mentioned it. You can type any other name you want. And Key is the password of network. Again, you can write anything. But remember it should be a minimum of 8 characters.
Check out the screenshot I have taken for you.
Step 4: After creating the network, you will need to start it. So, to start a connection type the command “netsh wlan start hostednetwork” And hit enter. Ok, once done, move to the next step.
As sooner you hit the enter button, the network you just created would go active.
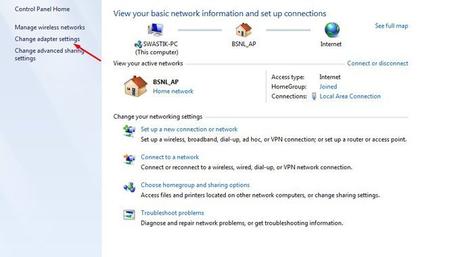
Step 5: As you have created and have started the network, its time to share the internet connection with a wi-fi hotspot. To do so, first of all, go to Open network and sharing center.
In the open network and sharing center, click on Change adapter settings. Check the screenshot mentioned below.
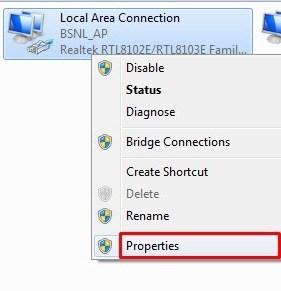
Step 6: Now, to share the internet connection with wifi hotspot right click on your main network and go to properties.
Here the network connection means the network connection which you use to connect to the internet. For instance, my network connections name is Local Area Connection. Check out the screen below.
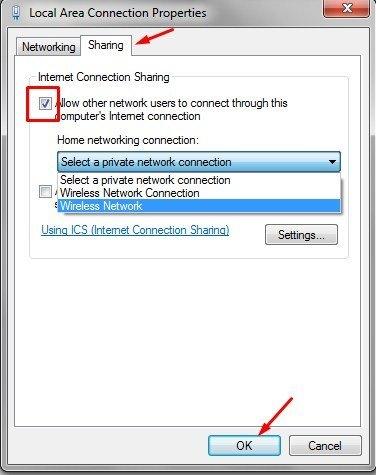
Step 7: This is the last and the most crucial step. After clicking on the properties, click on the sharing tab.
After that, in the Sharing tab, check the box “Allow other network users to connect through this computer’s network connection.
And click on the Home networking connection. Here select the wifi hotspot you just created. Click on Ok. Check out the screenshot I have mentioned below, if you didn’t get what I meant.
That’s it!! After you are done and have clicked on Ok, your laptop or PC will turn into a wifi hotspot immediately.
Now you can connect as many devices as you want to the network.
This is how to turn your windows PC into a Wi-Fi hotspot. Assuming you have got all the steps clearing. wrapping up the article. In case, of any confusion do drop your comment in the comment section below.
However, I have described each and every step thoroughly, so there should not be any confusion, but in case if there is any don’t hesitate to ask.

