Are You Looking For The Best Methods On How To Stop Automatic Updates On Windows 10? Here We have Listed 4 Best Methods for you to Disable/Turn Off Windows 10 Updates Easily.
Looks like you've finally decided to disable Windows 10 updates on your computer.
Welcome to the latest in our series of troubleshooting guides where we will be turning our attention to proven methods you can use to turn OFF Windows 10 updates.
Windows 10 updates come with certain fixes for critical system issues hence installing them is an essential part of maintaining your PC's overall wellbeing.
But sometimes, the way these Windows 10 system updates are handled has caused a lot of controversy amongst users.
Cumulative system updates are automatically installed whenever the Windows program decides to do so and this can lead to forced restarts of your computer at inappropriate times which can be quite frustrating for users of the OS.
Moreover, a program that you use frequently might not be supported by the latest Windows update.
Also read: How To Use System Restore In Windows 10
There are several other reasons why anyone would want to disable Windows 10 updates temporarily until a more suitable time.
So how to stop Windows 10 updates? We will describe proven methods right here in this DIY guide:
How to Turn OFF Windows 10 Updates

In this next section of our guide on how to stop Windows 10 updates, we have described four proven methods anyone can use to temporarily disable this feature.
1. Stop the Update Service for Windows 10
The Microsoft update service for Windows 10 is an essential feature that can be disabled temporarily by the user.
Here's how:- Start by clicking on the Win+R keyboard keys to launch the Run command prompt.
- Next, type out 'services.msc' within the space provided in the Run command box. Hit Enter afterward.
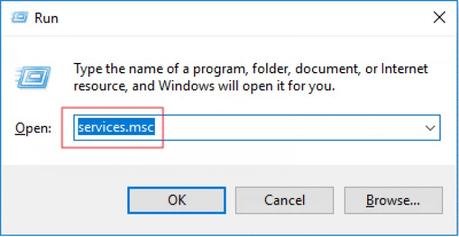
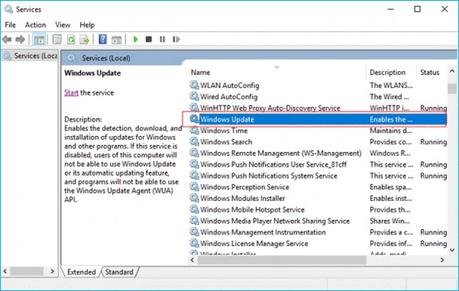
- Once this is done, you will be redirected to a Windows Services menu where you can look out for the Windows 10 Update Service.
- Once found, you can double-click on it to access the properties page for the Windows Update Service.
- You will then be taken to the Windows Startup type section from where you can select Disable from the options listed on the drop-down menu.
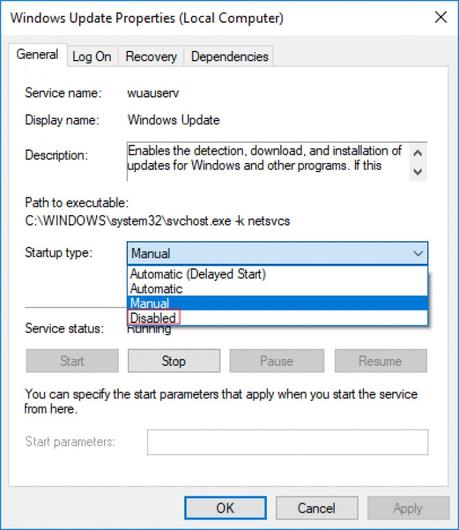
- Once you've completed the task described above, you can click on Apply>OK.
- You can exit the window afterward.
That's it! You've just learned how to stop Windows 10 updates by disabling the service.
2. Using the Group Policy Editor to Disable Windows 10 Updates
The Group Policy Editor can best be described as a unique tool that was developed for use on the Windows 10 Professional version.
Sadly, it is not supported by the Windows 10 Home user edition.
Are you a user of the Windows 10 Pro version? If yes, then the Group Editor Policy is available to assist you with switching OFF automatic Windows updates on your computer.
For users of the Windows 10 Home edition, you get to turn OFF automatic system updates by applying the Registry method we've described below:
- You can start by clicking on the Windows Start icon and then typing out "Group Policy Editor" within the space provided on the search box. Hit Enter afterward.
- You will then notice a pop-up window on the left-side panel, where you'll find a Computer Configuration feature. Go ahead and double click on it.
- Afterward, three different options will appear on your screen. You can go for the Administrative Template option and then double-click on it afterward.
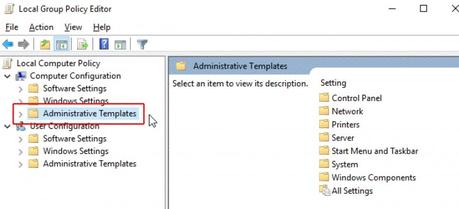
- You will come across various options you can use under the Administrative Template section; you can select Windows Components by double-clicking on it.
- While still on the Windows Components menu, you will find lots of folders. You only have to look out for the Windows Update folder located somewhere at the bottom of the page.
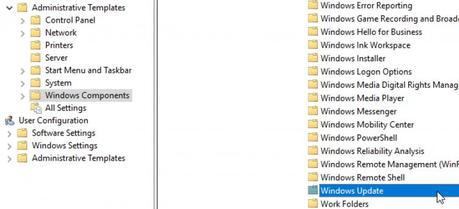
- Go ahead and select the Windows Update feature by clicking on it where you'll notice a few more files on the right-sided page panel.
- You can now select the Configure Automatic Updates option that's also located on the right-sided panel by double-clicking on it.
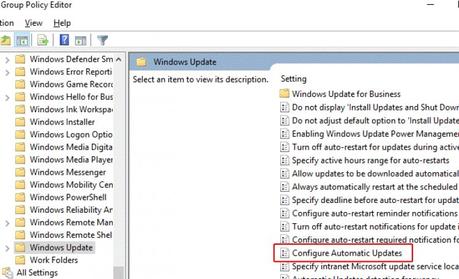
- Afterward, you will be redirected to a different pop-up window from where you can click on the Disable button. You can then click on the Apply button to save these changes.
- Next, click OK and you can exit the window.
That's it! You've just learned how to stop Windows 10 updates by using the Group Policy Editor.
Don't Miss: How to the Fix 'DNS Server Not Responding' Error on Windows and Mac
3. Using the Registry Tool to Turn OFF Windows 10 Updates
- You can start by launching the Run command prompt by pressing the Win+R keyboard keys.
- Afterward, type out "regedit" within the space provided in the command box and then you can hit Enter or click OK.
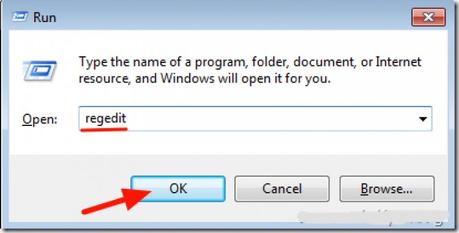
- Once this is done, the Windows Registry menu will launch. This is where you get to double-click on the Computer icon to access some more options.
- You can now select the HKEY_LOCAL_MACHINE command by double-clicking on it.
- Afterward, you will be presented with several other user options. Proceed to the SOFTWARE tab and then you can click on the arrow icon located alongside it.
- Next, you may scroll down to the bottom of the page while looking out for the Policies section. Once found, you can double-click on it for access to additional system folders.
- Click on Microsoft followed by the arrow key you'll find alongside it.
- Once this is done, you can expect to receive more folder options. Now you can click on Windows.
- Thereafter, you'll notice a bunch of system folders as you scroll to the bottom of the page to find the Windows Update section.
- You may now proceed to select the Windows Update tab and then you can choose a Key by right-clicking on it followed by the "New" option from the subsequent drop-down menu.
- You should now assign the new key with the name "Windows Update" and then you can hit Enter.
- Once this is done, you can then right-click on the key that was newly created and then click on "New" from the list of options on the drop-down menu and then from the next list that appears, click on Key.
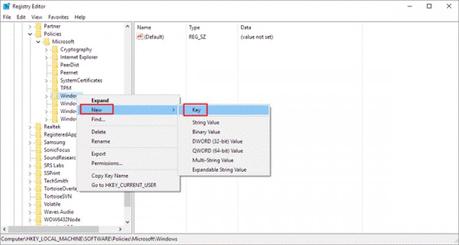
- You can now name the new key "AU" and then hit Enter.
- Once this is done, you can select the "AU" key by right-clicking on it. Next, you can go ahead and click on DWORD (32-bit) Value>New from the subsequent drop-down menu.
- Thereafter, you can navigate to the right-sided panel which consists of the AU keys feature. This is where you get to select the key that was just created and then open a new window by double-clicking on it.
- On the new window that pops-up, you will come across a section for Value Data. This is where you get to input the value "2".
- Once the value has been entered, you can proceed to click 'OK' and then exit the Registry window afterward.
This is how to stop Windows 10 updates permanently on your computer.
4. How to Stop Windows 10 Updates by Using the Metered Connection Feature
Perhaps you're using a Wifi connection for your computer; you'll be pleased to know that the Windows 10 Metered Connection feature can be used to disable automatic updates.
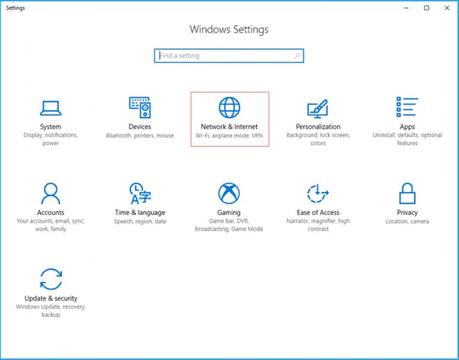
Here's how:- Start by pressing the Win+I keyboard keys to launch the Windows Settings page.
- While on the Settings menu, you'll be presented with several user options. For this process, you only need the Network & Internet feature.
- You can now look to the left-side panel, where you'll find the Wifi option. Go ahead and click on it.
- This action will launch the Wifi menu along with a management feature for known networks. You can click on it too.
- Next, you will be presented with the listed computer networks available. Once you have identified and selected the one you're using, you can click on the Properties icon.
- You can now proceed to the section for the Metered network connection and then switch the power button to the ON position.
Wrapping Up
That's it for our DIY guide on how to stop Windows 10 updates.
You can always check back here for more effective troubleshooting tips for your Windows 7/8/10 sy
