Are you annoyed by the automatic updates on your device? Do you want to get rid of these because it unnecessarily eats up your device memory and data pack? If these questions hold truth for you then you are certainly at the right place.
In this article we will tell you how to stop automatic updates in easy and simple steps. So, let’s get started with this.
Also, we will tell you how to stop automatic updates in android, iOS, Windows phone and in Windows 7.
How to Stop Automatic Updates
Before we begin delving deeper into the topic, let us first take a quick glance at the Operating Systems that are being covered in today’s topic! First up we have Android, followed by Windows and iOS. On the desktop side of things we have Windows 7. With that said, let’s get right into the article!
#1. How to Turn Off Automatic Updates in Android?

In order to turn off automatic updates in your android phone, you need not to install any third party application. You can easily do so by using the play store. In this section we will show you how you can do so.
Step #1: In order to disable automatic updates in Android you will first have to visit your Play Store. You can do so by navigating for the Play Store icon on your android phone. Once found, you have to tap on it in order to open it. Tapping on it will open the play store for you.
Step #2: Now in this step, you are required to locate for the menu of Play Store which is usually positioned at the top left corner of your play store screen. Alternatively, you can access it by swiping from the left corner of the screen.
By doing the required, a menu will appear in your screen. This is exactly what we are looking for.
Step #3: Now, in the menu you have to locate for the “Settings” option. Once found, all what you have to do is to tap on it.

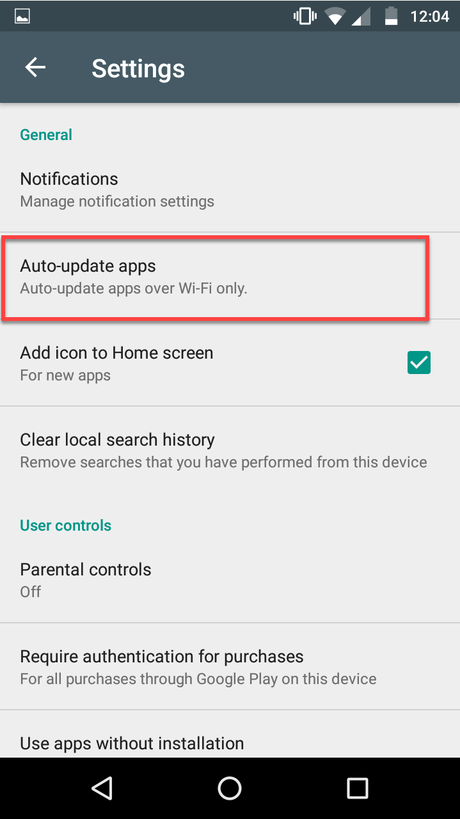
Step #4: Once you are done with the previous step then as a result of that the settings window will open up. Now, in the settings section, you are required to locate for “Auto update apps” which will be filed under the general tab. Once found, you need to tap on it.

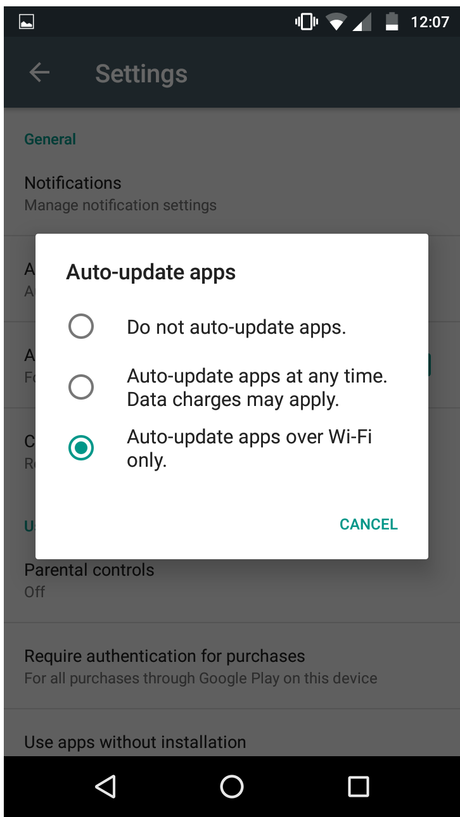
Step #5: As the result of the previous step, a pop up window will appear in your screen which will have the related options for automatic updates. Now, in order to turn off automatic updates in Android, you are required to tap on “Do not auto-update apps” option. This will activate the corresponding radio button and this way you can easily turn off automatic updates in your android smartphone.

Additionally, if you want to turn off automatic updates for some specific application then you can easily do so by going to the desired application page on the Google play store and then tapping on the three vertical dots like icon which is usually positioned at the top right corner of the window. After that, you have to check auto update apps section. Under this you will have to tap on the corresponding radio button next to the “Do not auto-update apps” option. Whoa, you just turned off automatic updates for the specific application.
#2. How to Turn Off Automatic Updates in Windows Phone 8.1?

You can easily disable automatic updates in windows phone 8.1. In order to disable automatic updates in windows phone 8.1 all what you require is to open the “store” and then tap on the three horizontal dots like icon which will be positioned at the bottom right of the screen. Now, you have to tap on “Settings” option.
Under the settings section you have to tap the switch corresponding to the “Update apps automatically” in order to turn automatic updates on and off.
Yeah, this is all what you need to disable automatic updates in windows phone 8.1.
#3. How to Turn Off Automatic Updates in iOS?

For disabling automatic updates in iOS, we first have to go to Settings and then iTunes and app store. Once you have done the required then you have to locate for the “Disable all automatic app updates” and then turn off the corresponding green switch next to it and this is all what it takes to turn off automatic updates in iOS.
#4. How to Turn Off Automatic Updates in Windows 7?

Step #1: If you want to turn off automatic updates in windows 7 then as the very first step you have to reach out to the windows update section. For this you can either type “windows update” at the start section or you can follow the following route: Control Panel -> System and Security -> Windows update.
Step #2: Once you are at the “Windows update” section then all what you have to do is to locate for the change settings option which is positioned at the left pane of the window right below the “check for updates” option.
Step #3: Now as the last step, all what you require is to click on the clickable area below the Important updates head. Clicking on it will open a drop down menu for you from where you can choose the nest suitable option for yourself. Since you have landed here so, we assume that you would want to turn off automatic updates. So, the recommended option is to select “Never check for updates”. Though it is not recommended by the windows.
Step #4: After this all what you require is to click on the “Ok” button and this way you have just turned off automatic updates in windows 7.
Final Words.
This final words section brings us to the end of this tutorial cum guide on how to stop automatic updates ? We hope that we were efficient enough to satisfy your curiosity about this topic.
We firmly believe that we have left no stone unturned while getting into the nitty-gritty of the topic and making you understand the entire concept of it. But if you still have any query regarding turning off automatic updates then feel free to drop your query via comments below. We will try our level best to resolve that.
Moreover, if you found this article helpful and worthy, do show your love by sharing it socially.
Thank you for passing by and giving it a read.

