Here is an ultimate guide on how to start a personal blog. Imagine you’ve never created a blog and have no idea what a website is. This guide is for you.
Absolutely no coding or technical skills are required. If you know how to “click” and use your keyboard, you’re already overqualified.
I don’t mean to exaggerate, but creating a personal blog is literally that easy! Also, it costs less than $1.5 or Rs 150.00 a month which I’d say is more than affordable, isn’t it?
Let’s not waste time and get started?
What you’ll need to start a personal blog?
Contrary to popular belief, you don’t need to be a “tech whiz” to start a personal blog.
All you need is:
- A domain (is free)
- A server (less than Rs. 80.00/month).
The best part? You get both of those things at the same place.
Technically, you can get the domain from a different provider and the server from some other place.
The problem with that? You have to set up your domain nameserver and make a few other changes.
Considering this is your first time, those changes may be confusing.
Hence, I recommend following this tutorial to the dot. If you do that, you don’t have to setup a separate domain as it’ll be included with your server!
How to start a personal blog?
I’ve explained the steps in utmost detail. For every choice you make, I’ve tried to explain why you’re making that choice. Hence, I urge you to go through the fine print, do not just scroll through the main steps.
Step 1: Visit www.hostinger.com or click the below button.
Click here to Start Your Personal Blog
Why Hostinger?
They’re literally the “cheapest” hosting provider (list) I’ve ever seen. I’ve used over a dozen servers so far, most cost 5-6x Hostinger’s price, and still do not deliver the quality Hostinger does.
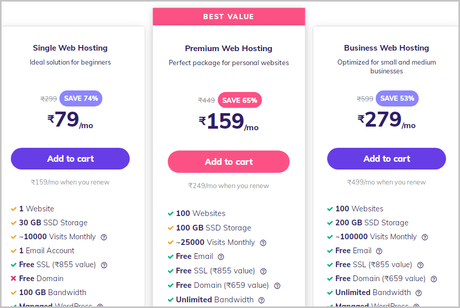
Step 2: Scroll down, and choose their “Premium Web Hosting” plan.
Why this plan?
It costs just Rs 159.00/month! That’s certainly less than what you spend on soft drinks, Pizza, or even just chocolates in a month, isn’t it?
(There’s also a 30-day refund policy so you don’t pay a penny if you don’t like it).
You also get a free domain for an entire year. The domain otherwise would cost you Rs 1000+/year. With Hostinger’s premium plan, you get it absolutely free.
Moreover, you can use the same server to host 100 websites!
You can also go with the cheaper plan if you’re very tight on the budget. In that case, you’d have to buy a domain separately which would cost you extra money.
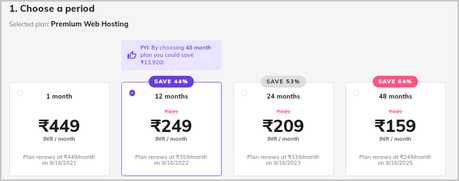
Step 3: On the next page, choose the package that suits you best. I’d recommend going at least with the 12-month package. (You only get the free domain if you go for at least 12 months ).
Step 4: Scroll down and either enter an e-mail ID, or login using your other accounts (Facebook/ Google).

Step 5: Choose a payment method. This is another reason why I recommended Hostinger, you can pay using:

- Cards
- UPI
- Paytm
- Netbanking
- Google Pay
- PayPal
- And even Cryptocurrencies!
Just make the payment using the mode that suits you best.
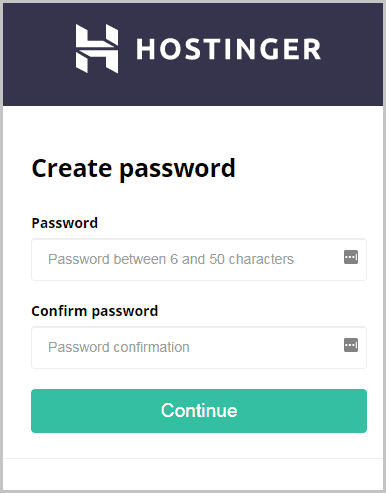
Step 6: The page will let you set a password for your account next.
Step 7: Next is just a welcome screen, click “Start now”.
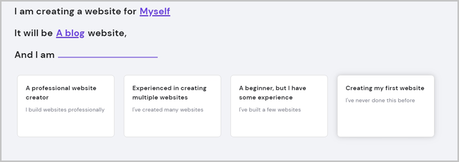
Step 8: A few questions will pop up. You only have to select an answer (no typing required). It technically doesn’t matter what you select here so just have fun with it.
Step 9: On the next page, just click on “Choose other option”.
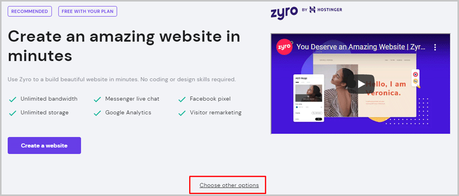
Why?
Because we will be using WordPress for creating your personal blog. Zyro is a free website builder by Hostinger which isn’t right for the purpose here.
Step 10: Because we didn’t go with Zyro, Hostinger now lets us choose the CMS for our blog. Choose “WordPress” here.
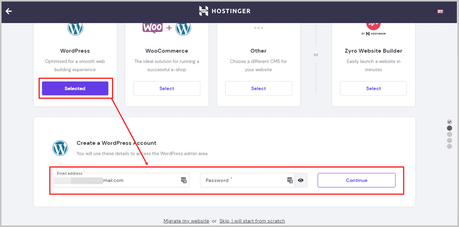
Step 11: On the same page, enter a password for your WordPress website. Yes, it can be exactly the same as your Hostinger password but not recommended. This password will be used to login to your WordPress panel (https.yourdomain.com/wp-admin/), that is where you will actually manage your website.
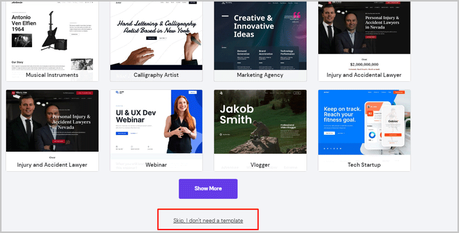
Step 12: You will be shown a few templates next. Just click on “Skip I don’t need a template”. (Scroll down on this guide, I’ve explained what a template is and which template you should use in detail).
Step 13: Remember you’re getting a free domain name? So on the next page, click on the “claim a free domain” option > enter a domain name of your choice and choose an extension (if you’re confused, just go with the .com option).
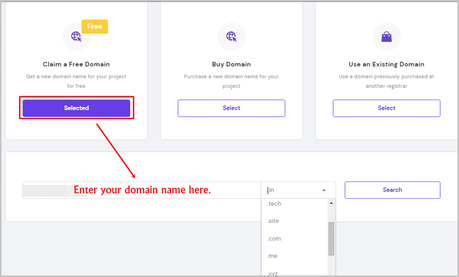
If this is your first time, follow below tips to come up with perfect domain to your personal blog
- Go for the .com option. This is the most recognized domain extension. You can also optionally go for .in, .us, and other extensions if you wish to go local.
- It’s best if you keep your name in it because it’s your personal blog. E.g. jackdorsey.com
- You probably won’t get your direct name, most common names are already registered. Hence attach prefixes and suffixes like “the”, “official”, “e” if you don’t get your exact name for the domain. E.g. if your name is “Jack”, possible combinations are TheJack.com, eJack.com, Jackofficial.com, officialJack.com etc.
- You can also use adjectives or professions. E.g. GamerJack.com, LawyerJack.com, DesignerJack.com and so on.
- Avoid using hyphens or numbers for your domain.
- Do not use trademarked words, e.g. PepsiJack.com. It may land you in legal trouble.
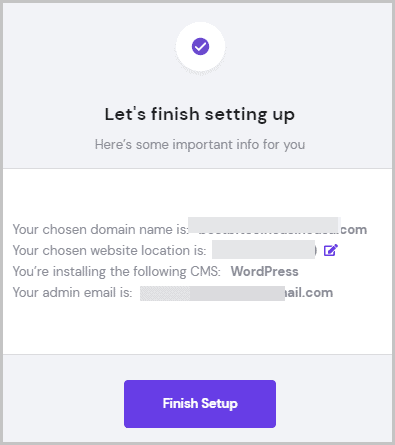
Step 14: On the next page, a summary of your domain will be shown. Simply click “Finish setup”.
Step 15: You’ll then be asked to enter contact details for your domain. Simply choose your country and click on “personal” (because we’re building a personal blog for you).
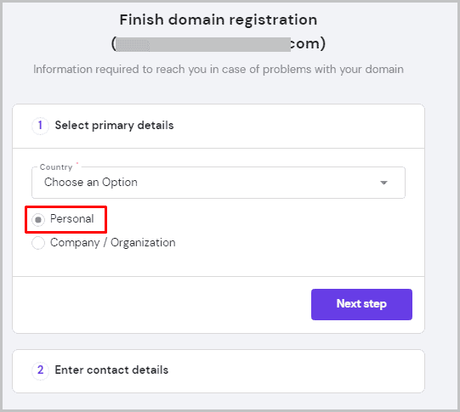
Fill in the other details on the form such as name, address etc. and click on “Finish registration.
Done! It will take 2-3 minutes and then you’ll get a “Your website is ready” message.
Verifying your domain
Your domain and server are up. However, according to ICANN rules, you must verify your e-mail and domain.
If you do not do this, your domain will be suspended after 15 days. The steps are extremely easy.
Just go to your e-mail ID, and you’ll find an e-mail from Hostinger with the subject: “IMPORTANT: Please verify your e-mail address.”
Just click on that e-mail and you’ll get a success message:
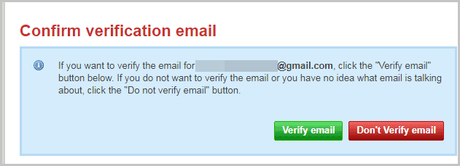
(Sometimes, it takes a few hours for this e-mail to arrive, so be patient. You can complete this step even a few days later).
Setting up WordPress
By now, you should have your hosting server and domain ready.
We now need to set your WordPress blog up.
WordPress is the #1 blogging CMS on the planet. It’s also 100% free.
Because we already selected WordPress earlier, you don’t need to install it separately. (This is why I recommended going all-in with Hostinger. In other cases, you’d have to manually install WordPress).
Let’s get started then?
Step 1: Login to your Hostinger account and click on the “manage” button next to the domain you wish to manage:

Step 2: On this page, simply click on the “dashboard” button. This will take you to your WordPress dashboard.

Step 3: On this page, click on the “edit website” button on the right.
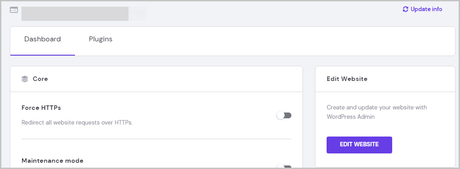
Done! Your WordPress dashboard would be launched. This is where you’ll be spending 99% of your time.
You can click on the “Write your first post” link to publish your first ever blog post!
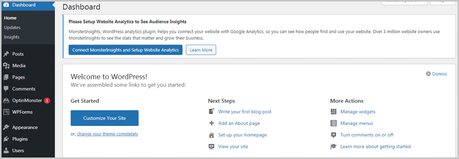
You’ll get a very simple, notepad-like editor. Simply write your text, add images and click publish. There’s no rocket science to it. I’m confident every single one of you can figure it out.
What are templates/themes and how to install one?
Templates are the “skin” on your blog. Just like themes on your phones, these decide how your website looks like.
The layout, colours, font and everything else as far as looks go is dependent on the theme.
In most cases, you can customize the themes to fit your brand, interests, color and personality. However, each theme still has a unique look that is exclusive to that theme.
Now, I’d recommend going with GeneratePress. (It’s 100% free).
It’s one of the most professional-looking and SEO-friendly templates.
SEO is probably the most important aspect of any website. SEO optimization impacts how much traffic you receive and how well you rank on search engines.
Because this is your personal blog, you may not care about SEO or traffic much. However, GeneratePress is still what you should go with.
Here’s how to install any theme on WordPress
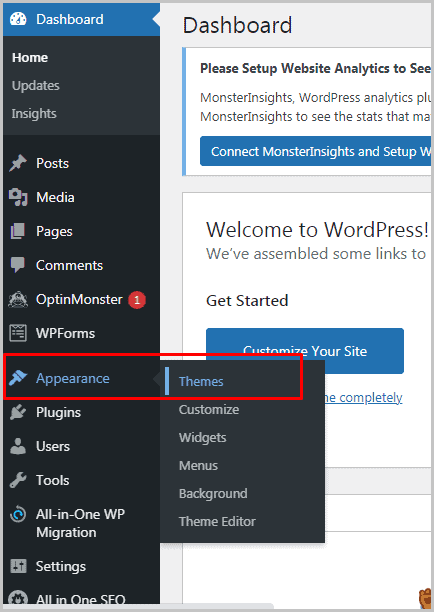
Go to your WordPress dashboard (https://yourdomain.com/wp-admin/) and then “Appearances> Themes”
Click on the “Add New” button at the top.
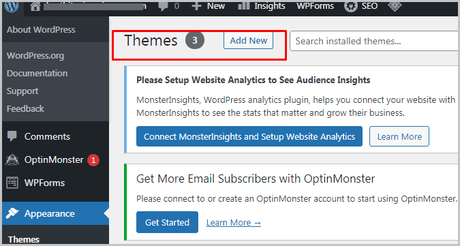
Click on the “Upload Theme” button and upload your theme. Regardless of which theme you choose, you’ll get a .zip file that can be uploaded here.
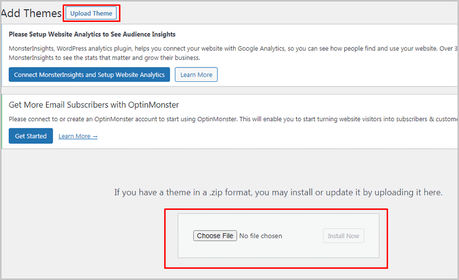
Done! Once the theme is uploaded, you can customize it from the “Appearances” tab.
What are Plugins and how to install them on your personal blog?
I’ll try to make this simple for you.
These are additional “features” you can install on your blog. These features are supported by WordPress, but aren’t enabled/included by default. They can be enabled when you install these plugins.
It may sound complex, but, the actual process is exactly the same as uploading a new theme. In fact, it’s simpler!
Now, there are a number of plugins every WordPress blog should have. (All of these are free so no worries there).
Because you’re creating a “personal” blog and not one for commercial purposes, the required plugins too aren’t as intense or complex as on a commercial blog.
- UpdraftPlus: An automated backup plugin- Even a personal blog has your efforts and hardwork, right? Automated backups make sure server crashes, lost credentials or anything else doesn’t wipe out your hardwork.
- Akismet: Even on a new blog, spam comments are abundant (hundreds of thousands). It’s a free plugin which detects spam comments.
- WP Rocket– It’s a caching plugin. It basically helps speed your site up.
A few other plugins such as YoastSEO too can be installed by you. These help improve SEO and rankings. On a personal blog, these may not be the priority but will sure help you get more hits.
How to install plugins?
There are two ways to install plugins. We’ll go the simpler route.
Go to your WordPress dashboard > plugins > Add new.
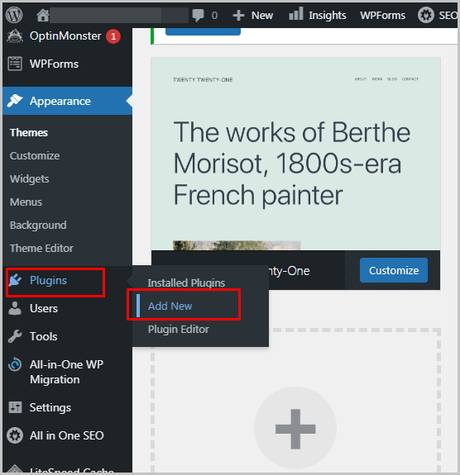
On the next page, type the name of the plugin you want in the search box. When the plugin is displayed, click on “install now”.

This method is simpler because you do not have to download/upload any files. WordPress automatically install the plugin in the background.
Frequently Asked Questions
Hey, I’m sure you’ve learnt how to create a personal blog by now.
However, I’m sure you’ve got a few questions left. I’ll try to answer them right here right now.
#1 Can you choose any other Hostinger plan?
Obviously. You can go with any of the other plans on Hostinger. However, on the cheaper plan, you won’t get the free domain. On top of the additional expense, you also have to configure additional settings to connect your domain to the server.
#2 Is a refund possible?
In case you create your blog and don’t like it, Hostinger has an extensive 30-day refund policy.
#3 Can I make money from my personal blog?
Yes, you can. The technicalities do not change. This is exactly how a commercial/professional blog is created as well. The difference is only in the type of content you post.
Final words on how to start a personal blog?
The entire process is mostly “point and click”, isn’t it? You don’t really need to have any technical skills.
Just choose a hosting plan, enter a domain, install WordPress, and done.
It may sound confusing if you’re a first-timer but if you followed this guide I’m sure you know it’s actually pretty easy.
So, let’s not waste any more time? Click here to start creating your personal blog right away!
Start Your Personal Blog
