How To Properly Configure W3 Total Cache For a Faster Blog Performance
Who doesn’t love a speedy blog? I know everybody do, that’s why we look for ways to make our blog as fast as possible. Some blogs can be sometimes frustrating when not taken care of properly and it will definitely drive most of your targeted traffic away if the issue is not taken care of, Right?

Let’s go further with our discussion shall we! Too much of plugins can cause your blog to perform poorly, right? When your blog is slow because of plugins, damaged databases tables or something else, it puts pressure on your server and discomfort other bloggers/ website owners sharing that same server with you. With this process, your hosting provider will have no option but to tell you to migrate or look for a new provider if you don’t have the money for migration

Must Read: Adding A Clickable Link To Your YouTube Video
Okay you ask me why “W3 Total Cache” and not “WP Super Cache”? I love W3TC because it has more options and features to make a wordpress blog run faster and that’s my opinion but what’s your opinion?
I am not trying to change your views on your preferred caching plugin because all works well on any wordpress blog (depending on your view). Today, I am just going to talk about W3TC and how to set it up.
How To Setup And Configure W3TC (W3 Total Cache)
If you have not used W3TC before, you can easily download it at wordpress.org directory or you can easily download it with this link and install
Remember: Disable all caching plug-in before installing the W3TC plug-in so conflicts won’t come between other plugins

If you have installed it, follow the below process carefully
Please also note that I will not be going as far as preaching how it works, I am just going to put out a comprehensive way to set it up. Any other question you’d like to ask, just use the comment box below and I’ll explain to you more on your question.
Enabling The Functions
Must Read: How to Write Quality Content And See Great Results
1. If you have installed the W3TC check your admin panel and see the “Performance” Section and click it.
2. Click “General Settings” – this is where we are going to activate all our settings
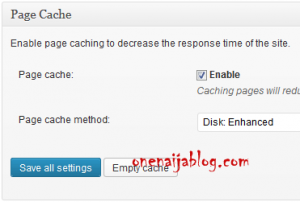
3. On the “General setting” page, the first step you’ll see is “General” leave it the way it is and jump to the next step Which is “Page Cache” and configure it like this:
Page cache: Click to check the Enable box
Page cache method: This should be “Disk: Enhanced” and click “Save all settings” [See Image below]
4. Next stop is the “Minify” – I’ll advice you to leave it disabled. If you must know why; It crashes most servers and most hosting providers recommend it off but hey! you can try it or ask your provider if they allow it.
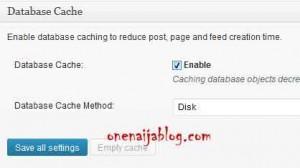
5. Database cache – Most bloggers using the W3TC do turn this feature off because most servers don’t need it but what advice I’ll give to you is, turn it on and study your server load, if your server is doing fine then you are good to go
The settings:
Database Cache: Click to check the Enable box
Database Cache Method: Disk
Now click “Save all settings [See image below]
6. Object Cache – If you are using a highly dynamic site then this option is well suited for you. It’s being used mostly by bloggers with complex database. So I’ll just slide this step.

7. Browser Cache – This part is also important because it reduces server load and also decrease response time.
The Setting:
Browser Cache: Click to check the Enable box
8. CDN – This is one of the best options so far and I so much love it. What it does is it reduces your load time and make your blog speed increased by 3x it normal speed.
The Settings:
CDN: Click to check the Enable box
CDN Type: If you subscribe to a CDN network, you should choose it below but if you are using a self hosted CDN you should leave it default.
If you’re thinking of a premium CDN, I’ll advice you to choose either MaxCDN or Amazon Cloudfront
9. We are skipping the “Reverse Proxy” and moving to “Network Performance & Security powered by CloudFlare” – My hosting provider gave all its users CloudFlare. So I activated mine through my Cpanel but you can learn more and how to activate your CloudFlare from Nwosu Mavtrevor’s post.
Now that we have enabled all the main and important features, let’s move on to how we can set them up properly. Shall we
Setting Up The Function
On our first round, we enabled all its exciting features right? Now we are going to setup the functions of the exciting features. So are you ready for the main event? If yes! Let’s go guyz…
1. Go to the “Performance” list by the left and click “Page Cache” are you there? Now the only option you’re allowed or should I say “need” to tick are:
A. Cache front page
B. Cache feeds: site, categories, tags, comments and
C. Don’t cache pages for logged in users… Others should be the way they were.
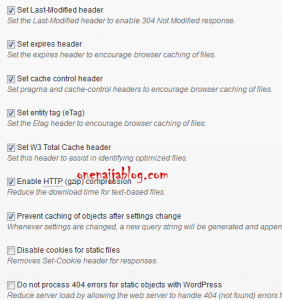
2. Browser Cache – In this section, you should check all boxes except for “Do not process 404 errors for static objects with WordPress” and Disable cookies for static files
3. Jump all steps and go to CDN – In the CDN area, scroll down to “Configuration”. Now properly enable it by following the image below.
Must Read: How To Create A Self Hosted CDN For W3 TOTAL CACHE
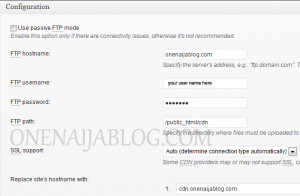
click to enlarge
Remember that you can replace what you see in the above image with your premium configuration. (This is just an example)
4. Click “Save all settings” and empty page cache.

Now we have successfully configured our W3 Total Cache (W3TC) successfully without any problems. Now tell me how fast your blog has become? Did your blog change in speed or not? Please let us know by using the comment box below
Remember This: Now that you have successfully configured your W3TC it is advisable to do a backup of it so in case you face any server crash or you unknowingly press the reset button, you can easily go back and upload the settings.
How do you do the backup setting? Simple! Simply go to “General Settings” >>> Scroll down to the end and you’ll see “Import/ Export Settings” [See image below]
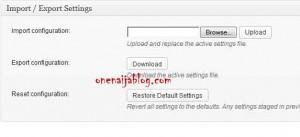
In the “Export configuration” Click download and you’re completely done…
Wow!!! I have finally taken care of this topic and to be honest, I am so glad I did because it has been requested by a fellow blogger and most of my readers

Must Read: How To Give Your Blogger Blog Comment Section a Different Color
Do you have question that you are not cleared about that you’d want me to finalize? then do use the comment box below and drop them and I’ll respond with an answer to my best of knowledge

Do you find the post interesting and would love to throw me a comment or thought? Then please do by using the comment box below. Remember that your comments and thoughts are highly welcomed and appreciated.
Do you like the post or was the post helpful? Then kindly click the like button, share us and recommend us to friends because you’ll never know which of your friends is finding it difficult to set up his or her own W3TC. And do not forget to subscribe to our feed for your latest updates on the go.
Don't Miss Any Post Again. Subscribe To Our Feed And Be Updated
Enter your email address below:
Powered by OnenaijaBlog

