One of the most popular OS in the world of desktop computers, Windows over the years has become synonymous with the words Desktop PC! The Windows Explorer always hide extensions of files that are known to the computer.
If you are able to open a file via double click, the extension of the file will be hidden by default. In this article, you’ll learn How to show file extensions on each version of Windows.
For example, if you have a file named example.txt, It will appear as “example”. And if you have a video file name X-Men.mkv, you’ll see only “X-Men”.
There are a number of reasons Microsoft has set file extensions to hide by default. One reason is here when we rename files we can remove the file extension, and this will result in the file not playing or opening.
To prevent this issue, Windows using this default option to hide known file’s extensions.

Attacker: They can affect your computer by viruses or Malware. Let’s assume they create a file and name it virus.png.exe! Your computer will show that file named as virus.png, and you will probably think this is an images file. But that will be executed once you double click it.
This creates a lot of issues and problems, such as peoples who try to fix problems caused by notepad and others. A .bat file is created by Notepad program and can be turned into a pretty dangerous virus with some commands.
So it is recommended to use an antivirus program on a daily basis. But wait, Microsoft added an option to easily enable file name extensions. In this post, we’ll show you how to do for each window, from Windows XP to Windows 10.
How to Show File Extensions in Windows 10
In Windows 10, this is quite easy to do. Enabling extension on Windows 10 is just a matter of 2 mouse clicks. Let’s jump how to enable file extensions.
Open the File Explorer by clicking either Ctrl+E, clicking its icon in the taskbar or from the start menu.
Now there are 2 methods to do this; you can pick any of these methods to enable file extensions.
Way 1. Is for keyboard nerds, Press the ALT key, next V then press HF, this will allow the extension of files to show.
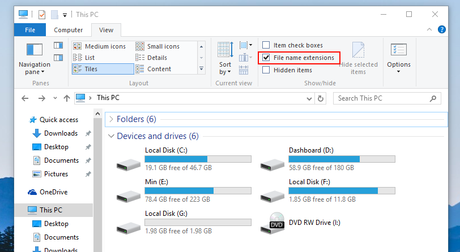
Way 2. Or click the ‘down arrow’ and click on the VIEW tab. (At the top side, you’ll have three tabs. Click the third tab VIEW). A semi-windows-box will slide down, where you need to tick ‘File name extension’.

Now tick the settings that say “File name extensions,” click the ‘up arrow’ to close the semi-windows box. This will show file extensions for every file. Repeat the steps to hide file extensions.

Method 2. Doing it the old way, Open the start menu, and type either “Folder Options” or “Folder settings”. You know that there is no floating tip that says you can search from the start menu.
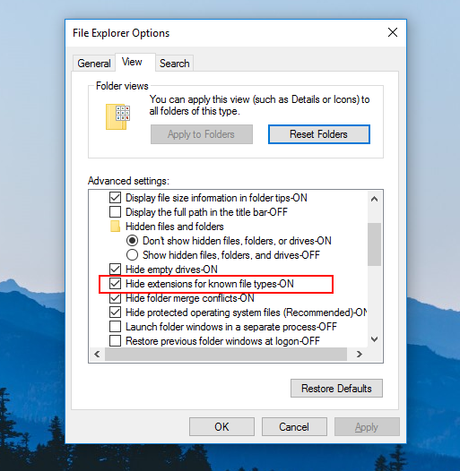
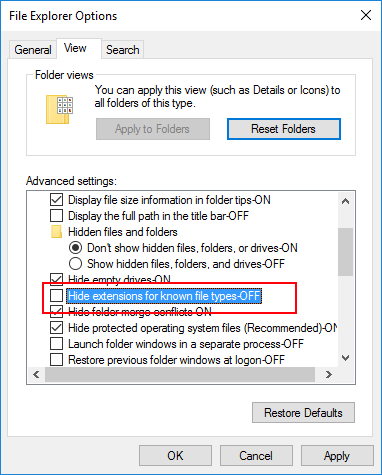
A little knowledge is indeed, however. Click the result and switch to the View tab. From there find the file extension setting and untick it.
From there find the file extension setting and untick it. Now save and check files, they will show their file extensions. If you anytime downgrade to Windows 8, read the next section. Although the steps are almost identical.
How to Show File Extensions in Windows 8
Step 1. Access the Start Screen; it’ll be opened as full-screen. (Unlike Windows 10, where you has options to make is boxed or full screen).
Step 2. Type “Folder options” or “Folder settings” without the quote. You know that there is no floating tip that says you can search from the start menu. A little knowledge is indeed, however. Click the result and switch to the View tab.

Untick the option “Hide extensions for known file types-ON. Also, you can set hidden files to show.

Click ok to save it. If you already had upgraded to Windows 10, you can use this same method to enable file extensions.
How to Show File Extensions in Windows XP
First of all, open the Windows Explorer. You can open it by Clicking the ‘My Computer icon on the desktop, or clicking My Computer from the start menu or Pressing CTRL+E.
Look for the menu bar, and click on ‘Tools’ ( the menu bar is present just below the top bar of windows explorer. Click the Tools; a pop-up menu will appear to choose ‘Folder Options.’
A new box will open, and you’ll see three tabs in it. Click the tab that says “View.”
You may need to scroll a Lil bit to find the “Hide file extensions for known file types” settings. You need to untick it to show file type. Apply or click ok to save this setting. Now you can see file extensions on your Windows XP machine.
How to show File Extensions Windows 7 and Vista
Press the Win button on your keyboard or just click the start menu.
IN the search box type “folder options” (with no quotes). And click on the “Folder Options” that appears in the search result. Next, on the dialog bix switch to the VIEW tab. Untick the box for “Hide extensions for known file types”.

Click the “OK” or Apply to save the settings.
Extra Tip: Here is how to show hidden files in Windows 7 so you can see hidden files along with their file extensions. Also in other windows show hidden files steps are almost the same.
In folder settings, choose the settings to show hidden files.
Conclusion.
Windows Explorer is more than just a File Explorer That all about How to Show File Extensions, so you’d be able to know the specific extensions of a file. This was a little knowledge you should know to be an advanced computer user.
Also, make sure to subscribe Knowledge cage on Facebook, you’ll know our next tutorial as soon it goes live.
You can always undo this tutorial by repeating the steps. If you would like to ask a question related to this topic, feel free – we got your back!

