Worrying about SEO optimization, don't panic the Yoast SEO Plugin is here. We use WordPress SEO plugin by Yoast because it is the top-notch and the complete SEO solution for the WordPress site. As usual when we talk about the best SEO plugins for WordPress then without any doubt the Yoast SEO plugins tops the list. This plugin is the most advanced plugin which is available in the WordPress.
Yoast SEO plugin is integrated with many features of the other plugins like Meta Robots plugin and RSS Footer plugin and there are many others on the list. This plugin will give many extraordinary features, but keep one thing in mind that setting up this Yoast WordPress plugin is that much easy.Here in the latest 3.0, you will see some UI changes but all the configurations are same as in the previous version.
Features of Yoast SEO plugin
- Images.
- XML News Sitemap.
- Focus keyword testing.
- Meta Robots configuration
- .htaccess and robots.txt editor.
- RSS footer/header configuration.
- Easily add noodp, noydir meta tags.
- Google search result snippet previews.
- Configurable removal of post types and taxonomies.
- Easily noindex, or nofollow pages, taxonomies or entire archives.
- Breadcrumbs support, with configurable breadcrumbs titles.
- Permalink cleanups, while still allowing for Google Custom Search.
- Ability to verify Google Webmaster Tools, Yahoo Site Explorer, and Bing Webmaster Tools
- Pages or posts that have been no indexed will not show in XML sitemap (but can if you want them too).
In this guide, you will know how to configure Yoast SEO plugin for the better SEO performance. So let's get started with the tutorial.
WordPress Yoast SEO Plugin:
The Yoast SEO plugin is the most advanced and the best WordPress plugin for the Search Engine Optimization. And the process of installing and configuring its setting is quite difficult for new bloggers or people who are not having any basic SEO skills.
If you somehow landed up with the incorrect configuration then definitely search engine bots will not do the indexing your blog or they may crawl the less important part of your blog which will quite disastrous for your blog.
Let's start this tutorial and start the set up this free plugin.
The Complete Setup and Configuration:
You need to start this process by installing and activating the Yoast SEO plugin. During the activation process, you will see the new menu item in WordPress admin bar along with the Yoast SEO logo on it.
Right after that process just go to Dashboard > Features > Advance Setting Pages and do one thing enable this feature. The WordPress blog where you are installing this plugin has already installed any SEO plugin or theme SEO settings then after the activation of the advanced setting you may go to SEO > Tools > Import from other SEO plugins on to the left panel. You should select the plugin from which you want to import the settings.
The best you can do is to create a backup of your database and then just go for the option "delete the old data after import". Do all these steps carefully and as mentioned in this tutorial.
Step 1: WordPress Yoast SEO Dashboard
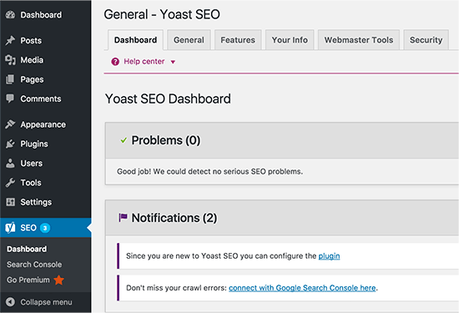
Here in this section, the very first step to getting started with this plugin is to submit your site Alexa, Bing, Google and the Yandex. Right after installing the plugin just click on to the SEO > Dashboard > Webmaster Tools to get the access to this page.
Now let's move on to the most advanced section of this plugin.
Step 2: Titles & Meta Tag Settings
As depicted above this one is the most important part of this plugin. After clicking on to the " Titles & Metas" just click on to "General" to know about the separator and the work of that separator. Definitely, this will help you set up quickly the titles and Meta SEO aspects of that separate plugin.
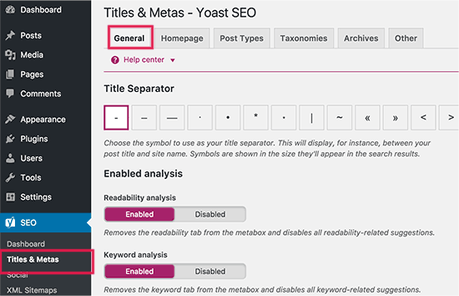
Now you need to click on to the "Homepage" tab of the "Titles & Metas" section and do the configuration setting of your homepage title and Meta description.
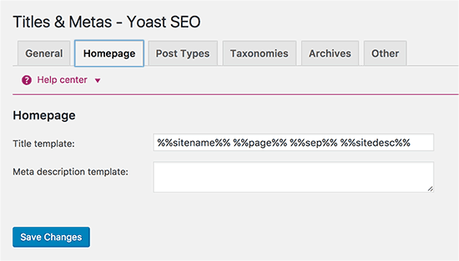
By default, you may see these are already filled with pre-filled with title-templates. For your homepage, you may create a static tile but for the posts, the title will definitely vary from one post to another.
Important: If you are somehow using a static homepage then you will definitely see links to edit your homepage and the blog page comfortably to add the title and the Meta descriptions.
Post Types Titles & Metas:The WordPress by default it comes with many post types like post, page, revisions, and attachment. Now you have the choice to define your own custom post types.
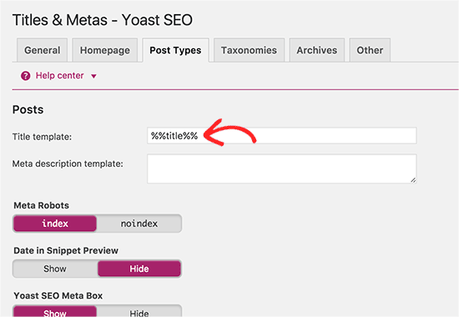
Here the Yoast SEO will allow you to set titles and Meta for the posts, pages, and other custom post types. It will use the site-wide title and the Meta description if you have forgotten to add the title and the Meta description for any individual post.
I will recommend you to just leave the description fields blank for all the posts types. You can just use the only post title as the title template. Do remember one thing that Yoast SEO plugin also adds the SEO Meta box in your meta box post edit area.
For the better SEO benefits, I will recommend you please manually enter the title and description for each post, page and custom post type.
Taxonomies:Just go on to the taxonomies tab, just configure the titles and the Meta for the categories, tags and post formats archives do this calmly. The default template variable will work for many sites. The Yoast SEO will pick the description from the categories and the tags.
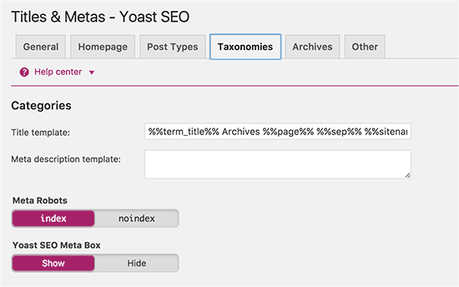
Don't worry if you are not having any description of terms in your categories, tags or the custom taxonomies then definitely WordPress SEO will not add the Meta description in the achieve section.
Archives:Now, let us move to this Archives tab, you have the option of the title and the Meta settings for the author and the date archive pages. I will recommend you to check the disable author archives for the single author blogs. The main blog and the author archives will contain as it is exactly same content for the single author blog. You can do this setting just to prevent the duplicate content.
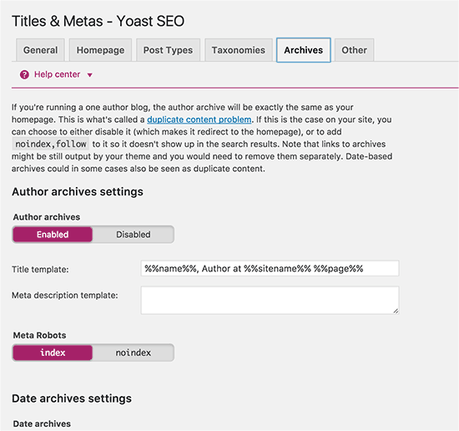
Just leave other settings as it is, and save the changes..
Others:This other tab has many additional settings. Using that you can disable picking up the descriptions from the Dmoz or the Yahoo directories just for your pages.
If you are not sure what to do here then it would be good for you to leave it unchecked. As it Google made this official that they do not care about the keywords and the meta tags.
Step 2: Social Settings
Now you have the idea about the array of features of Yoast SEO. And the great feature of this plugin is that it easily integrates your site with all trending social media platforms like Facebook, Twitter, and Google+.
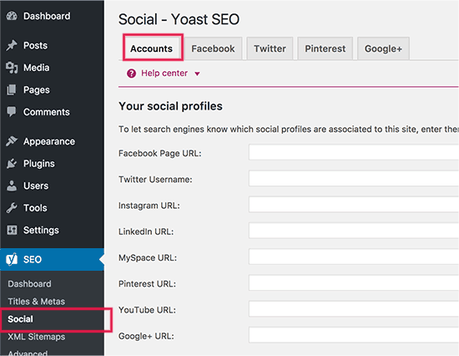
Just click on to the Social Link under the SEO menu and it will let you set up these platforms. You can easily configure each of them separately. Under the accounts, sections in the Social Settings, all the spaces are for all your social accounts. All you need to do is to add the URLs of Twitter username for the main social profiles of your site.
Just click on to any tags you want to add to the accounts section.
Step 3: XML Sitemaps
These sitemaps are very important for your WordPress site. The Sitemap is the easiest way to the index purpose and it will notify the search engines about your content.
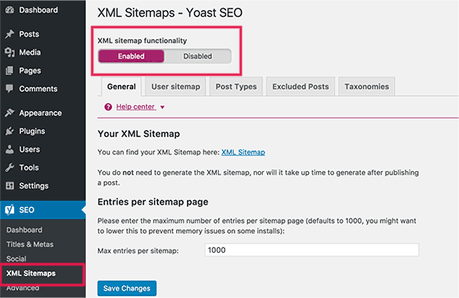
Yoast SEO will make it easy to add XML sitemap to WordPress. After the creation of the sitemap file just go and submit it to the Google, Bing and other search engines. The settings of the XML sitemap are currently divided into different tabs.
Step 4: Advanced
Permalinks:Here in this, we will talk about the Permalink settings in the Yoast SEO tab, you will not get the settings tabs. WordPress will add each category base URL like /category/ by default.
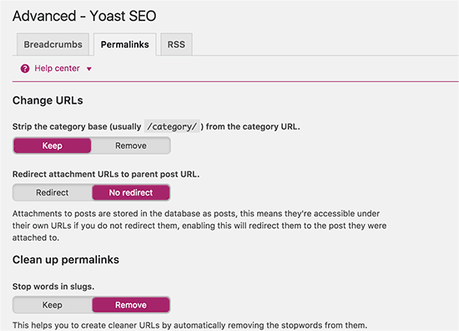
You can remove it j by clicking on to the "Remove" just strip it form you category URLs. Many people want to do this step.
Next point is to redirect the attachment URLs to the parent post. WordPress will allow you to attach images and other media to the post. But here the heck is that all the attachments somehow get their own URLs basically in most of the case that is unnecessary. So you can check this box, you can easily redirect the attachments page URL to the original post URL.
Remove stop words from the permalinks. Stop words basically are the common words in the English language. Yoast SEO will never suggest you add stopwords to your URL. If you remove these stop words from your URL then according to Yoast it will clean your URL. You can leave it unchecked because it will make URL smaller.
Web crawlers do visit your site when the javascript is disabled. Because they don't want to see the existing URL and will quickly move. Doing this will definitely increase the crawl efficiency.
RSS:RSS feed is mostly used by the content scrapers just to copy content from your post website. Here Yoast SEO will allow you to add any backlink to your website for each and every post in your RSS feed.
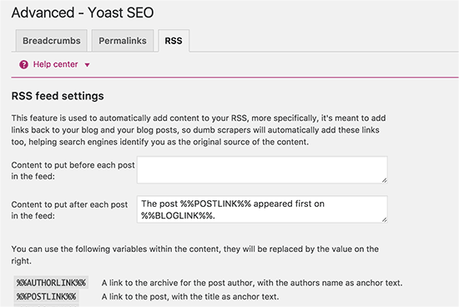
Using this way you can easily get the backlinks form their site and definitely google will know that you are the original source. There are many options and you can attach the author link, Post link and the description of the blog efficiently. Show your creativity because this can also be used to add any advertisement to your RSS feed.
Breadcrumbs:Breadcrumbs are really great for the internal linking because it will clearly define the trail to the page you are really on. These internal links will be useful in getting the search engines to understand the site structure and it will really help users to navigate your site easily.
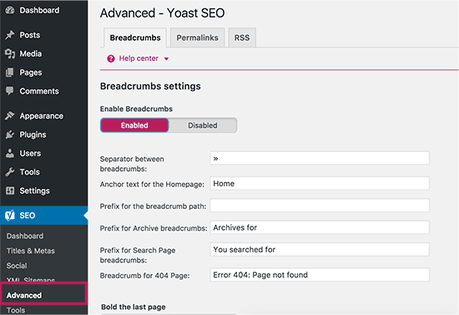
The given settings will work for many websites and if you are willing to change something then go ahead. When you are done just click on to the save changes option.
Step 4: Tools
Moving on to the next step, we have done many things till now so it will be good to export the settings as a backup. This will help you in future if you want to set up this plugin to your future site. You can use it as the initial guideline.
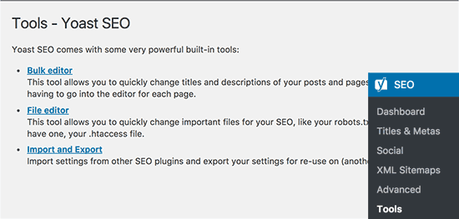
Here the bulk editor will help you to edit the post titles and the description of the bulk option. I will never recommend this as the Duplicate description and tiles will definitely cause damage to your SEO.
And another one is the file editor if possible keep away from this settings if you are a beginner. If you do any mistakes here it will definitely lead your website inaccessible from the search engines or it may also make it useless.
I hope for the best, this tutorial may help you to set up WordPress SEO by Yoast successfully.
Yoast SEO Premium
Step 5: Meta Description & Titles
Here in the latest version of Yoast SEO, really they have done major design change. This UI change may confuse many old users when it comes to adding the meta titles and the description.
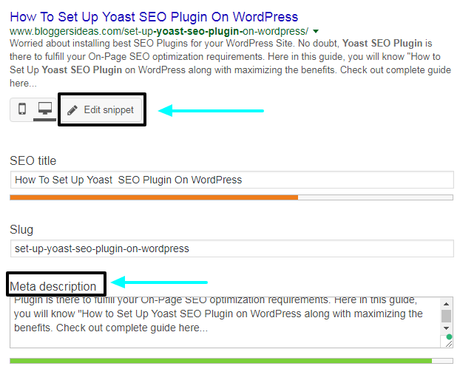
All you need to click on to the "Edit Snippet". When you will be there you can edit the "SEO Title" (Meta Title) and "Meta Description".
Redirects:This one is a good feature you will get here, it will let you direct any of the URL to another URL of your desired choice. You may get too many 500 internal errors just check the Google Webmaster Tool. And you can re-direct them just to save the link juice.
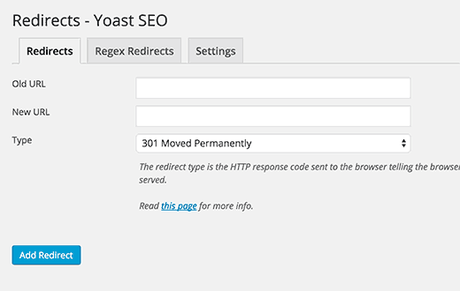
You can through our article to remove this error:
Step 6: Customizing and Maximizing the Benefit
If you are thinking that just installing and customizing the Yoast SEO will give you the benefit then you are wrong man. All you need to do is to customize the settings on every post.
Suppose you are editing any post or any page in WordPress then you will definitely going to see the meta box below in the post editor of the Yoast SEO. The best part about the box is that it has tons of SEO options available. Just check the analysis section.
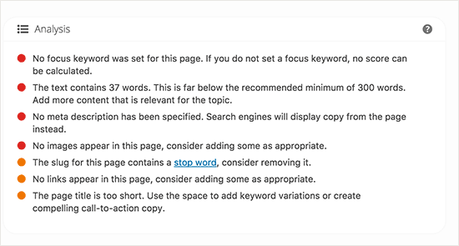
Most times it happens that your SEO title and your post title may not be the same. You should always write a custom Meta Description because users will see that when they make any search which is the most important one.
Keep on focusing a keyword when you are writing the articles. You will check the keyword density in the analysis section. Once you will save the post you will see the analysis of the post just below the Snippet preview. This will give you a detail about all the insights for that specific post.
Step 7: Webmaster Tools
If you do have little information about SEO then you may hear of some of the popular search engines like Google, Bing, and Yandex. Alexa will allow site owners to add their site just by using the Webmaster tool area.
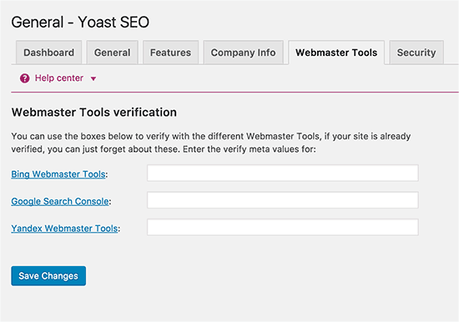
Webmaster tools will help search engines in crawling the index and the insights of your site content. You have to add a meta tag to your site or merely upload a file.
The problem is that most of the beginners are afraid to add meta tags, you can rely on Yoast SEO Plugin and it will definitely ease the process for you. All you need to do is to add the meta codes that you received from the search engines in all the respective field depicted there.
Some of the Hand-Picked post for WordPress:EndNote: Set Up Yoast SEO Plugin
Now each and everything is crystal clear from installing this plugin to configuring it and how to make most use of it and the most appropriate SEO optimization with WordPress SEO plugin by Yoast.
Make sure what you are doing before making any changes because any wrong configuration will let you pay more and will definitely attract negative SEO effects.
Do let me know if you are using this amazing Yoast SEO Plugin on your WordPress site in the comment section. I hope you like this tutorial about the set up of Yoast SEO Plugin. Show your love and support by sharing this article on all trending social media platforms and help others.


