


Restoring your Mac to its factory settings will erase all of your data from the hard drive, as well as your settings and custom settings. There are a number of technical issues you can fix by restoring a Mac to its factory settings. You should also do this before selling or giving your Mac to someone to protect your personal information and allow the new owner to personalize the device.
Our simple step-by-step guide will help you wipe everything on your Mac, reinstall MacOS, and restore your computer to its original factory settings.
Erase your Mac
Step 1: For MacBooks, connect the AC adapter to avoid the risk of draining the battery.
Step 2: Make sure your Mac is connected to the internet, preferably with a wired connection. Erasing your hard drive is easy, but once it's erased you'll need to access your Mac's factory settings. Apple stores this data remotely on its servers.
Step 3: Click the Apple logo in the upper left corner and select Restart ... in the drop-down menu.
Step 4: After your Mac restarts, press the key Cmd and R. Keys together. Press and hold until you see either an Apple logo, spinning globe, or other home screen on your Mac. This will take you to MacOS Recovery.
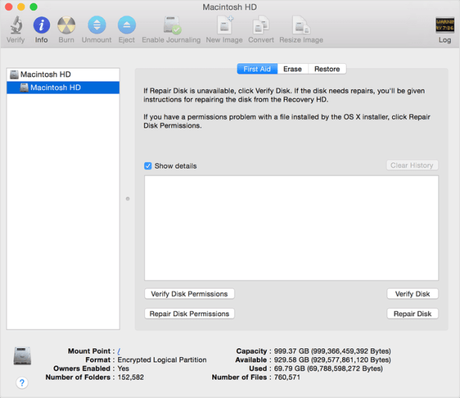
Step 5: After a few moments, enter your password when prompted. The Mac OS Utilities A popup will appear on your screen. Choose Disk utility on the list and click Continue.
Step 6: Your Mac's startup disk is listed on the left and is usually named "Macintosh HD" by default unless you renamed it. Another drive is also listed with the word "data" at the end. For example if your startup disk is on Macintosh HDYou should also see a drive labeled Macintosh HD data. If you don't have one Data Go on, don't worry - just go on Step 9.
Step 7: Choose Data drive, click To edit in the menu bar and then select Delete APFS volume in the drop-down menu. Alternatively with the Data Drive selected, you can click that minus Disk Utility toolbar button.
Step 8: In the window that appears, click Clear to confirm. Make sure you don't click Delete volume group. If you have other data drives, erase them as well, but leave the normal Macintosh HD drive alone.
Step 9: Select your master volume - it usually is that way again Macintosh HD. click To edit is in the menu bar followed by Clear... in the drop-down menu. Assign a name (or stick with Macintosh HD if you want) and choose a format.
Note: For the file format you should choose either APFS or Mac OS Extended (Journaled). Disk Utility will show the recommended format by default - stick with it unless you have a specific reason for another format.
Step 10: click Clear. You may see a prompt for your Apple ID information.
Finally, Mac drive erasing can take some time. When you're done, close Disk Utility to return to the MacOS Utilities window.
Reinstall the operating system
Now that the primary drive has been deleted, you need to reinstall macOS. Press the Reinstall macOS Option in the MacOS Utilities list and click Continue Continue. You may have to click through some confirmations and enter your password before you can proceed.

Because Apple stores your Mac's factory settings on its servers, your computer needs an Internet connection so it can get new settings off the assembly line.
Note: This download solution only works with newer versions of MacOS. This shouldn't be a problem for modern devices. All devices are used to download factory settings from the Internet.
However, if you are using Snow Leopard (10.6) or earlier, you will not be able to reinstall these settings from the web. Instead, you'll need the original macOS installation CD that came with your computer.
Also, When you reinstall macOS, a setup wizard will ask you basic questions about your region, etc.
If you're selling or giving away your Mac, leave the setup wizard untouched. Instead, press and hold the button command and Q. Keys to close the setup wizard Click on Shut Down. This will turn off your Mac and the setup wizard will wait for the new owner.
Alternative: overwrite installation
If erasing your Mac isn't ideal, you can completely reinstall macOS without erasing any data. It's the "lite" version of a full erase in that you don't have to erase the hard drive if you just want a clean, fresh install.

This option is useful if you have corrupted data, cannot isolate malware, or are having problems due to a bad update. However, this process can leave data that is relatively easy to recover. This means that if you are selling or giving away your Mac, this method is not a good idea.
However, if you continue with this method, please follow the steps below. As always, make sure you back up any data and documents that you plan to keep.
Step 1: Shut down your Mac and restart it as normal. Immediately after turning on the computer, press and hold the button command and R. Release the buttons when you see the Apple logo. This opens the Mac OS Utilities MacOS Recovery window.
step 2: Choose Reinstall macOS on the list. Confirm that you want to reinstall the operating system that has the latest version installed.
Alternative: time machine
If you're already using Time Machine to store backups, you can use it to restore macOS too. This is useful when you want to restore certain settings and data instead of your entire operating system - possibly to save data while you troubleshoot a bug or similar problem.
Step 1: Shut down your Mac and restart it as normal. After switching on, press and hold the button command and R. Release the buttons when you see the Apple logo. This opens the Mac OS Utilities MacOS Recovery window.
Step 2: Choose Restore from Time Machine Backup on the list. Keep in mind that when you save backups to an external drive or server, your Mac must be connected to these devices in order to complete the restore.
Turn off your devices in Apple Music, iCloud, and Messages
If you are selling or giving away your Mac, be sure to completely disable both your Mac and any connected devices before doing a factory reset. This prevents anyone from accessing your personal data in the future.
Apple Music

Step 1: Launch Apple Music and click account in the menu bar.
Step 2: Move the mouse pointer over the drop-down menu Permissions, then click Deactivate this computer.
Apple Music will now remove that particular device from the list of authorized devices. You can no longer access your Apple Music content from your computer, but no one else can.
iCloud

It's not enough to just sign out of iCloud - you also need to make sure that no local data is left on your computer.
Step 1: Click the Apple logo in the upper left corner and select System settings in the drop-down menu.
Step 2: In the, click the Apple ID icon System settings Window.
step 3: Choose overview Category listed on the left, then click Log out Button.
MacOS will ask you if you want to keep your current iCloud data on the computer. Uncheck the boxes for anything you want to delete Depending on what you want to do with your Mac, you might not be able to uncheck boxes.
Messages
Whether you're selling, donating, or replacing your Mac, you'll want to keep messages private. To do this, you need to sign out of the Mac's Messages app. The app syncs messages between your iPhone and Mac. Hence, deactivating it is vital for your privacy. Fortunately, signing out and deleting your message data is straightforward.
Remember, backing up your data is always a good idea. Especially before you hand your Mac over to a buyer (or someone you don't trust), you'll want to wipe everything off your computer. But before you take a step, it's worth backing up anything you don't want to lose forever. We offer instructions on how to back up your data to an external drive to make things easier. You can learn too How to back up data with iCloud - Just sign out of your Mac when you're done.
Editor's recommendations