Duplicate images may slow down your system, occupy important storage space, and complicate picture organization. Whether your Windows PC is for personal or business use, effective picture management is crucial. Eliminating duplicate images can help you recover space, boost system efficiency, and streamline photo administration.
Here we will discuss the best manual ways to remove duplicate pictures from your Windows Photo Library. We have also reviewed and listed the best Duplicate Photo Detector, for the automated handling of this task.
Read More: How Can Contract Management Software Help Your Business?
Method 1: Remove Duplicate Pictures Manually
The easiest approach is to go over your Photos Library manually-activated and remove duplicates. If you only have a few duplicates to delete or a small library, this method performs well.
Step-by-Step Guide to Manually Remove Duplicate Pictures
1. Open Your Photos Library:
- Go to the Photos Library in File Explorer and access the album where all your photos are saved.
2. Use Thumbnail View:
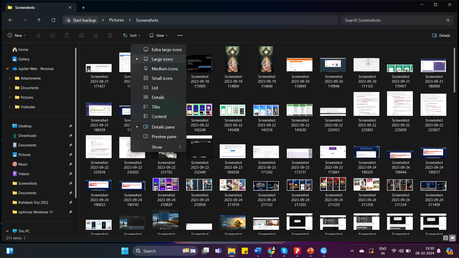
- Go to the View menu and click on the Large Icons option to view thumbnails of the images.
3. Sort Photos by Name or Date:
- Use the sort options to organize your photos by Name or Date. This will help you easily identify duplicates that were created or saved around the same time.
4. Compare Photos Visually:
- Go through each photo, comparing them side by side. When you find duplicates, decide which version to keep based on resolution, file size, or quality.
5. Delete Duplicate Photos:
- Right-click on the duplicate photo and select “Delete”.
Method 2: Use Windows Photos App to Remove Duplicates
Finding duplicates may be made easier by the built-in tools in the Windows Photos app that assist you to organize and manage your pictures.
Step-by-Step Guide to Remove Duplicates Using Windows Photos App
1. Open the Photos App:
- Open the Photos application by searching for it on Windows 10 or 11 via the Start menu.
2. Navigate to the Photos Library:
- For all your photos, switch to the “Collection” or “Albums” view to have access to all of them.
3. Use the Filter Option:
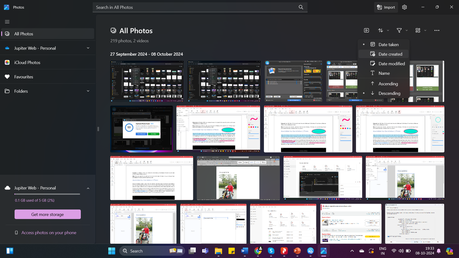
- Click on the “Filter” option to sort photos by date, location, or folder. This can help you identify duplicates more easily.
4. Delete Duplicate Photos:
- Once duplicates are identified, right-click on each one and select “Delete” from the menu.
5. Empty the Recycle Bin:
- Go to the Recycle Bin and permanently delete the duplicates to free up storage space.
While the Windows Photos app does not have a dedicated duplicate detector, its filtering options make it easier to locate similar photos.
Method 3: Remove Duplicate Photos Using Preview Panel
File Explorer has another option to easily preview images and delete duplicates. You can use the Preview Panel to look into the images in the album.
Step-by-Step Guide to Remove Duplicates Using Preview Panel
1. Open File Explorer:
- Press Windows + E to open File Explorer and navigate to your Photos Library.
2. Sort by Size, Name, or Date:
- Click on the “View” menu and then select the “Details” option.
- Sort the photos by date or time to identify duplicates.
3. Use the Preview Panel:
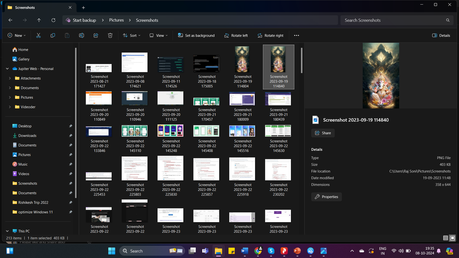
- Allow the preview pane from the View tab to have a larger preview of the photographs so as to facilitate comparison of the photographs side by side.
4. Select and Delete Duplicates:
- Once you have located the first duplicate image, right-click on it and select ‘Delete’ to get rid of the duplicate one.
Using File Explorer’s sorting and preview options can be helpful, but like the manual method, it can be labor-intensive for larger collections.
Method 4: Using Duplicate Photos Fixer Pro
Duplicate Photos Fixer Pro is a great choice if you need a thorough and easy way to eliminate duplicate pictures. Designed to precisely identify and eliminate duplicate photos, this premium tool is an automated utility to find and remove duplicate photos from a large photo collection. It offers various customization options to improve the duplication detection process.
Key Features of Duplicate Photos Fixer Pro
- Customizable Matching Criteria: Duplicate Photos Fixer Pro allows users to customize matching criteria, such as exact match, similar match, and custom filters based on the Bit size, Time interval etc.
- Batch Processing: Scan all folders/drives and delete duplicates in batch, saving you time.
- Scan External Storage Space: You can scan internal or external storage devices connected to your PC to look for duplicate photos.
- Scan Cloud Storage: It’s easy to scan the cloud storage space like Google Drive, Dropbox, and apps like Picasa Library, or Lightroom Classic with this utility.
- Preview and Mark Duplicates: Organize your images effectively with the preview feature. As you can have a quick look at the images in-app before deleting duplicate photos.
- Available on Multiple Platforms: The Duplicate Photos Fixer Pro works perfectly on Windows, macOS, Android, and iOS.
Step-by-Step Guide to Use Duplicate Photos Fixer Pro
1. Download and Install Duplicate Photos Fixer Pro:
- Go to the website and download the application for your operating system. Install it by following the on-screen instructions on your computer. Activate the product with the purchased license key to use the premium unlimited version.
2. Launch the Tool and Add Folders:
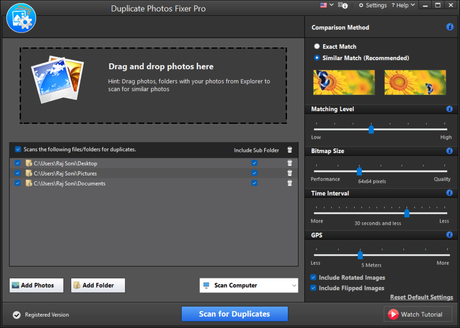
- Begin by launching Duplicate Photos Fixer Pro and click on the ”Add Photos” or “Add Folder” option. You can also drag and drop the Photos.
3. Customize Matching Criteria:
- Choose the type of match you want, such as Exact Match or Similar Match. You can also adjust the Similarity Threshold to control the scan’s strictness.
4. Start the Scan:
- Click on “Scan for Duplicates” to begin. The tool will analyze the photos and display a list of duplicates.
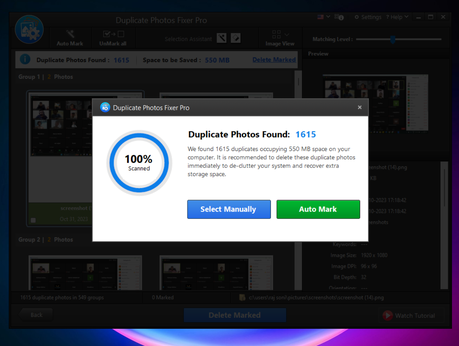
5. Preview and Mark Duplicates:
- Use the preview feature to see each duplicate photo. You can automatically mark duplicates with the Auto-Mark feature on the top ribbon.
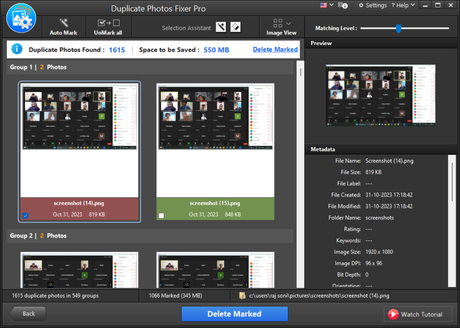
Delete Duplicates:
- Click on the “Delete Marked” option to remove the found duplicates. The tool provides a summary of the storage space you’ll recover.
Conclusion
Taking care of your picture collection doesn’t have to be a chore. These techniques will help you to quickly delete superfluous pictures and maintain the optimization of your collection. Whether you decide to use a manual method or make investments in a product like Duplicate Photos Fixer Pro, routinely deleting duplicates will guarantee that your Photos Library stays simple and easily available.

