I know I have said this countless of times but I’ll still say it again – Facebook is one of the best place to get good traffic from.

Even after limiting page reach, bloggers/ website and business owners still find ways of getting some reasonable amount of traffic from the largest social network platform.
Must Read: That One Reason You Need a Mobile Theme for Your WordPress Blog
Seriously, I don’t know how you get your Facebook traffic, but one of the most annoying ways that still works like charm is tagging people to your links.
Ahahah… Yeah, tagging people to your link on Facebook brings in some reasonable amount of traffic, how? When you tag a friend, the link will appear in his or her timeline right? This will make all his/her friends see the link you tag her with. Now the important part is; if your headline is catchy, those friends are surely to click the link to see what you’ve written, great right?
I don’t know about you but I seriously hate being tag in links that does not relate to me or what I normally blog about. And believe me, I do get tagged heavily.
Must Read: Do You Always Get Tagged On Facebook? Here Is A Simple Way To Untag Yourself
Yes, when I get tagged on a link that doesn’t relate to me, I do untag myself but for how long am I going to untag myself from all the irrelevant links i get to my timeline daily? Most of us bloggers are not always glued to Facebook because we have just so many things to do, right? So moderating what shows on our timeline sure looks best…
Just like a blog where you moderate your comments before publishing it, this is exactly how your Facebook timeline will be. Anytime you’re online, you’ll moderate your timeline, approve links that are related to you and drop the rest that are not.
Why you need this?
There are some times when a friend hacked account will tag you on one of their tricky tactics in other to get you and your other friends personal information. You know that when you get tagged, your friends will also see the link and some of your friends might be interested to check the link out because of the catchy title they use. And once they click the link, their Facebook details are going to be transferred to the hacker.
I have received many of those hack and spammy links and thank God my friends don’t see such on my timeline because I moderate them before they could go live.
Spam is spam that’s why we moderate our blog comment before it goes live. Moderating your timeline will keep you and your profile neat and professional

How Do I Moderate What Shows on My Facebook Timeline?
Okay, you can moderate what appears on your timeline by following the below steps.
Note: The tutorial will be in two steps; the first will be for our desktop users and the second step will be for our mobile users.
Step #1: Activating the Moderators mode using a Pc
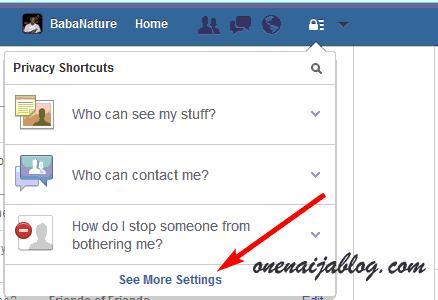
First – Login to your Facebook account >>> click the padlock sign located above you’re the header. See image below…

Have you clicked it? Now a simple “Privacy Shortcut” will pop up >>> Click “See More Settings” to take you to your Facebook settings. See image below…

Have you done that? If yes, your “Setting” page will appear. Now, by the left hand side, click “Timeline and Tagging”
On “Who can add things to my timeline?” inside your “timeline and Tagging Setting” Page, “Edit” the “Review posts friends tag you in before they appear on your timeline?”
Must Read: How Do I Get My Google Adsense Payment Straight to My Bank Account? a Perfect Solution
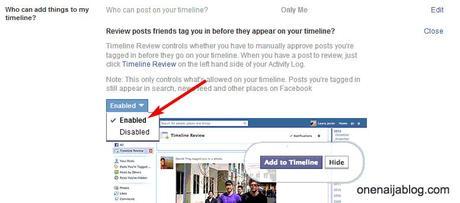
Are you in the edit page? If yes, click on the “Disabled” button found on the page and change it to “Enabled”. See screen shot below…

Hurray!!! Now you’re done. You must approve any post or link from your friends before they appears on your timeline, awesome right?
Step #1 Activating the Moderators mode using a Mobile
Using mobile is a bit easy so I am sure that you are going to love this process as well

Okay, let’s get into business guys… So are you ready?
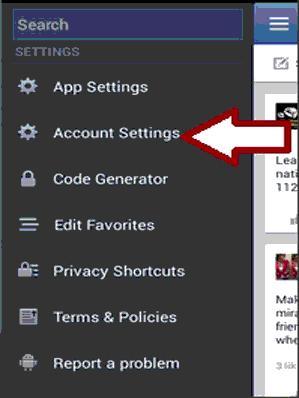
First, go to your Facebook mobile app menu at the top left hand side of the app
Scroll to “Account Settings” and click on it. See image below…

Have you done that? Now click “Timeline and Tagging” in the page that appears…
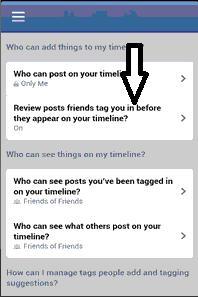
Now click the “Review posts friends tag you in before they appear on your timeline?” link to take you to your main goal. see Image below…

Now turn the “Timeline Review” to “ON” and you’re done with the process.
The process was very simple to understand right? now go and get bothered no more

Let’s Talk:
Now that we know how to review links and post before they goes live on our timeline, what do you think? Please do drop your views and comment using the comment box below.
Must Read: Top Five Reasons Why You Won’t Last Long In your Blogging Career
Do you have questions or thoughts you’d love to share with us? Please do, by using the comment box below. Remember that your comments, questions and thoughts are highly welcomed and much appreciated.
Be social:
Do not forget to share this post to your friends and loved once because I am sure that they are going to find it interesting enough

Don't Miss Any Post Again. Subscribe To Our Feed And Be Updated
Enter your email address below:
Powered by OnenaijaBlog

