Paraffin wax, Candle dyes and wick
For Beginners!Materials Required
- Paraffin wax
- Candle wick
- Candle dye
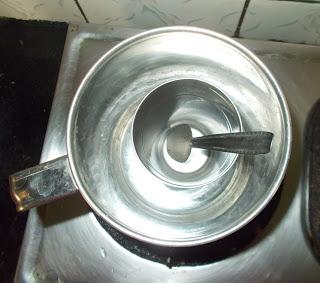
- One large and one medium sized vessel (double boiler)

Your very own double boiler
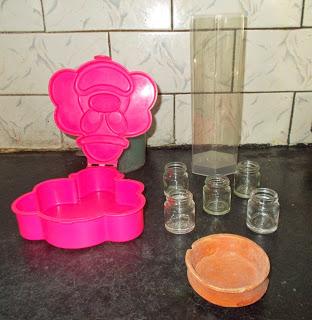
- Candle mold / votive

Different moulds and votives that you can easily get in your house
Process:Select your votive or moulds carefully. Any glass container can be used as a votive and metal or plastic containers can be used as mold. [ A mold is called a votive when the candle/wax is not taken out of the container after solidification ] Here, I have used both.
Tip: Its better to choose small votives as twenty small candles arranged in different patterns always look way more cute than one large candle and can be made using the same amount of wax!
Snip the candle wick into pieces according to the size of the votives (keep the wick two inches longer than the votive)

Carving the wax
Chop the paraffin wax into pieces. Now this is the most time consuming and laborious part. I came up with a technique that'll make it easier.

Carve in circular motion
Instead of trying to chop it like a vegetable, imagine that you are an artist and try to carve out the wax in strong circular motions. The wax will come off like snowflakes that are easier to melt.

Use a large knife
Tip:Use a large knife that can cover a large area and is easy to hold. Paraffin wax is pretty hard and you don't want blisters on your hands even before you start making the candle!
Pour water into the larger vessel and place it over a flame. Put the wax chunks/flakes inside the smaller vessel and place it in the larger vessel. Heat the water making sure it doesn't reach the wax inside the smaller vessel and keep stirring the wax.
[Keep on stirring no matter what. The more you stir the easier the wax will dissolve. Sometimes the wax may coagulate and form chunks but do not lose heart and keep on stirring!]

Melt the wax in a double boiler
Tip: Use a vessel with a wide mouth. Not only will it make it easier for you to stir but the wide base will also absorb more heat and make the wax melt faster.
While the wax melts and starts to form a clear liquid, add a very small amount of candle dye and keep on stirring so that it is thoroughly mixed. Do this till all the wax has melted and you have a nice coloured liquid.

Add dye
Carefully dip the wick in the molten wax with tongs and let it dry. Once dry it will be straight and firm.

Refills used for supporting the wics
Pour the wax into the votive. Wait for thirty to sixty seconds for the wax to cool a bit. Then place the wick at the center. Support it with pens, pencils, refills, fork or scale so that it stays in place.
Tip:Keep it in the refrigerator to help it cool faster.

Snipping the excess wick
Once cooled trim the excess wick leaving sufficient length to burn.

If you are using a plastic or tin container, take the candle out. Glass containers can be used as votives.
YOUR CANDLE IS NOW READY TO LIGHT UP THE WORLD !

Cake candle with multiple wicks

Black Pentagonal candle

Earthen lamp Candles

Excess Wax of burnt out candles can be used as candle dye Tip : After the candle has burnt out, you can use excess wax as dye for your next coloured candle
[Some people use crayons or coloured candles in place of candle dye]Info for locals:
If you live in Kolkata, you will get all the materials required at Yakub Mullick & Sons, Shop no. B-13, New Market. This year's rates are Rs150 per kg paraffin wax, Rs 10 per pack of candle dye and Rs 5 for two metres of candle thread. Moulds start at Rs 30.
Happy Candle making!
Also see:
How to make?
Ice Candles

Layered Multicoloured Candles

Egg shell candles

Was this helpful?
Please leave your queries and suggestions in the comments...


