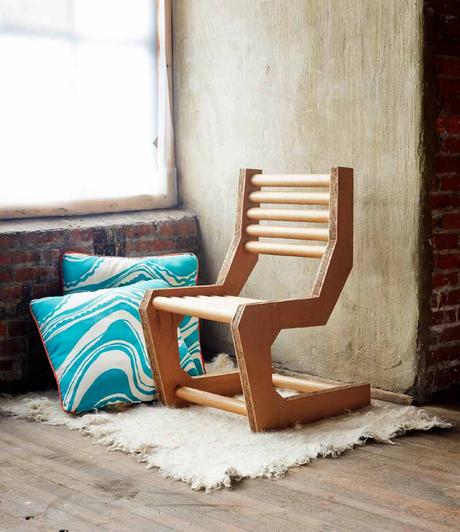
The Cardboard Cantilever Chair performs a bit of structural sleight-of-hand, creating a daring form out of a weak material.
Cantilever chairs first appeared in the 1920s, as designers in Europe began to experiment with radical forms and industrial materials. Bauhaus designers Mart Stam, Mies Van Der Rohe, and Marcel Breuer all designed cantilevered chairs out of chromed tubular steel. The lack of back legs, combined with the springy nature of the steel tubing, made for a pleasant, ergonomic flexibility. In 1934, Gerrit Rietveld designed the Zig-Zag Chair, composed of just four wood planks, reducing the cantilever to its simplest manifestation.
The Cardboard Cantilever Chair performs a bit of structural sleight-of-hand, creating a daring form out of a weak material. Corrugated cardboard (strong in compression) is mated with hardboard and cardboard tubes (strong in tension) to produce a hybrid loadbearing assembly. Laminated with wheat paste and finished with water-based polyurethane, this is a guerilla take on the most iconic of modern forms.
MATERIALS
• Forty pieces (approximately) corrugated cardboard, 30" x 30"
• Four pieces ¼ "-thick hardboard, 30" x 30"
• Wheat paste (see page 25)
• PVA glue
• Eleven thick-walled (at least 3/16th " thick) cardboard tubes, 1 ¾ " diameter (approximately) x 24" long
• Polyurethane, wax, or other finish of your choice
TOOLS
• Pencil
• Tape measure
• Straightedge
• Box cutter
• Paintbrush
• Scrap plywood
• Weights or sandbags
• Mallet
• Clamps (optional)
• Drill/driver
• 1 ¾ " hole saw
• Circular saw
• Jigsaw or handsaw
STEPS
1. Cut enough 30" squares of cardboard to make a stack 5" tall (approximately 40 single-wall sheets). You can piece together smaller sheets, but keep this to a minimum for maximum strength; sandwich any pieced layers between two continuous sheets. Creases are okay, but make sure they are oriented at right angles to one another in adjoining layers for strength.
2. Lay out two 30"-square pieces of hardboard on the floor with the rough sides facing up. Brush the rough sides thoroughly with wheat paste (recipe on page 25), making sure to saturate the entire surface. Lay a piece of cardboard on top of one piece of hardboard. Paint the cardboard with wheat paste, and stack a second piece of cardboard with the grain (corrugation flutes) oriented perpendicular to that of the first piece. Repeat until the stack is 2." thick, with every layer of corrugation alternated.
Note: It’s important to work as quickly as possible to prevent the glue from drying and/or the cardboard curling from the moisture in the glue before the stack is under clamping pressure.
Cap the stack with the second piece of hardboard — smooth side facing out — and a piece of plywood to distribute the clamping weight. Evenly lay out plate weights, sandbags, cinderblocks, or other heavy objects on top of the stack. Let the paste cure for at least 24 hours. This is important, as it takes a long time for the center of the laminated stack to dry, and cutting into soggy cardboard will ruin the lamination. Turn a fan on the stack to promote airflow (I have had stacks take so long to dry that they began to mold). Repeat the process to create a second stack.
3. Lay out the chair silhouette on the dry stacks as shown at right. Cut out as much as possible with a circular saw, then use a jigsaw to finish up the interior cuts. Cutting laminated cardboard in this way throws up a lot of super-fine dust, so wear a mask and cut in a well-ventilated area.
4. Lay out the holes for the tubes according to step 6 of the layout sequence at right. Bore recesses for the tubes with a hole saw, being careful to drill only halfway through the depth of the side pieces.
Note: Make sure the center mandrel bit of the hole saw will not penetrate the outer hardboard layer.
The sides with holes should be mirror images of each other. The hole saw will leave a plug behind after it is withdrawn; pry this out with a box cutter
5. Glue the tubes into one side with PVA glue, seating the tubes fully into the recesses with a mallet, as needed. Repeat to add the other side. Set the seat up and twist the sides until everything is neat and even and the chair sits squarely on the ground. If necessary, clamp everything together to draw the sides tight. Let the glue dry.
6. Finish the chair as desired. Water- or oil-based polyurethane or a simple wax are good options for these materials.
DISPOSAL: If finished without wax, this whole chair can be tossed in a recycling bin, or chopped into pieces and composted.
Click here to purchase the book.
