Installing a computer printer, basically, involves two steps. One, installing the software which allows your computer to communicate with the printer and the other one is establishing the connection.
The connection between a printer and the computer can be made via two mediums. One parallel and the other way is via using a USB cable. Most of the printers used in recent time mainly support USB.
If you have an old system, then you will have to use the parallel connections. Since this is the only options provided on old computers.
In today’s article, we will let you know the complete step by step guide on how to install a printer for your computer,
So, let’s not waste much time and get started with the guide How to install a printer for a computer.
How to Install a Printer For Your Computer
The guide on how to install a printer contains all the steps that will help you to learn to install the printer. In this guide, we have provided almost all the steps with the screenshot.
But before following the steps, make sure all the cables are properly connected on both ends i.e., the computer and the printer. If it is so, move to the steps given below. And if the cables are not connected, then before following further steps, make sure you do connect them.
In the guide on how to install a printer on Windows, I will let you know all possible ways to install a printer on your computer. First, we will begin with the Printer Wizard. The steps are given below.
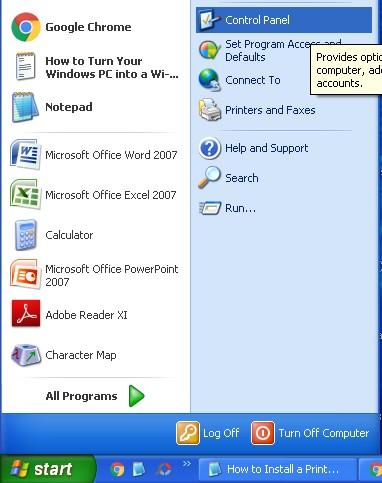
Step 1: first of all click on the start button displaying on the taskbar and go to the control panel.
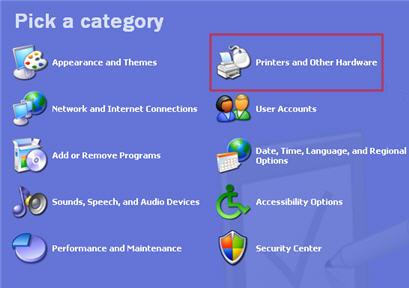
Step 2: In the control panel, pick the category Printers and Other Hardware. Check out the below screenshot I have mentioned.
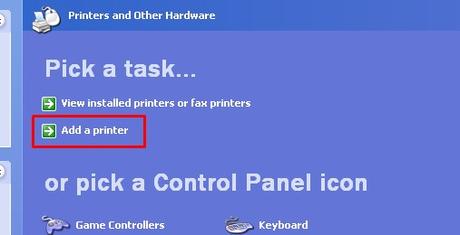
Step 3: As sooner you click on the Printers and Other Hardware option a new window will pop up. Here you will have to click on the Add a Printer option.
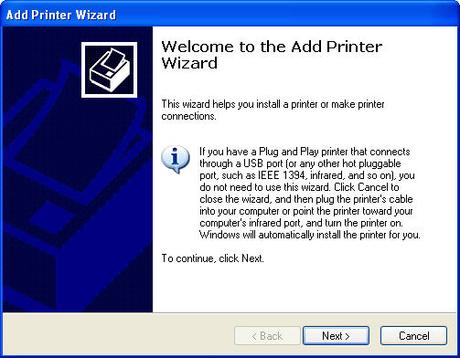
Step 4: When you click on the add a printer option, an Add Printer wizard will pop up. Click the Next button to enter the Local Printer wizard.
Step 5: In the next window, you will be provided with some options. There would be two radio buttons; you have to select the first option that is Local Printer attached to this computer.
Also, make sure the checkbox beneath this radio button i.e., Automatically Detect and Install my Plug and Play Printer is selected. If it is not, click on it. Once done, click Next.
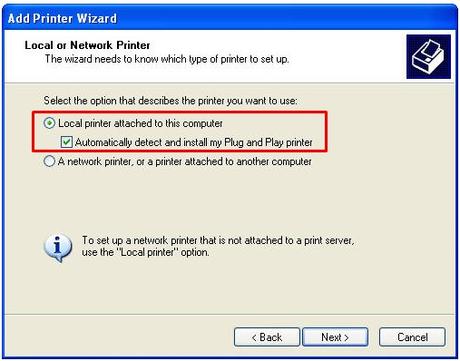
Step 6: In the next step, you will see a New Printer Detection dialog box along with the message Windows is searching for the new plug and play printers to install.
If the wizard is unable to detect your printer in the New Printer Detection dialog box, click Next to install the printer manually.
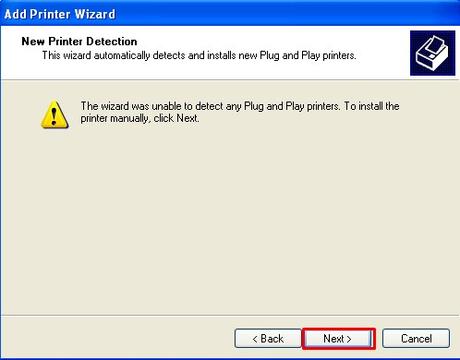
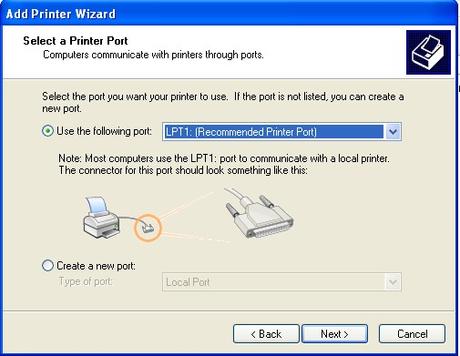
Step 7: When you click on the Next button, you will see a dialog box I have mentioned below.
In the Use the Following Port drop-down menu, select the port for the printer to use. Once done, click Next.
LPT1 is recommended. But you can choose any if you want.
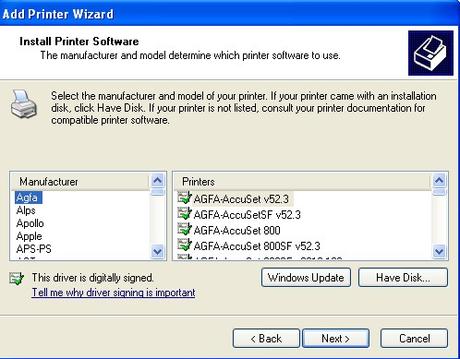
Step 8: In the next window, you will have to select the manufacturer and the model of the printer from the Manufacturers and Printers section. Once done click on Next.
And if you have Software Disk for the printer, then you will have to select the option Have Disk and insert the disk into your floppy or CD-ROM drive.
Step 9: After you click on the Next button, you will be asked to enter the name of the printer. You will see a dialog box, similar to the image I have mentioned below.
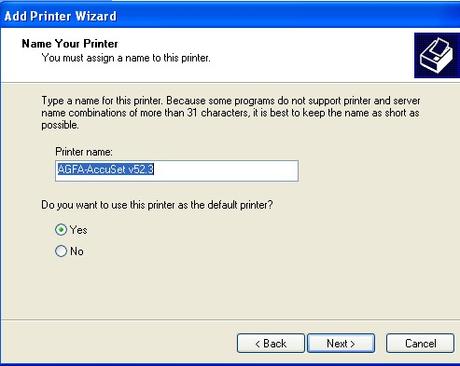
In the image above, as you can see the name of the printer is highlighted. If you want to edit it or change it, simply remove the previous one and type the name you want. And try to keep the name as short as possible.
And if you want to keep the printer as default, then leave the Yes radio button selected just below the name.
Once done, click Next.
Step 10: As sooner you click on Next, you will see a new printer sharing dialogue box. If you want to share your printer with other users, then select the radio button, Share name.
This is the name which appears in front of anyone when they select this printer for printing their documents. If you don’t want to share the printer, keep the radio button Do not share this printer selected and click Next.
Step 11: As sooner you click on the next button, you are done. You will see a dialog box, the Print Test Page. If you want to print a test page from the newly installed printer, keep the radio button selected as yes. And click on Next.
And if you don’t want to print a test page, select the radio button No, and then Next.
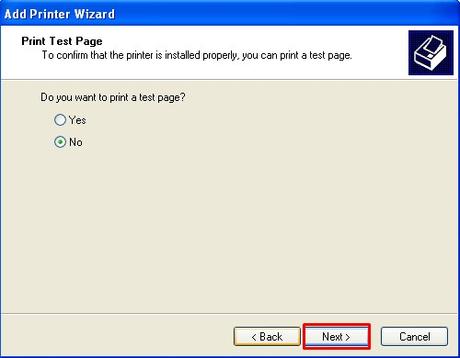
As sooner you click the Next button, you will see a completion wizard saying, completing the Add Printer Wizard. Simply click Finish.
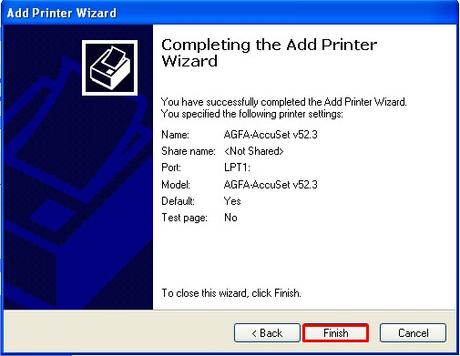
And you are done!!
This is how to install a printer for your computer. This was the most useful way to install the printer. Another way to install a printer is by using the CD drive.
For this, you will have to establish all the connection as mentioned above and then Insert the CD that came with the printer.
If the CD doesn’t start automatically, you will have to go to My computer and open the CD drive. Once done, open the setup.
In case, the CD is not working, or you are facing any issues with the above method I mentioned, you can download drivers as well and install them to the computer.
And you will be able to install the printer on your computer.
These were the three ways to install a printer. I hope you found the guide useful. In the case of any confusion, you can drop the comment below.
And if you enjoyed reading the guide, have a look at the other tutorial by clicking here. You may find it useful too!

