How do I insert tables in blogger blog post? Many have asked me that same question and today feel like the best day to drop something for my people 
Okay! I learned long ago that - aside your blog and its contents, making your blog posts as neat as possible also attracts more eyes. Do you agree with me?

Sometimes, you will feel tired reading through a blog because of how the author formats his blog posts. Before writing that post of yours, put yourself in your reader's shoe and ask yourself, will I read this if I was a visitor? Let's move along...
Must Read: Simple Fix on Disqus Not Showing on Blogger Blog Mobile ViewAs a blogger, one thing you should also focus on is formatting your blog post to make it as neat as possible... let the next person see it and say - "you did something awesome".
If you are a tech blogger and you do reviews on products like mobile phones, giving a full specification comes with it. But to make the specs stand out and sweet on the eyes, using tables to outline the specs will make the post neat and enjoyable to read.
How to "insert tables in blogger" Blog Post
To insert a table in your blogger blog post is not that difficult as long as you follow this steps I am about to share with you.
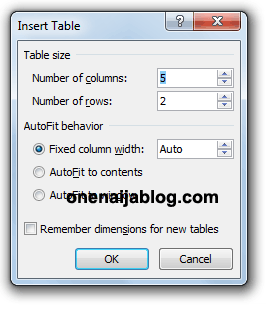
To insert tables in blogger blog post >>> go to Microsoft Word and draw your table there... don't know how to draw a table? Go to " Insert" in your Microsoft Word and click " Table" >>> click " Insert Table" and something like the image below will popup. Input the amount of column and rows you'd want and click " Ok ".

After drawing the table on your Microsoft Word >>> add what you want to write about to the table and maybe add some colors (if you like), to make it look cool.
Have you done that already? If your answer is yes, Now it's time to save it.
Must Read: Adding The Google Plus and Native Comment System to Your Blogger BlogTo make the table we've done work swiftly on our blogger blog, we have to save it as HTML file.
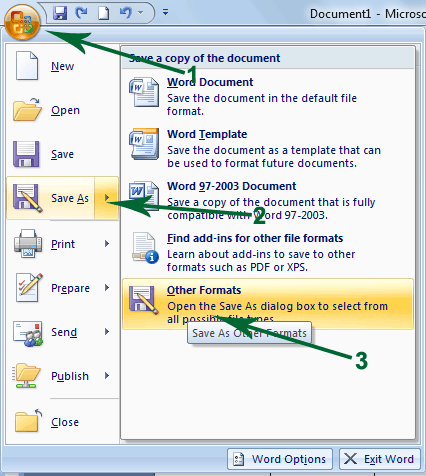
To save the table as HTML;Click the " Office Button" >>> Hover your mouse to the " Save As" >>>> and Click " Other Formats " ... see image below.

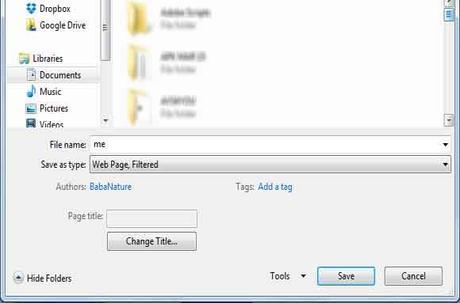
In the " Save As " area:
File name: Input any name you wish to
Save as type: web page, filtered
To make it clear enough, here's a screen shot below...

Have you successfully saved the Table? If yes, go to the folder where you've saved the HTML file in.
Now right-click the HTML file >>> Click " Open With " and open it with Notepad.
Have you done that? If yes, you will see a bunch of codes in your Notepad. Just copy the codes and move over to your blogger blog account.
To put the codes inside a post, go to the post and click edit >>> click HTML and place the code in the area where you'd want the table to appear. Or if you want to insert it on a new post, click the write new post >>> in your new post area, click "HTML" and paste the codes you copied from your Notepad.
Have you done that? Now click the " Publish " button and you have successfully created a table in your blog. it looks neat right? Go and make your review on products, charts, account, report looks neat and appreciated by your readers.
Conclusion
By following the above tips, you can easily create a table even without knowing much about HTML.
In case you meet any problem along your way of achieving this, please do let me know using the comment box below and I will be here to reply you asap
Back to you
It looks like I have said so much about so much on how to easily insert tables in blogger blog post, now let me pass the keyboard to you guys.
Do you have comments, questions and thoughts you'd love to share with us? Please do use the comment box below to drop your view.
Must Read: Creating a 301 Custom Redirect for Blogger BlogRemember that your comments, questions and thoughts are highly welcomed and most appreciated.
Be social
What the post helpful enough? Please do share it with friends on all your social networks. It might help a friend who's in need of a post as this.
Do not forget to subscribe to our feed for your latest updates on the go.

