Are you looking to increase your internet speed on windows 10? Here we have explained step by step information on how you can speed up the internet speed for free without any software.
Looks like you've finally decided to find out how to speed up internet in Windows 10. Welcome to the right webpage for that kind of info.
The Windows 10 OS has been available on the software market for quite a long time now, and lots of users are still facing performance-related issues like slow speed while surfing the web.
Your internet service provider is not always responsible for slow browsing, downloading, & upload speeds. Sometimes, it might just be your Windows 10 PC configuration that's limiting your surfing speeds for different reasons.
We've got help right here. We'll describe how you can tweak your Windows speed-throttling options to give your PC that extra oomph!
Go ahead and try out the following handy tips to improve your productivity by making your computer zippier:
How to Increase Your Internet Speed on Windows 10 (Steps)
In this next section of our DIY guide on how to speed up internet in Windows 10, we've described 5 proven methods anyone can use.
Details below:
1. Pause Automatic Updates
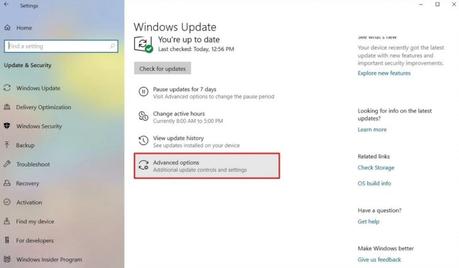
Because the process of downloading system updates automatically tends to consume a significant amount of your bandwidth, your connection speed can reduce drastically.
And even though it's impossible for you to check the total size of system updates before downloading them, you can however put the process on pause.
Here's how:
Navigate to Settings>Update & Security>Windows Update>Advanced Options, and then switch ON the 'Pause Updates' feature.
That it! You've now discovered how to speed up internet in Windows 10 by pausing the automatic download of system updates.
Note that the Windows 10 OS will allow you to enable the update pause for 35 days only. Once this period elapses, you will be required to extend the duration once again via the same process described above.
2. Set Metered Connection
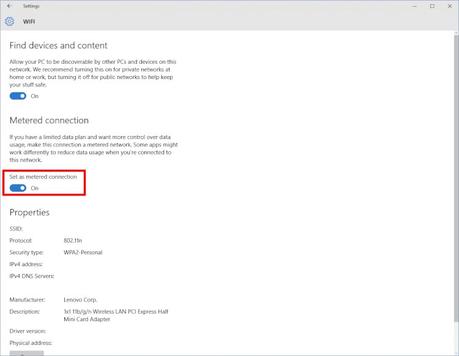
This next approach will involve using the Metered Connection feature introduced by Microsoft on the Windows 8 OS.
This handy network feature is perfect for users who prefer subscribing to limited internet data plans.
If your network has a metered configuration, system updates will only be downloaded when a higher bandwidth network is detected.
This is why high-speed connection providers such as Spectrum Internet are highly recommended since they typically feature unlimited data bandwidth that can cater to your entire web-based activities.
Here's how to enable the metered connection on Windows:
Navigate to Settings>Network & Internet. Once there, you can select the PC connection you are currently using and then switch ON the option for "Set as Metered Connection".
3. Prevent Background Apps From Running
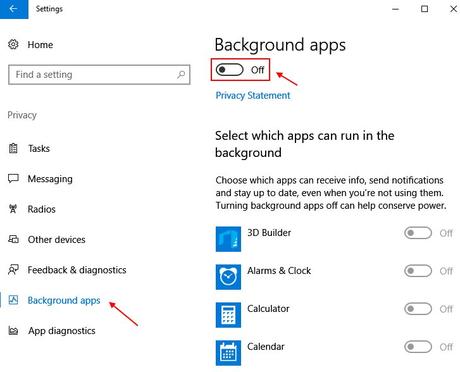
Your installed apps can consume a chunk of bandwidth, battery juice, and RAM while running in the background.
Once apps are installed from the official Microsoft Store, they are set to perform background operations by default, which can slow down your internet speed.
Luckily, you can prevent these apps from performing any unwanted background actions.
Here's how:Go to Settings>Privacy>Background Apps. Once there, you can switch OFF the 'Let Apps Run in the Background' option.
Now all your installed apps will have to request your permission first before updating or running in the background hence freeing up available system resources for improved speed and all-round performance.
That's it! You have now learned how to speed up internet in Windows 10 by stopping all background app activity.
4. Disable Windows Services Updates
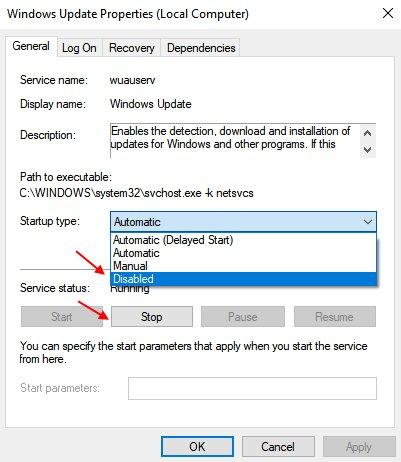
By disabling the Windows Services Update feature, you get to enjoy seamless, fast, and uninterrupted internet surfing sessions.
But on the downside, you will be automatically depriving yourself of any performance benefits associated with the latest system updates. Hence, we are not recommending that you use this approach unless you have the presence of mind to switch them back on again as soon as possible.
Here's how to turn OFF the Windows Update feature if you don't have a working home wifi network and are connected to your mobile hotspot instead:
Open the Start menu and look out for Services. On the next screen, search for the Windows Update feature and then click on it.
Afterward, select the 'Disabled' option.
That's it! You've now learned how to speed up internet in Windows 10 by disabling the services update feature.
You get to adjust these settings anytime you wish by accessing the Services page from the Start menu.
5. Empty the DNS Cache
The Domain Name System (DNS) is there to help your Windows system store up your browsing data and accelerate the internet surfing process. This is done by converting domain names into recognizable IP addresses for your machine.
But, these stored records can become old and error-prone, this means the DNS cache must be cleared to allow for fresh data storage.
Here's how to empty your PC's DNS cache:
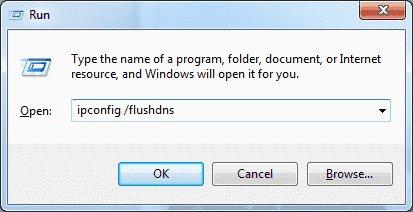
Press the Win + R keyboard keys. Afterward, type out 'cmd' inside the pop-up box that appears and then, press Enter. Next, type out 'ipconfig /flushdns', in the dialog box and then hit Enter.
That's it! You have now learned how to speed up internet in Windows 10 by clearing the DNS cache.
Rounding Up
Here ends our discussion on how to speed up internet in Windows 10.
Now you are aware of the different methods you can use to optimize your PC and increase your overall productivity.
