If something seems to be missing in part of your image, or if you have an object or drawing on your canvas that needs to stand out more, you may have been trying to figure out how to make a selection in Photoshop.
Although the tool you need to use is not obvious, there is a tool that can do the job and give you the desired result.
Photoshop Path Selection Guide
- Open your image in Photoshop.
- Select the stroke object layer or create a new layer.
- Select the Selection tool from the toolbar.
- Make a choice.
- Click Edit at the top of the window, then Stroke.
- Select outline options, then click OK.
Our tutorial continues below with more information on how to make a selection in Photoshop, including images of those steps.
You may need to change the arrangement of objects in the image quite often, including layers containing words. You can read our tutorial on moving text in Photoshop and learn how to change its position.
Adobe Photoshop CS5 is great for the many different tasks you need to do with your images, but for most people, painting in the program can be very difficult.
This is due to a combination of the lack of precision associated with using a mouse and the difficulty of drawing a straight line.
So when you need to draw a rectangular or elliptical shape, including squares and circles, you will find yourself looking for an automated way to do it.
Luckily, Photoshop CS5 includes several selection utilities that you can use to make selections in Photoshop CS5. Combined with the Stroke tool in the Edit menu, you can create good shapes quickly and accurately without resorting to complicated freehand drawing.
Google Slides has a solid set of editing tools, including a way to learn how to circle things in Google Slides.
How to Stroke a Selection in Photoshop CS5 (Picture Tutorial)
The stroke feature in Photoshop CS5 is useful for transforming the outline of your selection into a single line of color.
While this tutorial will show you how to stroke a square or round selection in Photoshop CS5, you can apply the same principle to any selection made in Photoshop CS5.
Step 1: Start by opening the image file you want to add a selection to. If you're creating a file from scratch, launch Photoshop, click File at the top of the window, click New.
Step 2: If you want to create a stroke selection on a separate layer, press Shift + Ctrl + N to create a new layer. Otherwise, the selection you selected will be drawn on the currently selected layer.
Step 3: Click the Selection tool in the toolbar on the left side of the window.
If you want to use a different selection shape, right-click the Selection tool, then click the desired shape. You can choose a rectangular, elliptical, vertical or horizontal line.
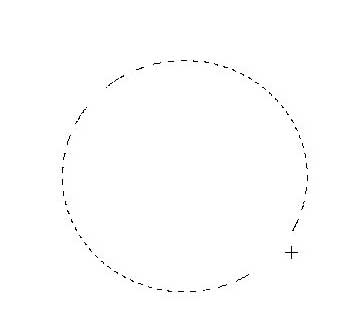
Step 4: Click on the canvas, then drag your mouse until you have the selection you want.

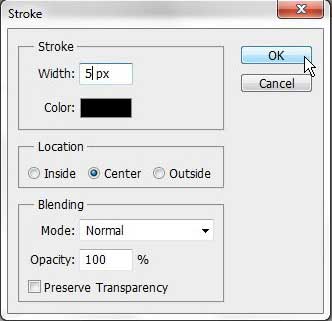
Step 5: Click Edit at the top of the window, then click Stroke.
Step 6: Select a value for the stroke width, click the box to the right of Color to choose a color for the outlined selection, and then choose how you want the stroke to appear in relation to the selection.
The Inside option will be inside the selection, Outside will be outside it, and Center will be on the selection line.
If necessary, choose a blend mode, opacity, and whether or not to keep the transparency. When all your stroke options are set, click the OK button.

Your end result may be different, but my 5 px wide outline circle, drawn with black in the center of the selection, looks like the one shown in the image below.

If you created an outline selection on a separate layer, you can use the Move tool at the top of the toolbar to drag the outline shape to the desired location in the image.
Now that you know how to highlight a selection in Photoshop, you can use it to add borders around the selection, draw different shapes, and create interesting effects.

