If you prefer a clean desktop, you can hide the taskbar and only show it when you want to see it. This guide shows you how to hide the taskbar in Windows 11, whether you want to keep it hidden all the time or just temporarily.
The Windows taskbar is one of the most useful parts of Windows. The taskbar shows you which programs are open and allows you to switch between them with ease. However, if you’re running a program on your computer that requires a lot of screen space, then it can be frustrating to have the taskbar in the way.
It’s very easy enough to hide the taskbar in Windows 11. So let’s get started.
How To Hide The Taskbar In Windows 11
Step 1:
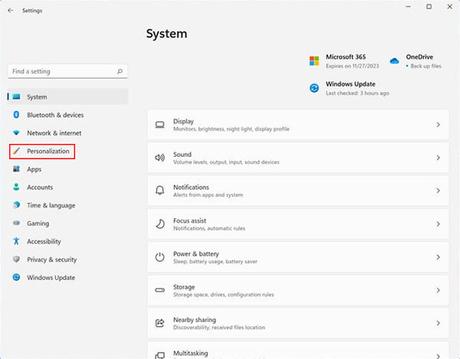
Press the Windows key along with the “+” key to take you to the Settings page. After that click on the Personalization from the left sidebar.

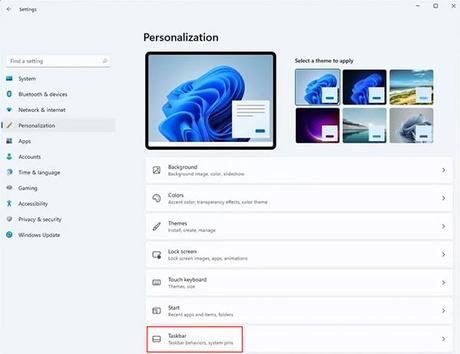
Step 2: Under Personalization, find the Taskbar and click on it. Which will show you all the options related to the taskbar.
There is one easy method that take you right over here. For that, you need to simply right-click on an empty area of the taskbar and select Taskbar settings from the popup menu.

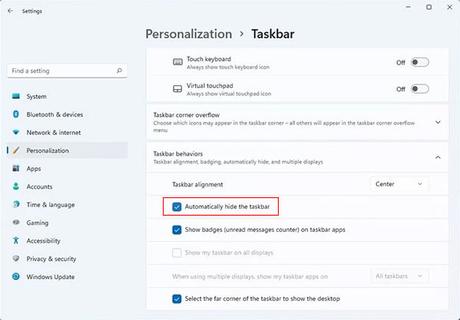
Step 3: In the Taskbar settings page, check the box next to “Auto hide the taskbar” in order to make it disappear whenever you’re not using it. To bring it back into view, move your cursor to the edge of the screen from where the taskbar is hidden.

Step 4: Again, if you don’t want that auto hide taskbar then follow the same steps again and uncheck the “Auto hide the taskbar” box.
Final Verdict
So, these are the steps that you need to follow to hide the taskbar in Windows 11 operating system. These are very basic steps that anyone can follow to show/hide the taskbar.
