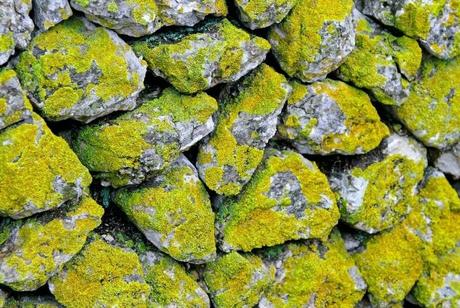
In some climates, you’ll find moss growing on its own. In fact, some people believe moss only grows by themselves.
However, that’s not entirely true. Although moss can grow by itself, you can also cultivate moss yourself. You can decide to grow moss on rocks, in gardens, and even on edges. Even better, you don’t need a professional as you can do it yourself.

In case you’re looking to grow moss on a stone. And you’re aren’t sure what exactly to do. Don’t worry; we’ve got your covered.
In this post, we’ll provide a step-by-step guide on how to grow moss on a stone. We’ll also tell you everything you need to have in mind as you begin.
Dive in!
Why Should You Grow Moss on Stones?
In case you aren’t thoroughly convinced about growing moss, you should. And this is because it comes with loads of benefits. For instance, it adds a beautiful look to your garden.
So, are you wondering what more moss brings to the table? Here are some of its benefits:
- Moss provides a beautiful blend between the artificial and the natural
- Moss attracts various birds such as goldfinches, robins, chickadees, and sparrows among others
- It gives an excellent opportunity to measure the degree of air pollution in your house through its color
- It provides color – green – to your home which people believes promote positive energy, improve sleep, and reduce the risk of a heart attack
- Moss is extremely easy to maintain, and you don’t even need to water them regularly
When to Grow Moss?
Learning how to grow moss requires you to know when to grow moss. This is because getting the timing right can be the difference between success and failure.
So, if you want to grow moss, an excellent time to do this is during spring. Even better is early spring. During this time, the ground is usually still wet, and it provides excellent conditions for moss growth.
Also, starting during early spring means that your moss would have grown properly before summer. And they would be less likely to succumb to the challenging conditions that come with summer.
However, before you begin, ensure you’re sure no torrential downpour or frost is coming again.
Conditions for Moss Growth
If you’re looking to grow moss, certain conditions must be present. For instance, the growth of moss depends on the acidity of the soil. Precisely, it would be best to grow moss in a land with an alkalinity level between 5 and 6.
Although this isn’t exactly relevant here as our focus is on stones, you’ll need to keep it in mind. And this is if you decide to grow your moss on the soil.
Also, you’ll need a damp area that has some form of shade. This is because moss doesn’t have real roots. What they do have are little filaments that they use to absorb nutrients.
Because they aren’t rooted, they are likely to dry out in the absence of adequate water. So, it would be best to ensure that they get some form of protection from the sun.
Also, moss doesn’t perform well in areas full of dirt, extra weeds, and foliage. They need the area to be free of rot to grow adequately. So, ensure that wherever you pick meets these conditions.
What do You Need to Grow Moss?
To grow moss on the stone, you’ll need a combination of tools and materials. Relevant tools that you need to grow moss include:
- Rake
- Pitchfork
- Gardening gloves
- Blender
- Hose & sprinkler
- Spatula or paintbrush
- Spray bottle
On the other hand, relevant materials that you need to grow moss include:
- Moss transplant
- Moss slurry
- Landscaping pins
- Soil pH strip
- Buttermilk or plain yogurt (two cups)
Step-By-Step Guide on How to Grow Moss
Now that we’ve touched the preliminary issues let’s get right to the how.
Step 1: Pick a Moss Type
You’ll need to pick the type of moss that you intend to grow on stone. This is important because various types exist based on their shape, climate requirement, and color.
Generally, you can look at them from two categories, namely
- Pleurocarpous mosses
- Acrocarpous mosses
Generally, Pleurocarpous mosses grow horizontally. On the other hand, Acrocarpous mosses have vertical growth. As such, Pleurocarpous mosses are usually broad, while Acrocarpous mosses are generally long.
However, we recommend you go with Pleurocarpous mosses for stones. And this is because they tend to have faster growth than Acrocarpous mosses, especially on rocks.
Step 2: Find an Actual Moss
The next step after deciding what type of moss you want is to find somewhere to pick it up. Usually, you can find the moss you require through three means.
First, you can walk into your neighbor’s garden and ask for moss. Remember what distinguishes one moss from another, so you pick the type you want. Then, utilize a digger to get the moss out of the ground.
Second, you can also get your desired moss-type from a nursery. The advantage is that you get access to a variety of moss shapes. You can also talk to the owner, usually more experienced, and gain further insight into planting mosses.
Finally, you can find an online store and purchase the moss you need yourself. This shouldn’t be hard. Just type where to buy moss in your location on a search engine. You should get some fantastic options.
Step 3: Prepare the Moss
If you were planting in the soil, you would just need to plant at this stage. However, since you want to plant on stone, you need to prepare the moss.
The goal is to convert the moss into a moss slurry. This way, the moss can be in better condition to grow on stones.
So, at this stage, you’ll need to do the following.
- Get a bowl
- Add the amount to moss you want to grow
- Add the two cups of buttermilk or yogurt that you got earlier
- Mix them
Ensure you get a perfect mixture at this point. To do that, ensure the mix isn’t too thick. If it’s too thick, then add water to dissolve it. Alternatively, if it’s too watery, then pour more moss to make it thick and creamy.
Step 4: Spread the Moss
At this stage, what you need to do is pour the mixed solution on the stone of your choice. It’s not just about pouring. You’ll need to ensure you spread the solution properly on the stone you want to grow the moss on.
In case you’re looking towards growing on more than a stone, gather the rocks together. Then, apply the solution to all of them.
Also, remember, you might need to spray the stone just before you apply the solution. This is because moss on rocks needs water for proper growth. However, you don’t flood the stone with water.
Subsequently, a small quantity of water six times each day will do the trick. Remember, small amounts, as otherwise, you will only reduce the excellent work you had done.
Step 5: Exercise Patience
You might be wondering why this is here. Well, it’s because it’s crucial. You can’t expect the moss to grow directly, more so being on stone.
As such, you’ll need to wait it out and trust that the most will grow. Just keep on watering, and be sure to see results.
In Conclusion
Growing moss isn’t a bad idea. It provides a lot of benefits to your home or garden. And one of the places where you can grow moss is on a stone.
You might want to think it’s impossible. Well, it’s not. In this article, we have detailed a step-by-step process on how to grow moss on a stone.
If you’re interested, you can follow it. Rest assured, you’ll reap the desired results.


