
Many capture special moments on their devices as visual media, but these are often not large enough to be displayed on walls for everyone to enjoy. The best way to do it is to enlarge your photos before printing them for display.
But people wonder if they will stretch the photos beyond their capacity, ending up with a blurry, pixelated photograph that will send all your printing efforts down the drain.
Fret not! Photo editing software lets you bring your favorite images and cherished memories to life.
Editing images is no longer challenging; you can do it in just a few clicks, even in the comfort of your home. And without any technical experience!
Pictures evoke memories. They hit close to home and make us feel safe. That said, you can scale up or down the image you love, print it on canvas and preserve it for years.
In this guide, we'll show the best tips and tricks to keep in mind when expanding a photo for print, along with some best photo editing apps that save the day.
Without any further ado, let's begin.
Understanding Photo Enlargements
Upsize versus Downsize
Upsizing, enlarging, or upscaling a photo is trickier than downsizing, but it doesn’t mean it’s impossible. In fact, it’s relatively easy now, thanks to new technologies.
In downsizing, pixels (dots that make up an image) are removed to cater to the desired size. The existing pixels are then redistributed to smaller sizes to produce a final output.
On the other hand, with enlarging, there is a 360-degree turn. Instead of removing, pixels must be invented to fit the desired size.
The invention of pixels is tricky, as it's being done by software based on available information. Guessing which pixel would go where in the new size presents a possibility of degradation, i.e., losing some image quality, but you can now avoid it with the help of this guide.
Therefore, some things should be considered when enlarging an image for printing. Otherwise, the entire purpose of breathing life into your cherished memories gets null and void.
How to Enlarge a Photo for Printing Using Photopea?
While many photo editing apps are available, let’s discuss Photopea, one of the emerging software for enlarging pictures. It contains many of the same elements as the renowned Photoshop but without the steep learning curve. Plus, it’s free to use though you can upgrade to a premium version for an ad-free experience.
Let’s discuss how to use the editor.
Step 1: Launch the Photopea website.
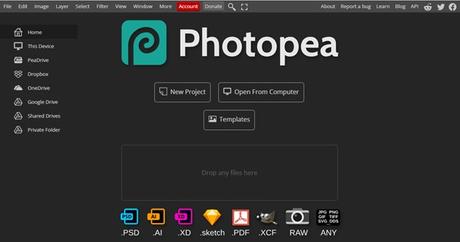
This is how the website will appear to you upon launch. It is a web-based app with a mobile version, making editing even easier.
Step 2: Click "File" on the top menu and select "Open" from the drag-down bar. Choose your desired file and press "Ok." You can also press Ctrl + O to execute the command.
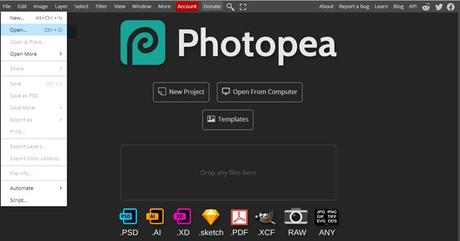
If you don't have any images, you can use the templates feature and select a picture of your choice. Similarly, you can also drag and drop the file in the "drop any files here" box.
Step 3: Once the picture is in the view, go to the "image" in the top menu, and select "image size." You can simultaneously hold Alt + Ctrl + I keys to carry out the command.
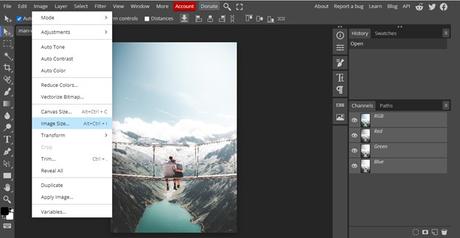
Step 4: A dialog box will appear. Here the original properties of the image are highlighted. Click on the pixels, and from the drop-down menu, choose inches. Doing this will convert the width and height of the picture from pixels to inches.
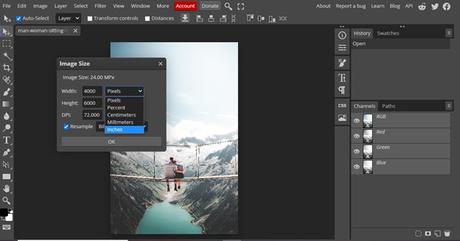
Step 5: Change the DPI from 72 to 300. Check the "resample" box. Write your desired dimensions in width and height. If you're unsure about the aspect ratio, select the chain link icon, and it'll take care of that.
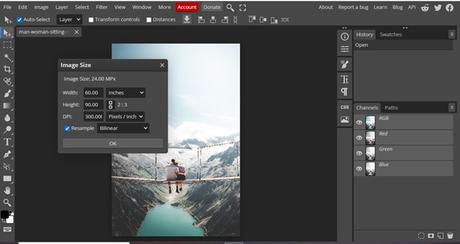
Once the chain link icon is selected, write your desired width, and the software will calculate height automatically, maintaining the proportions of the image accurately.
Press OK once all instructions are carried out.
Step 6 (optional): Go to the File option and select Save as PSD if you've already made edits after the enlargement.
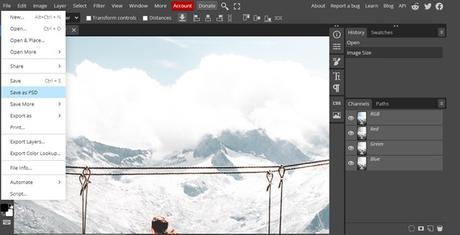
Step 7: If not, select "File," click on the "Export as" feature and a box will appear. Choose your desired format.
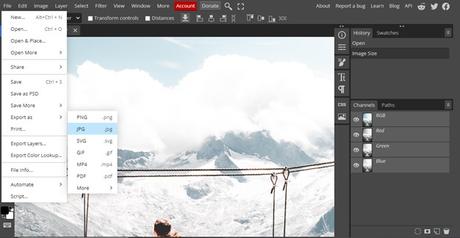
Step 8: A window like this will open in the software. Zoom in to view any blurriness or degradation.
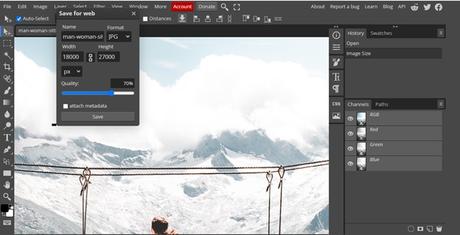
Step 9: Swipe the slider to 100 for quality and press "save."
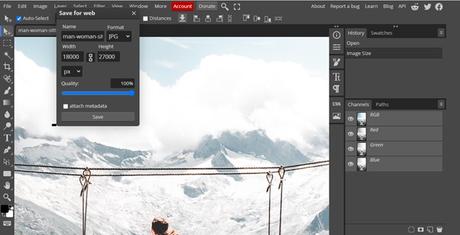
Here, your enlarged image is good to go for printing now!
Now that you've enlarged an image safely without losing the details, it's time to seal the deal.
Pro Tip: You can also enlarge a photo without compromising on quality using an artificially intelligent image upscaler.
Factors to Keep in Mind When Enlarging a Photo for Printing
Think of these pointers as a checking list for enlarging an image.
Know your PPI
The most crucial element in pictures is pixels per inch or dots per inch. It's the do-or-die factor of an image, as the more pixels there are, the better the view. If the dots per inch are less, the quality of your photo, when enlarged, will be poor.
Therefore, ensure that the photo you plan to enlarge falls into the below criteria for successful execution:
-
Average: At least 72 dpi
-
Good: 150-300 dpi
-
Excellent: 300+ dpi
Generally, pictures clicked from mobile phones are compressed down to 72 dpi for better loading abilities. You'll also find many images on the web with the same resolution.
However, it's not an ideal size for the print. Printing with this PPI will not give you the desired result, as the final output has a fair chance of being grainier and blurrier.
The image resolution directly relates to the image quality, making it an essential component. It affects the sharpness, detail, and overall quality of the photo. To ensure that your photos have a visually appealing look with crisp details, they must have high resolution.
Here's where the magic comes in; you can change the dpi of your photo with any online tool or photo software.
Pro tip: You can check the image quality for printing using our free online image resolution checker.
Format matters
Another essential factor that plays a significant role is the format of the picture. While photo editing software can work in formats like jpg, png, tiff, svg, and raw, some formats take bonus points over others.
One such format is raw. Photos taken in this format possess rich data compared to those clicked in jpg format. It happens because raw files contain unprocessed data directly from the camera's sensor and thus can preserve the maximum amount of image data.
This data is a savior during enlargement, producing clear, crisp prints that make the day.
Moreover, another advantage of using raw or tiff files is lossless or no compression. Simply put, the image data is not compromised during storage, as with the jpg file, which utilises lossy compression, which leads some of the data to get lost, thus sacrificing the picture quality, which doesn't do justice when enlarged.
Therefore, try to use pictures in a raw format to make the most of your print.
Tip: In the end, raw files need to be converted to jpg or tiff format as these are compatible with most printers.
Know the art of capturing high-quality photos
While this is not something new, it still needs to be said out loud, as this factor holds tremendous value. If you're getting your pictures clicked by a professional, this is not an issue. However, if you're a novice, remember these elements to produce outstanding pictures.
To turn your photos into print, ensure they are clicked with the proper equipment, a high-resolution camera, tripod, and ring light if needed.
Know your camera's capabilities inside out and familiarise yourself with it. Play around with settings and experiment with shutter speed, ISO, camera modes, and other elements to get the best shot.
The more practice you have, the better the shots will be!
Final Words
Capturing memories through pictures is a wonderful way to spark conversations and elevate the mood in any living space. Whether it's your home or office, enlarging a photo can transform it into a captivating centrepiece, proudly showcasing the cherished moments you hold dear.
To ensure stunning results, there are a few key factors to consider. First, focus on the image resolution – higher resolutions lead to sharper and more impressive enlargements. Additionally, choosing the right image format is essential; opt for formats that preserve the quality of the picture during the enlargement process.
With these tips in mind, you are ready to surprise yourself and your loved ones with truly remarkable prints that will bring joy and nostalgia to your hearts. May every photo you print always bring a genuine smile to your face, serving as a constant reminder of life's beautiful moments.
Embrace the art of photo printing with enthusiasm, and let the walls of your home or office come alive with cherished memories. Happy photo printing!"
