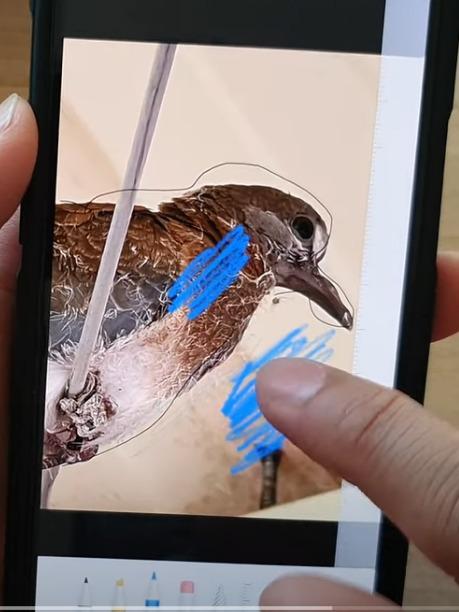
Have you ever wished that you could quickly draw on an iPhone photo? An image with notes is sometimes the best way to explain something quickly.
The good news is that adding a drawing to any picture on your iPhone is quick and easy. You can add your drawing and save the new picture with just a few taps.
Read on to find out how to draw on an iPhone picture.

How to Add Markup to a Photo on iPhone
Markup is an Apple feature that lets you add text or signatures to photos. You can also draw freely on top of them.
Markup on iPhone is as simple as this:

- To draw on a photo, open the Photos app.
- Click Edit
- Click on the Markup icon.
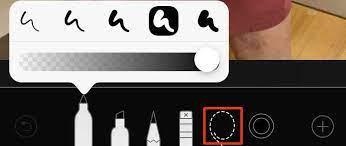
The Markup tools are now at the bottom of the screen. Let’s look at the different tools that are out there.
With the Pen Tool on iPhone, you can draw on photos
Your photo can be enhanced by drawing solid lines with the pen tool. The Photos app allows you to access this.
Apple’s pen tool can be used in the following ways:
- To edit a photo, select it in Photos and click Edit.
- If it isn’t already selected, tap the Pen Tool.
- When you tap again, you can adjust the opacity and thickness of the lines.
- You can change the color by tapping the Colors icon.
- In the photo, use your finger to draw. Thick lines are created by faster strokes.
- You can undo a mistake by tapping the Undo icon.
- Keep your finger on the screen if you wish to create perfect shapes. Remove your finger once you have seen the corrected shape.
Quick Links:
- Adobe Photoshop Lightroom Coupon Codes
- Custom versus Stock Photos
Using the Highlighter Tool on iPhone
You can use the highlighter tool to mark text areas similar to how you would with a real highlighter.
On iPhone, you can use the highlighter tool as follows:

- You can edit your photo by opening it in Photos and tapping Edit.
- Highlighter Tool can be found by tapping on it.
- Changing the thickness and opacity of the line can be done by tapping again. For most text, the default setting is 80%.
- You can change the color by tapping the Colors icon.
- Draw with your finger over the text or image you want to highlight.
- You can undo a mistake by tapping the Undo icon.
- When you keep your finger on the screen, you will be able to convert simple shapes into perfect lines.
Using the Pencil Tool on iPhone
It produces an effect that looks like a pencil, similar to the pen tool.
If you want to use the pencil tool on your iPhone, follow these steps:
- You can edit your photo by opening it in Photos and tapping Edit.
- Select the Pencil Tool.
- Changing the thickness and opacity of the line can be done by tapping again.
- You can change the color by tapping on the Colors icon.
- You can highlight text or images by drawing with your finger. It is more opaque to use faster strokes.
- You can undo mistakes by tapping the Undo icon.
- You can convert simple shapes into regular shapes by keeping your finger on the screen.
What you need to know about using the iPhone Eraser Tool
Using the eraser tool is a convenient way to remove parts of your drawing without undoing everything.
The iPhone eraser tool can be used in the following ways:
- The Edit button in Photos lets you edit your image.
- The Eraser Tool can be used by tapping it.
- Alternatively, you can select the Object Eraser to erase entire objects or the Pixel Eraser to erase wherever you draw.
- If you want to erase a certain area or object, draw a line with your finger over it.
Lasso Tool for iPhone: How to use it
Selecting parts of your drawing with the lasso tool allows you to move them around.
On an iPhone, you can use the lasso tool as follows:
- You can edit your image in Photos by tapping Edit.
- The Lasso Tool can be accessed by tapping it.

- By dragging your finger along the surface of an object, you can select it.
- If you draw through multiple objects, they will all be added to your selection. Dotted lines should indicate your selection’s border.To choose an area, draw a box around the area you want to choose.
- This will choose everything inside the enclosure.Move your choice with the mouse. When you’re done, you can deselect everything by tapping somewhere else on your image.
Using the Ruler Tool on iPhone
You can draw straight lines at an exact angle using the ruler tool.
On an iPhone, you can use the ruler tool as follows:
- Open your photo and tap Edit in Photos.
- Tap the Ruler Tool.
- Move the tool around by pulling it. To change the angle, you can turn it with two fingers.
- Once the ruler is in place, choose one of the drawing tools and run your finger along the ruler.
- Tap the Ruler Tool again to get rid of the line you just drew.
iPhone: Saving an edited photo
You’ll need to save your image after you’ve made the changes you want.
You can save your work by following these steps:

- Done can be found at the top of the screen to the right.
- You can save your edits by tapping Done in the bottom-right corner of the screen.
You will now be able to save your photo with your drawing attached.
You may also Read:
- 8 Top OCR Software For Your Business
- How To Be A Lifestyle Blogger On Instagram
Editing an image and restoring it
Here is the original image if you want to go back:
- On the right side of the screen, tap Edit.
- From the screen’s bottom right, tap Revert.
We have restored the original condition of your photo.
Conclusion
On an iPhone, you don’t need a fancy photo editor to change photos or draw on them. You can do the job with the help of the editing tools in the Photos app.
There are a lot of other simple features that can make using your iPhone even better. For example, if you want to take back control of your time, you might want to learn how to use Apple Focus on iPhone. If you care about your privacy, you might want to stop your iPhone from tracking ads.
Finding it hard to type? There are some iPhone keyboard tips you can learn that could change the way you type for good.

