Just like me, I know that many bloggers (especially newbie) don’t have that cash to purchase some things online; like those expensive plugins and high neck cutting themes or even a premium CDN. I know coming up as a blogger is hard because I have been to that road but hey! With your determination things will work out just fine…
Do you know that as a blogger, it is important or should I say “advisable” to subscribe to a CDN network?
Must Read: Top Secret Tips On Writing a Really Good Title
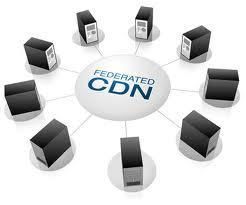
Before we go further, let’s know the meaning of CDN: According to Wikipedia, A content delivery network or content distribution network (CDN) is a large distributed system of servers deployed in multiple data centers in the Internet. The goal of a CDN is to serve content to end-users with high availability and high performance.
With CDN, you can reduce the loads on your server and makes your blog 3x faster than usual. A CDN company has servers from different locations which makes your blog available and faster to your readers.
We have different companies running these services and to mention few; cloudflare, amazon cloudfront, maxCDN, AT&T and so many more…
But what if you don’t have that money to pay for a CDN? Ok there is another trick and the trick is, you can host your own personal CDN server and it will work beautifully but not as beautiful as the paid ones that have multiple servers (but at least it’ll work

CREATING A SELF HOSTED CDN
Without wasting much of your time, let’s just jump into it and know what we’ll find.
Must Read: How To Permanently Uninstall Any WordPress Plugins
A QUICK NOTICE: Hey this tutorial is for those who have w3 total cache plugin installed on their blog. So if you don’t have one go download it for a faster blogging experience

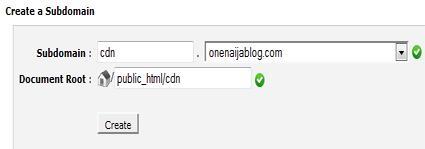
Ok first create a sub domain using your Control Panel (C-Panel)
To create a subdomain, go to your “Domains” section inside your “C-panel” and click “subdomains” (See image below)

Now create your subdomain like the image you see below

Have you done that? Now click “Create”
After creating the subdomain, you’ll see a message like the image below

We have successfully created our CDN server and let’s make it work with our w3 total cache.
Have you downloaded the plugin already? Do you have the plugin already? If your answer is “No”, download the w3 total cache here and install it as usual
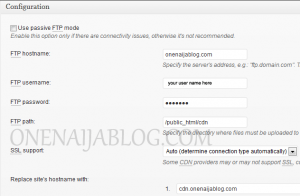
Now go to your wordpress admin panel and locate “performance”, have you seen it? Now hover your mouse and click on “CDN” and fill it like below…
FTP hostname: Here is where you input ftp server. (It’s mostly your domain name)
FTP username: Here is where you input your ftp username
FTP password: Here is where you input your password
FTP path: Here is where you put your subdomain Document root path
Replace site’s hostname with: Here is where you put your subdomain you created (see image below)

click to enlarge
If you have done all that correctly, click the “test ftp server” if you input it well, it’ll say passed but if wrong state me what you’re doing wrong by using the comment box below.
Click “Save all setting” and go to general setting and activate the CDN server…
You have successfully created your own personal CDN server for your w3 total cache. Is it simple or is it simple?

Must Read: 10 Things to Consider when Selecting a Domain Name
Do you have comments and thought that you’d love to share with us? Then do use the comment box below. Remember that your comments and thoughts are highly welcomed and appreciated.
Was the post helpful? Then please do click the like button share us and recommend us to friends because you’ll never know who among your friends might be in need of it.
Don't Miss Any Post Again. Subscribe To Our Feed And Be Updated
Enter your email address below:
Powered by OnenaijaBlog

