Have you ever been away from your computer and missed a crucial email? Emails are simple to send and receive on an iPhone from anywhere. Additionally, if you set up an email account on your iPhone, you’ll receive notifications each time an email is sent to you. How to add an email account to your iPhone is shown below. Here we give you an idea about How to Configure Your iPhone to Use an Email Account.
How to Add Email Account to iPhone:
You must add your email account to the Mail app before you can start checking your emails on your iPhone. Your username and password for each email account you want to add must be provided. A single inbox will then allow you to read and reply to emails from all of your accounts.
Key Points:
Additionally Simply adheres to the straightforward instructions listed below to get started.
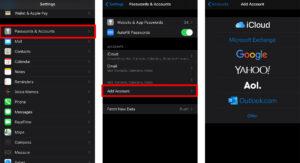
- Launch the Settings app. Your iPhone comes preloaded with the Settings app.
- Then Tap Add Account.
- Then The type of email account you wish to add can be chosen. A variety of choices, including iCloud, Google, Yahoo!, AOL, and Outlook.com, will be shown to you. Just tap Google if you wish to add your Gmail account. resembles a series of gea.
Read more: How to Modify Your WiFi Password and Name

- Then Tap Next. Now, wait for the Mail app as it attempts to verify your account information.
- The Information from your email account is synced to your iPhone. You could have a few options available depending on the email account you added. The Contacts and Calendar applications on your iPhone may sync data from your email account.
- Tap Save.
How to Manually Add Other Email Accounts to iPhone:
You’ll need to manually add your email account and provide further information if your email host isn’t among the available alternatives. To set up POP, IMAP, or Exchange email accounts on your iPhone, you’ll need this information
You may access your emails using either POP or IMAP, which are two separate email protocols. IMAP is for Internet Message Access Protocol, whereas POP stands for Post Office Protocol. IMAP allows you to access your email messages without downloading or keeping them on your device, whereas POP uploads your email messages to your iPhone.
Below are the steps on how to add POP or IMAP email accounts to your iPhone.
Key points:
- Open the Settings app.
2. Scroll down and tap Passwords & Account.
3. Then tap Add Account.
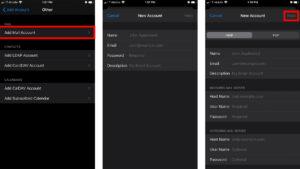
- Tap Other. If you want to add POP or IMAP, choose Other. If you want to add Exchange, tap Microsoft Exchange.
- Then tap Add Mail Account.
- Fill out the form for a new account. Type in your name, email address, password, and a name or description linked to your email account.
- Tap Next.
- Select IMAP or POP. These are located at the top of your screen. Try entering your email address in Apple’s Mail Settings Lookup webpage if you’re unsure which option to select. This can provide you with your hostname, username, and advice on whether to utilize IMAP or POP.
- Complete the forms for the incoming mail server and the outgoing mail server. Enter your login, passwords, and host names. You may either acquire this information directly from your email provider or check it up on the internet, generally via the email provider’s website.
- After you fill out the form, tap Next. Now, wait for the Mail app as it attempts to verify all the information you entered in step 9.
- Finally, tap Save.
Read more: How to tell if you’ve been blocked on Android

You’re done now! Your iPhone will now have access to your email account, and you may check your email. But you’ll need to go back and modify it if the data is wrong. You might wish to contact your email provider if it still returns incorrectly. Check to see our tutorial on adding an email signature in Outlook if you use that program.
